Are you tired of digging through messy drawers or piles of tools when you need something fast? Imagine having all your tools right where you can see them, easy to grab and put away.
Using pegboards for tool storage can transform your workspace, making it cleaner and more efficient. You’ll discover simple steps to set up your pegboard and smart tips to keep your tools organized. Ready to take control of your tools and save time?
Let’s dive in.
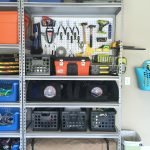
Credit: www.familyhandyman.com
Benefits Of Pegboard Storage
Pegboards are a smart way to organize tools. They save space and keep tools in order.
Using pegboards makes your workspace neat and tools easy to find.
Maximizing Vertical Space
Pegboards let you use wall space to store tools. This frees up workbench and floor areas.
Storing tools vertically keeps your workspace clear and more open.
- Use hooks to hang tools on the pegboard
- Place shelves on pegboards for small items
- Organize tools by size or use on the wall
Improved Tool Accessibility
Tools on pegboards are easy to see and grab. This saves time during projects.
Clear organization helps you find the right tool quickly without searching.
- Arrange tools by type or frequency of use
- Keep heavy tools at a comfortable height
- Label sections for faster identification
Customizable Layouts
Pegboards let you change your tool setup anytime. Add or move hooks and holders easily.
This flexibility means your storage can grow as your tool collection changes.
- Use different peg sizes for various tools
- Mix hooks, baskets, and shelves
- Adjust layout for new or special tools
Choosing The Right Pegboard
Choosing the right pegboard is important for tool storage. It helps keep tools organized and easy to reach.
Consider the material, size, thickness, and mounting hardware. These factors affect how well your pegboard works.
Material Options
Pegboards come in different materials. Each type has benefits and drawbacks to consider.
- Wood:Strong and durable. Can be painted or stained. May absorb moisture.
- Masonite:Smooth surface and affordable. Not very strong for heavy tools.
- Metal:Very strong and long-lasting. Resists moisture and damage. Usually more expensive.
- Plastic:Lightweight and moisture resistant. May not hold heavy tools well.
Size And Thickness Considerations
Pick the right size to fit your wall space. Make sure the pegboard is thick enough to hold hooks firmly.
- Standard pegboards are 4 feet by 8 feet. Smaller sizes work for limited spaces.
- Thickness usually ranges from 1/8 inch to 1/4 inch. Thicker boards hold heavier tools better.
- Check the hole spacing. Most have 1 inch between holes for standard hooks.
Mounting Hardware
Use the right hardware to mount the pegboard securely. This keeps it stable and safe.
- Use screws with anchors for drywall mounting.
- Mount on wooden studs for stronger support.
- Use spacers to create a gap behind the pegboard. This allows hooks to fit easily.
- Check that all hardware can hold the weight of your tools.
Preparing Your Workspace
Setting up a pegboard for tool storage starts with a clean and organized workspace. A well-prepared area makes installation faster and safer.
Take time to clear the wall space and gather all the information you need before you begin the setup process.
Selecting The Installation Area
Choose a wall area that is easy to reach and has enough space for your tools. Avoid spots near doorways or where moisture collects.
Look for solid walls like wood or studs behind drywall to hold the pegboard securely.
Measuring And Marking
Measure the wall space carefully to fit the pegboard size you want. Mark the top and bottom edges with a pencil.
- Use a tape measure to find the width and height available.
- Mark where the screws will go, aligning with wall studs.
- Double-check your marks with a level to keep the pegboard straight.
Gathering Necessary Tools
| Tool | Purpose |
| Tape Measure | Measure wall space |
| Level | Ensure pegboard is straight |
| Drill | Make holes for screws |
| Screwdriver | Secure screws in place |
| Pencil | Mark measurements and holes |
| Stud Finder | Locate studs behind wall |
| Safety Glasses | Protect eyes during drilling |

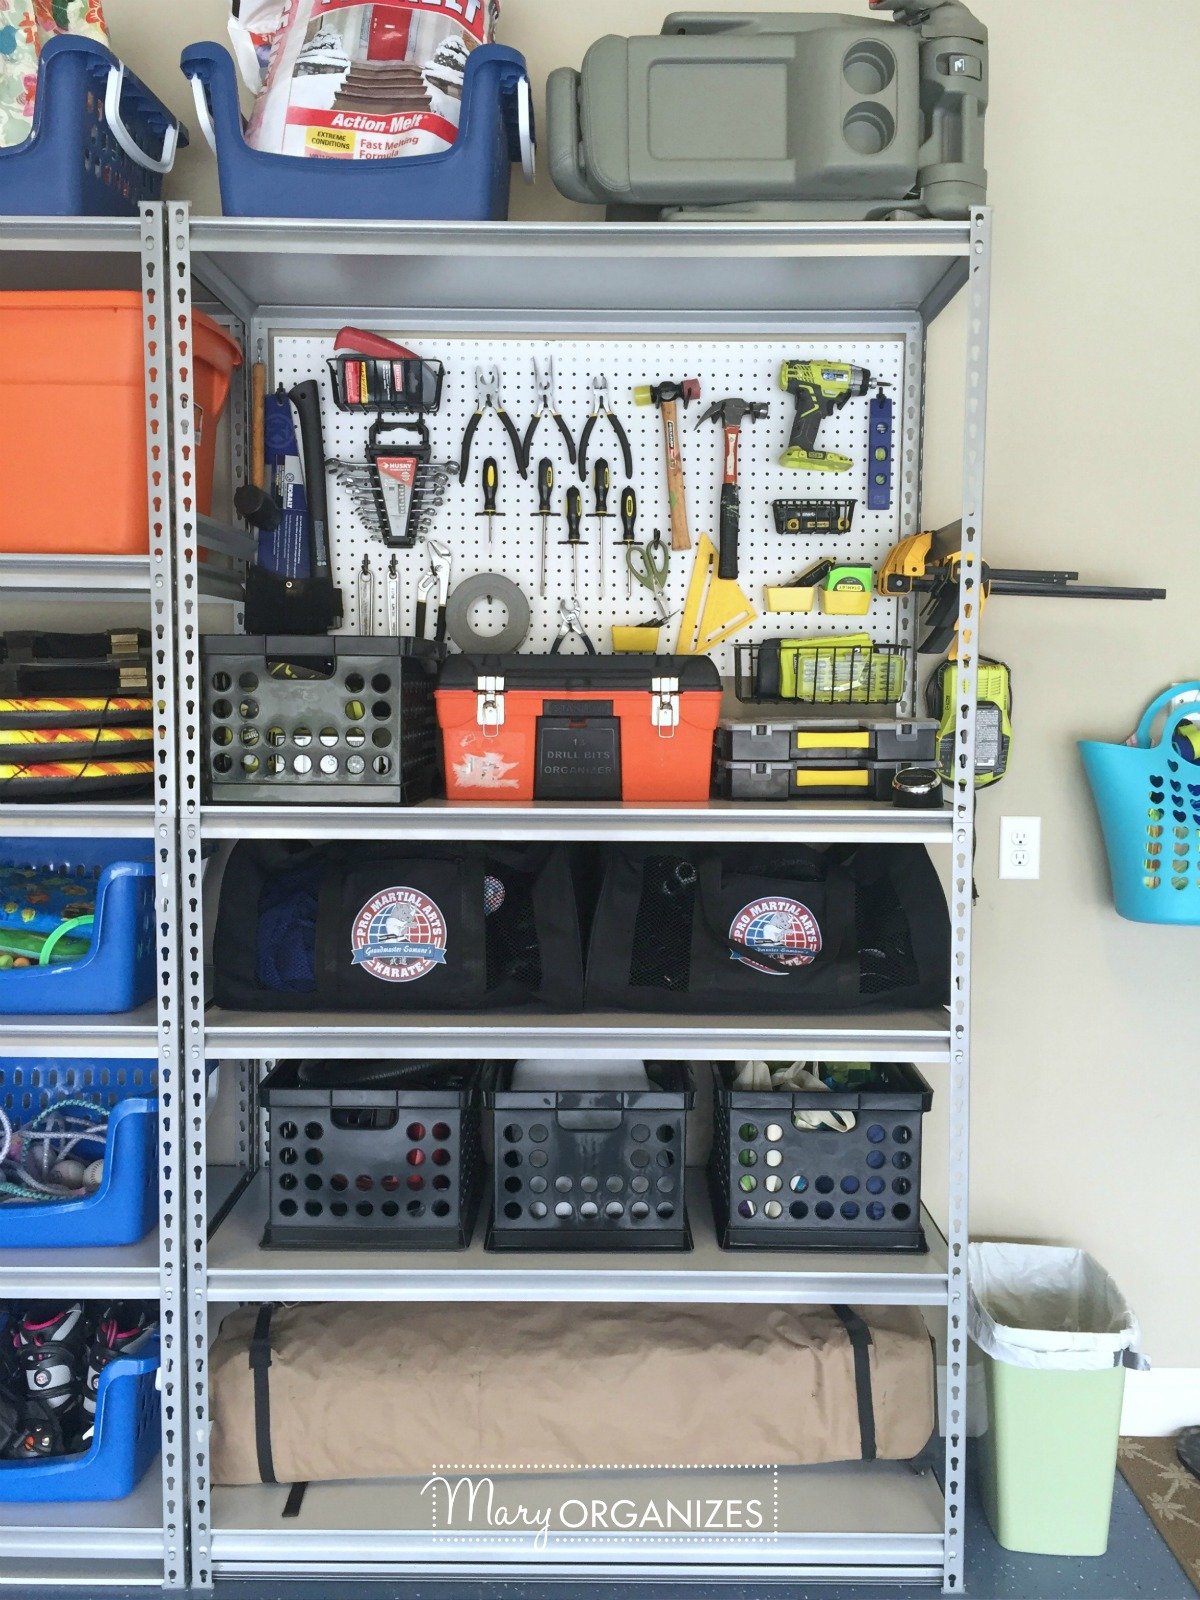
Credit: www.reddit.com
Installing The Pegboard
Installing a pegboard helps keep your tools organized and easy to find. This guide covers key steps to mount your pegboard securely and space hooks properly.
Use the right materials and techniques to ensure your pegboard stays stable and supports your tools well.
Wall Mounting Techniques
Choose a wall that can hold the weight of your tools and pegboard. Avoid drywall without studs behind it for heavy tools.
- Find wall studs using a stud finder.
- Mark the stud locations with a pencil.
- Attach wooden furring strips to the studs for spacing.
- Secure the pegboard to the furring strips with screws.
Ensuring Stability
Stability is important so the pegboard does not bend or fall. Use enough screws and support behind the board.
| Support Method | Description | Recommended Use |
| Wooden Furring Strips | Attach strips to studs to create a gap behind the pegboard. | Heavy tools and frequent use |
| Direct Wall Mount | Screw pegboard directly into studs without spacing. | Light tools only |
| Metal Frame | Use a metal frame to hold pegboard in place. | Garage or workshop walls |
Spacing For Hooks And Accessories
Proper spacing helps you fit hooks and tools comfortably. Leave enough room to add or move accessories later.
Follow these spacing tips:
- Keep at least 1 inch of space between hooks.
- Allow 3 to 4 inches between larger tools.
- Use pegboard grids to plan your layout.
- Place frequently used tools at eye level.
Organizing Tools On Pegboard
Using a pegboard is a smart way to keep your tools neat and easy to find. It saves space and helps you work faster.
Organizing tools on a pegboard lets you see everything at once. You can arrange your tools in a way that fits your work style.
Grouping By Function
Group tools that do similar jobs together. This way, you can grab all the tools you need quickly.
For example, keep all cutting tools in one area and all measuring tools in another.
- Place screwdrivers in one section
- Keep hammers close to nails and fasteners
- Store wrenches by size and type
Using Hooks And Holders
Hooks and holders keep your tools secure on the pegboard. Choose the right type for each tool.
Use hooks for hanging tools like hammers or pliers. Use holders for drills or tape measures.
- Single hooks for small hand tools
- Double hooks for heavier tools
- Special holders for power tools
Labeling For Quick Access
Labels help you find tools fast. Mark each spot on the pegboard with the tool name or shape.
Labels also help you put tools back in the right place after use. This keeps your workspace tidy.
- Use clear, easy-to-read labels
- Place labels above or below each tool
- Consider color-coding for tool groups
Creative Space-saving Tips
Pegboards offer a smart way to organize tools in small spaces. They keep tools visible and easy to reach.
Using pegboards creatively can save room and help you maintain a tidy work area.
Double-sided Pegboards
Double-sided pegboards let you use both sides for tool storage. This doubles the amount of space without taking more wall room.
Place the pegboard in the middle of the room or hang it from the ceiling. This creates an island of storage you can access from all sides.
Incorporating Shelves And Bins
Add shelves and bins to your pegboard to hold smaller items and supplies. This helps keep your tools and parts organized.
- Use small bins for nails, screws, and bolts.
- Add shelves to hold power tools or paint cans.
- Label each bin and shelf for quick access.
- Choose clear bins to see contents without opening.
Utilizing Corners And Unused Areas
Corners often go unused but can be perfect for pegboards. Use corner pegboards to fit tools in tight spots.
| Area | Best Tool Type |
| Corner pegboards | Hand tools like hammers and wrenches |
| Above workbench | Screwdrivers and pliers |
| Under shelves | Lightweight tools and accessories |
Maintaining Your Pegboard Setup
Keeping your pegboard neat and functional helps you find tools fast. Regular care stops clutter and damage.
Simple upkeep ensures your pegboard lasts long and stays useful in your workspace.
Regular Clean-up
Dust and dirt can build up on your pegboard and hooks. Clean it often to keep tools visible and easy to grab.
- Wipe the board with a dry or slightly damp cloth
- Remove hooks and clean hard-to-reach spots
- Check for rust or damage on metal hooks
- Organize tools back in their places after cleaning
Updating Layouts
Change your pegboard layout when you get new tools or your needs shift. A good layout saves time and space.
- Remove tools and hooks from the board
- Plan new spots for your tools based on use
- Place hooks and holders in new positions
- Hang tools and test the setup for comfort
Replacing Worn Hooks
Hooks can wear out or bend from heavy tools. Replace old hooks to keep tools safe and secure.
| Hook Type | Signs to Replace | Replacement Tips |
|---|---|---|
| Metal Hooks | Rust, bending, or cracking | Choose rust-resistant metal or coated hooks |
| Plastic Hooks | Cracks or loss of grip | Pick strong plastic or metal alternatives |
| Specialty Hooks | Loose fit or missing parts | Buy exact replacements for stability |

Credit: www.makingmanzanita.com
Frequently Asked Questions
What Are Pegboards Used For?
Pegboards are used to organize and store tools efficiently. They offer a versatile solution for keeping tools visible and accessible. By hanging tools on pegboards, you save space and reduce clutter. This system helps in maintaining a tidy workspace, making it easier to find and use tools when needed.
How Do You Install Pegboards?
To install pegboards, first select a suitable wall space. Use a stud finder to locate wall studs. Secure the pegboard using screws at the corners and along the studs. Ensure it is level before tightening. This provides a sturdy surface for hanging tools, optimizing your storage solution.
What Tools Work Best With Pegboards?
Pegboards accommodate a wide range of tools. Commonly used tools include hammers, screwdrivers, wrenches, and pliers. Small power tools can also be mounted securely with appropriate hooks. The versatility of pegboards allows customization, making them suitable for various tool types and sizes.
Are Pegboards Suitable For Heavy Tools?
Pegboards are generally designed for lightweight to medium-weight tools. For heavier tools, ensure the pegboard is firmly secured to wall studs. Use strong hooks specifically rated for heavier loads. This ensures safety and prevents damage to both the pegboard and the tools themselves.
Conclusion
Pegboards help keep tools neat and easy to find. They save space and make your workspace tidy. You can hang many tools in one place. Changing the setup is quick and simple. Everyone can organize tools without much effort. Try using pegboards to improve your tool storage today.
It makes work easier and faster. A small change can bring big benefits. Give your tools a proper home. You will enjoy a clean, efficient workshop.