
Are your cuts coming out uneven or off-angle? If you want your projects to look professional and precise, getting your miter saw perfectly aligned is key.
This guide will show you exactly how to check and adjust your saw so every cut is sharp and accurate. Whether you’re a beginner or have some experience, mastering miter saw alignment will save you time, reduce waste, and boost your confidence with every cut.
Keep reading to discover simple steps that will transform your woodworking results.

Credit: infinitytools.com
Choosing The Right Miter Saw
Picking the right miter saw helps you make accurate cuts easily. It saves time and keeps your work safe.
There are many types of miter saws. Knowing their features helps you choose the best one for your projects.
Types Of Miter Saws
Miter saws come in three main types: standard, compound, and sliding compound. Each type works best for different jobs.
- Standard Miter Saw:Cuts at fixed angles. Good for simple crosscuts and miter cuts.
- Compound Miter Saw:Tilts to cut bevels and miter angles. Ideal for crown molding and frames.
- Sliding Compound Miter Saw:Has a sliding arm. Allows cutting wider boards with bevel and miter angles.
Blade Selection Tips
Choosing the right blade affects the cut quality and blade life. Different blades fit different materials and cuts.
| Blade Type | Teeth Count | Material | Best Use |
| Crosscut Blade | 60-80 | Carbide | Clean cuts on wood |
| Combination Blade | 40-50 | Carbide | General purpose cutting |
| Plywood Blade | 80-100 | Carbide | Thin wood and plywood |
| Metal Cutting Blade | 40-60 | Bi-metal | Cutting metal pipes and rods |
Setting Up Your Workspace
Preparing your workspace is important before using a miter saw. A good setup helps you work safely and accurately.
This guide focuses on two key points: having a stable surface and good lighting.
Stable Surface Importance
A stable surface keeps your miter saw steady. This stability improves cutting precision and reduces accidents.
- Use a flat and level table or workbench.
- Make sure the surface can hold the saw’s weight.
- Check that the surface does not wobble or shake.
- Secure the saw with clamps if possible.
- Clear the area of clutter to avoid distractions.
Adequate Lighting
Good lighting helps you see your work clearly. It reduces mistakes and keeps you safe.
| Lighting Type | Best Use | Notes |
| Natural Light | Daytime work | Bright and even, but may change during the day |
| Overhead Lights | General workspace lighting | Should cover the entire area evenly |
| Task Lights | Direct light on cutting area | Use adjustable lamps to reduce shadows |
Calibrating The Miter Saw
Calibrating your miter saw ensures accurate cuts and better results. Proper calibration helps keep your projects precise.
Regular checks and adjustments keep the saw aligned and safe to use. Follow these steps to calibrate your miter saw correctly.
Checking Blade Alignment
Start by unplugging the saw for safety. Check if the blade is square to the base and fence. Use a combination square for accuracy.
- Place the square against the fence.
- Touch the blade teeth lightly with the square.
- Look for any gaps between the blade and square.
- Adjust if the blade is not perfectly aligned.
Adjusting The Fence
The fence must be straight and tight against the base. A misaligned fence causes angled cuts. Use a wrench to loosen fence screws and move it.
| Fence Position | Action |
| Too far from blade | Move fence closer and tighten screws |
| Not square to base | Use a square to adjust fence angle |
| Loose screws | Tighten securely after adjustment |
Aligning The Miter And Bevel Angles
Set the saw to zero degrees on both miter and bevel scales. Use a digital angle gauge or a protractor for precise reading.
- Lower the blade to touch a flat wood piece.
- Check if the blade is perfectly vertical (bevel).
- Adjust the bevel angle if needed using the bevel lock knob.
- Turn the miter scale to zero and check alignment.
- Adjust the miter lock if the angle is off.
Using Alignment Tools
Aligning a miter saw correctly improves cutting accuracy. Using the right tools makes this task easier and precise.
This guide covers three common alignment tools for your miter saw setup.
Square And Combination Square
Squares help check if your saw blade and fence are at a true 90-degree angle. A combination square adds angle measurement features.
- Place the square against the saw fence and blade.
- Check if the blade edge aligns perfectly with the square’s edge.
- Adjust the saw if you see any gaps or misalignment.
- Use the combination square to measure other angles, like 45 degrees.
Digital Angle Gauge
Digital angle gauges give precise angle readings. They are easy to use and show results on a screen.
| Step | Action |
| 1 | Turn on the digital angle gauge and zero it on a flat surface. |
| 2 | Place the gauge on the saw blade or table. |
| 3 | Read the angle on the digital display. |
| 4 | Adjust the saw until the desired angle shows on the gauge. |
Dial Indicator
A dial indicator measures small variations in the saw blade’s position. It helps find precise alignment errors.
To use a dial indicator:
- Attach the indicator to the saw base near the blade.
- Move the blade slowly across the indicator’s probe.
- Watch the needle for any movement indicating misalignment.
- Adjust the saw parts until the needle stays steady.
Cutting Techniques For Accuracy
Using a miter saw requires skill to make accurate cuts. Proper techniques help you get clean and precise results every time.
Focusing on clamping, cutting speed, and avoiding common errors will improve your work quality and safety.
Proper Clamping Methods
Secure your workpiece firmly before cutting. This prevents movement that can cause uneven cuts or injury.
- Use clamps that fit the size of your material.
- Place clamps close to the cutting area without blocking the blade.
- Check that the piece is level and stable before starting.
- Apply even pressure to avoid warping the wood.
Consistent Cutting Speed
Keep a steady speed while cutting. Moving too fast or slow affects accuracy and can damage the blade or material.
| Speed Factor | Effect on Cut |
| Too Fast | Rough edges and blade wear |
| Too Slow | Burn marks and blade overheating |
| Consistent | Smooth and clean cuts |
Avoiding Common Mistakes
Watch out for errors that reduce cut quality. Fixing these early saves time and materials.
- Do not rush the cut; steady hands produce better results.
- Always check blade alignment before cutting.
- Wear safety gear to protect against debris.
- Keep the saw clean and well-maintained.

Credit: www.mcfeelys.com
Maintenance For Long-term Precision
Keeping your miter saw accurate takes regular care. Small tasks can keep the blade aligned for years.
Follow simple steps to clean, replace, and lubricate parts. This helps your saw stay precise and safe.
Regular Cleaning
Dust and debris can affect your saw’s accuracy. Clean the saw after each use to avoid buildup. Use a brush or compressed air to remove sawdust from tight spots.
- Unplug the saw before cleaning
- Remove sawdust from blade and table
- Wipe down the fence and miter gauge
- Clean the motor vents to prevent overheating
Blade Replacement Schedule
A dull blade causes rough cuts and can misalign the saw. Replace blades based on use and material type. Look for signs like burning wood or slow cutting speed.
| Usage Frequency | Material Type | Replacement Time |
| Weekly | Hardwood | Every 3 months |
| Monthly | Softwood | Every 6 months |
| Occasional | Softwood | Every year |
Lubrication Tips
Lubricate moving parts to reduce wear and keep the saw running smoothly. Use a light machine oil on the pivot points and slide rails.
- Clean parts before applying lubricant
- Use only recommended lubricants
- Wipe off excess oil to avoid dust buildup
- Lubricate every 3 months or after heavy use
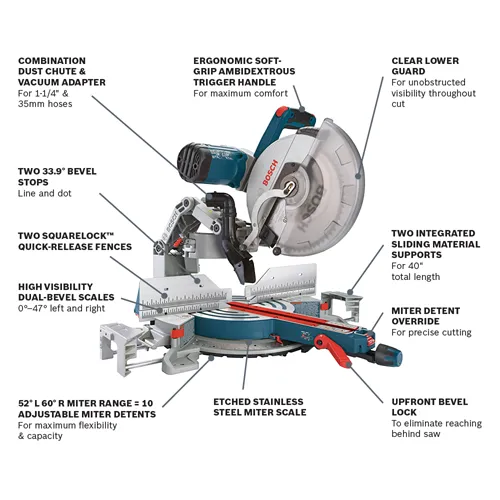
Credit: www.boschtools.com
Frequently Asked Questions
How Do I Align A Miter Saw Blade Properly?
To align a miter saw blade, first unplug the saw. Loosen the bevel and miter locks, then adjust the blade to zero. Use a square to check alignment. Tighten locks securely once the blade is perfectly aligned for accurate cuts.
Why Is Miter Saw Alignment Important?
Proper miter saw alignment ensures precise and clean cuts. Misalignment can cause inaccurate angles, poor joint fits, and waste materials. It also extends blade life and improves safety by preventing binding or kickbacks during cutting.
How Often Should I Check Miter Saw Alignment?
Check your miter saw alignment before each major project or after moving the saw. Regular checks maintain cutting accuracy and extend tool life. Frequent alignment ensures consistent performance and reduces costly mistakes in your woodworking.
Can I Align A Miter Saw Without Special Tools?
Yes, you can align a miter saw using a combination square or a carpenter’s square. These common tools help check blade angles accurately. While specialized tools can help, basic squares are effective for most alignment tasks.
Conclusion
Aligning your miter saw boosts cutting precision. Regular checks ensure accuracy. Tighten loose parts for stable operation. Use a square to verify blade alignment. Adjust fences for correct angles. Clean the saw regularly to maintain performance. Practice makes alignment easier.
Follow these steps for better results. Your projects will benefit from precise cuts. Don’t overlook miter saw maintenance. It saves time and enhances work quality. A well-aligned saw is crucial for any woodworker. Keep your tools in top shape. Your efforts will pay off.
Happy cutting!
