Are you ready to take your woodworking skills to the next level? Understanding router bits is the key to unlocking endless creative possibilities.
Whether you’re shaping edges, carving intricate designs, or making precise cuts, the right router bit makes all the difference. In this guide, you’ll discover which bits suit your projects best and how to use them like a pro. Keep reading, and you’ll soon feel confident choosing and handling router bits to bring your ideas to life with precision and ease.
Choosing The Right Router Bits
Router bits are tools that shape wood and other materials. Picking the right bit helps you get clean and precise cuts.
Each router bit has a special use. Knowing their types, materials, and sizes will guide you to the best choice.
Types Of Router Bits
Router bits come in many shapes. Each shape creates a different edge or cut on your workpiece.
- Straight bits cut straight grooves and dados.
- Round-over bits make smooth, rounded edges.
- Chamfer bits cut angled edges for decoration.
- Flush-trim bits copy patterns or templates.
- V-groove bits carve V-shaped grooves and letters.
Material And Coating Options
Router bits are made from different materials. The material affects how long the bit lasts and how well it cuts.
Many bits have coatings that reduce heat and wear. Coatings help the bit stay sharp longer.
- High-speed steel (HSS) bits are affordable but dull faster.
- Carbide-tipped bits stay sharp and last longer.
- Solid carbide bits offer the best durability and cutting power.
- Titanium and diamond coatings improve heat resistance.
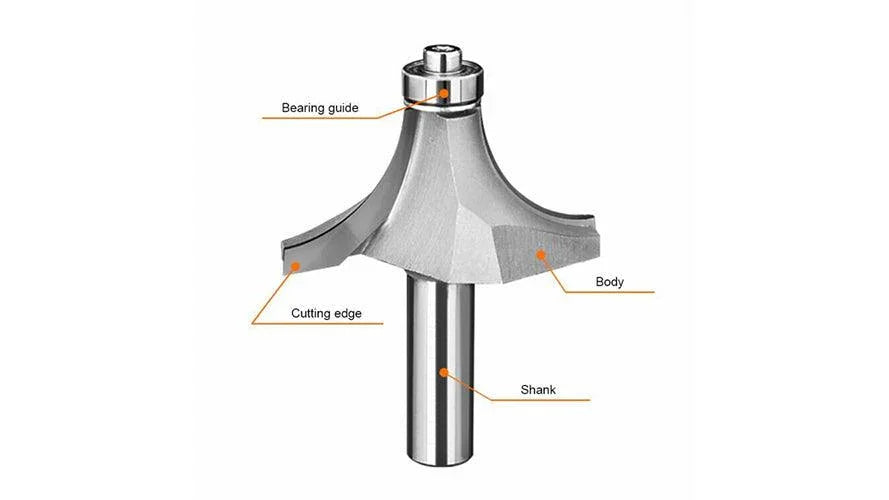
Shank Sizes Explained
The shank is the part of the bit that fits into the router. Its size matters for safety and performance.
Common shank sizes include 1/4 inch and 1/2 inch. Larger shanks give more stability and less vibration.
| Shank Size | Use | Benefit |
|---|---|---|
| 1/4 inch | Light work and small routers | Easy to handle, less expensive |
| 1/2 inch | Heavy-duty and larger routers | More stable and less bit breakage |

Credit: www.amazon.ca
Router Bit Profiles And Their Uses
Router bits shape wood edges and surfaces. They create different designs and joints. Knowing each bit’s use helps you pick the right one.
This guide explains common router bit profiles and how to use them. Each type has a special role in woodworking projects.
Straight Bits
Straight bits cut straight grooves or dados in wood. They are good for making slots or hollowing out areas. These bits come in many sizes for different depths and widths.
Flush Trim Bits
Flush trim bits have a bearing that guides the cut along an edge. Woodworkers use them to copy shapes or trim edges flush with a template. They make clean, precise cuts.
Chamfer Bits
Chamfer bits cut angled edges on wood. These angled cuts add style or help fit pieces together. The most common angles are 45 and 22.5 degrees.
Round-over Bits
Round-over bits create smooth, rounded edges. They soften sharp corners on furniture and trim. These bits come in various radius sizes for different rounding effects.
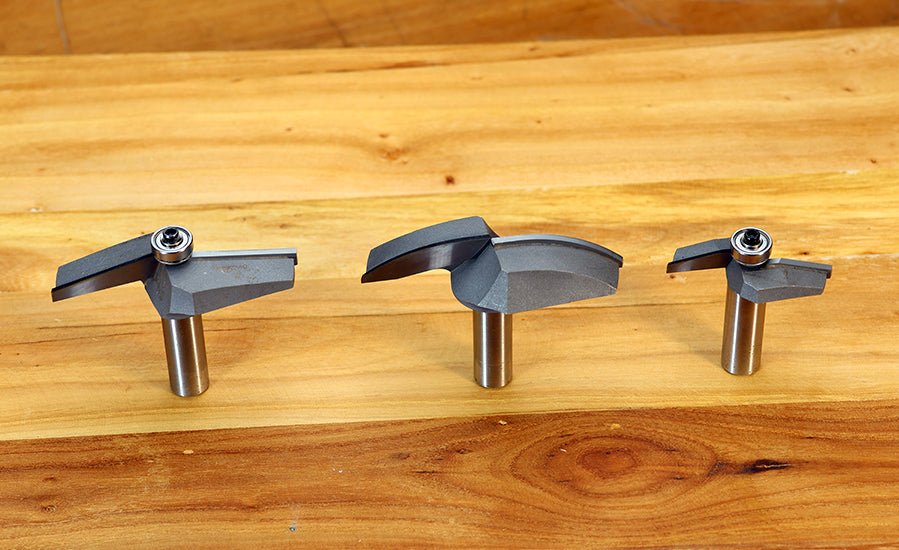
Rabbet Bits
Rabbet bits cut a step-shaped recess along the edge of wood. These cuts join wood pieces tightly. They are common in cabinet making and drawer construction.
V-groove Bits
V-groove bits cut V-shaped channels in wood. They add decorative lines or lettering. These bits come in different angles for various groove depths.
| Router Bit | Purpose | Common Use |
| Straight Bits | Cut straight grooves | Slots, dados, hollowing |
| Flush Trim Bits | Trim edges flush | Copying templates |
| Chamfer Bits | Cut angled edges | Edge styling, joinery |
| Round-Over Bits | Round edges | Softening corners |
| Rabbet Bits | Cut step recesses | Joinery, cabinets |
| V-Groove Bits | Cut V-shaped channels | Decorative grooves |
Tips For Precise Routing
Routing wood requires care and attention to detail. Using the right techniques helps you get clean and accurate cuts every time.
This guide covers key tips to improve your routing skills and avoid mistakes.
Proper Speed Settings
Set the router speed based on the bit size and the material. Too fast can burn the wood, too slow can cause chipping.
- Use higher speeds for small bits
- Lower speeds for large bits
- Slow down when routing hardwood
- Increase speed for softwood
Correct Feed Rate
Feed rate is how fast you move the router along the wood. Moving too fast can cause rough cuts. Going too slow may burn the wood.
| Material | Feed Rate |
| Softwood | Medium to fast |
| Hardwood | Slow to medium |
| Plywood | Medium |
| MDF | Slow to medium |
Using Guides And Jigs
Guides and jigs help keep the router steady and ensure straight, even cuts. They reduce errors and improve precision.
Tips for guides and jigs:
- Clamp guides firmly to the workpiece
- Use a straight edge for long cuts
- Build custom jigs for repeat cuts
- Check jig alignment before routing
Maintaining Router Bits
Router bits need care to stay sharp and safe. Proper maintenance helps you get clean cuts and long tool life.
Cleaning and storing router bits properly protects them from damage. Following safety rules keeps you safe during use and maintenance.
Cleaning And Sharpening
Clean router bits after each use to remove resin and dust. Use a soft brush and mild cleaner. Avoid harsh chemicals that can damage the bit.
- Soak bits in a cleaning solution for a few minutes.
- Use a toothbrush to scrub away buildup.
- Rinse with water and dry completely.
- Sharpen dull bits with a diamond hone or take them to a professional.
Storage Solutions
Store router bits in a dry place to prevent rust. Use holders or cases that keep bits separate to avoid dulling and damage.
| Storage Type | Benefits |
|---|---|
| Plastic case with slots | Keeps bits organized and protected |
| Foam-lined box | Prevents movement and reduces damage |
| Wall-mounted rack | Easy access and saves workspace |
| Magnetic strip | Quick access but avoid metal-on-metal damage |
Safety Precautions
Always wear safety glasses and hearing protection when using router bits. Check bits for damage before use to avoid accidents.
- Disconnect power before changing bits.
- Use the correct bit size for your router.
- Keep hands away from the bit when the router runs.
- Secure workpieces firmly to prevent slips.
Common Mistakes To Avoid
Using router bits correctly is key for good woodworking results. Many beginners make simple errors that hurt their work and tools.
This guide lists common mistakes and how to avoid them. Learning these tips will help you work safer and smarter.
Overloading The Router
Overloading happens when you push the router too hard or use the wrong speed. This can burn the wood and damage the bit or motor.
- Do not force the router through the wood.
- Use the correct speed for the bit size and wood type.
- Make several shallow passes instead of one deep cut.
- Keep the router moving steadily without pausing.
Ignoring Bit Wear
Dull bits cause poor cuts and can be dangerous. Check your bits often and replace or sharpen them as needed.
| Signs of Bit Wear | Effects |
| Dull edges | Burn marks on wood |
| Chipped or broken edges | Rough cuts and tear-out |
| Slow cutting | Overheating and motor strain |
Improper Bit Installation
Installing the bit wrong can cause vibration or the bit to come loose. This is unsafe and can ruin your work.
- Make sure the bit is clean before installing.
- Insert the bit fully into the collet and tighten securely.
- Check the bit runs true by turning the router on briefly.
- Do not overtighten the collet to avoid damage.

Credit: www.temu.com
Advanced Techniques For Woodworkers
Using router bits in new ways helps woodworkers create detailed work. These techniques add style and precision to projects.
Learning these methods can improve your woodworking skills and allow you to try unique designs.
Stacking Router Bits
Stacking router bits means placing two or more bits on the router shaft. This creates custom shapes in one pass.
This technique saves time and makes complex profiles easier to cut.
- Choose bits with matching shank sizes
- Test the setup on scrap wood first
- Secure bits tightly to avoid movement
- Adjust cutting depth carefully for each bit
Creating Custom Profiles
Custom profiles give wood edges unique looks. You can design your own shapes by combining different bits.
Try mixing round-over, chamfer, and ogee bits to make new edge styles.
- Draw your desired profile on paper
- Match the shape with available router bits
- Use a fence or guide for straight cuts
- Make test cuts to perfect the profile
Multi-pass Routing
Multi-pass routing means cutting a shape in several shallow passes. This reduces stress on the bit and wood.
This method helps when working with hard wood or deep cuts.
- Set the router to a shallow depth for the first pass
- Make several passes, increasing depth gradually
- Keep the router steady and move at a consistent speed
- Clear wood chips between passes for a clean cut
Credit: www.findbuytool.com
Frequently Asked Questions
What Are The Main Types Of Router Bits?
Router bits come in various types like straight, flush trim, round-over, chamfer, and dovetail. Each serves a unique purpose in shaping or trimming wood edges.
How Do I Choose The Right Router Bit Size?
Choose router bit size based on your project’s edge detail and material thickness. Larger bits create deeper cuts; smaller bits offer finer details.
Can Router Bits Be Used On Materials Other Than Wood?
Yes, router bits can cut plastics and soft metals. Ensure the bit material and speed match the material for clean cuts.
How Do I Maintain Router Bits For Longevity?
Keep bits clean, sharpen regularly, and store properly. Avoid overheating by using the right speed and feed rate during use.
Conclusion
Choosing the right router bits is crucial for your projects. They affect precision and quality. Basic shapes work for beginners. Complex designs need special bits. Always check the material and size. Proper maintenance extends their life. Clean bits regularly for best results.
Invest wisely in quality bits. They save time and effort. Remember, practice improves your skills. Experiment with different types. Over time, you’ll find favorites. Let your creativity lead the way. Happy woodworking!