Are your sanding discs scattered all over your workspace, making it a challenge to find the right one when you need it? You’re not alone.
Disorganized sanding discs can slow you down and disrupt your workflow, leading to frustration. Imagine the satisfaction and efficiency of having a neatly organized collection of sanding discs, where everything is easy to find and within reach. This article is your guide to transforming chaos into order, unlocking the secrets to organizing your sanding discs efficiently.
With these tips, you’ll spend less time searching and more time perfecting your projects. Dive in to discover how a few simple changes can make a big difference in your workshop.

Credit: www.amazon.com
Choosing The Right Storage
Organizing sanding discs well saves time and keeps your workspace neat. The right storage helps protect discs from damage.
Pick storage that fits your needs and makes it easy to find the right disc fast.
Types Of Storage Solutions
There are many storage types for sanding discs. Choose one based on how many discs you have and your workspace size.
- Stackable trays hold discs flat and save space
- Hanging racks let you see discs easily
- Drawer organizers keep discs dust-free
- Rotating carousels offer quick access to many discs
Material Considerations
Storage materials affect disc protection and durability. Use materials that resist moisture and dust.
Plastic and metal are common choices. Plastic is lightweight and easy to clean. Metal is strong and long-lasting.
- Plastic storage protects discs from dust and moisture
- Metal racks offer sturdy support and last long
- Wood can absorb moisture, so avoid it for sanding discs
Space Optimization
Use your workspace well by organizing sanding discs to save room. Choose compact storage that fits your area.
Stackable or wall-mounted storage frees up bench space. Keep frequently used discs within easy reach.
- Use vertical space with wall racks or pegboards
- Stack trays to save horizontal space
- Label storage for quick disc identification
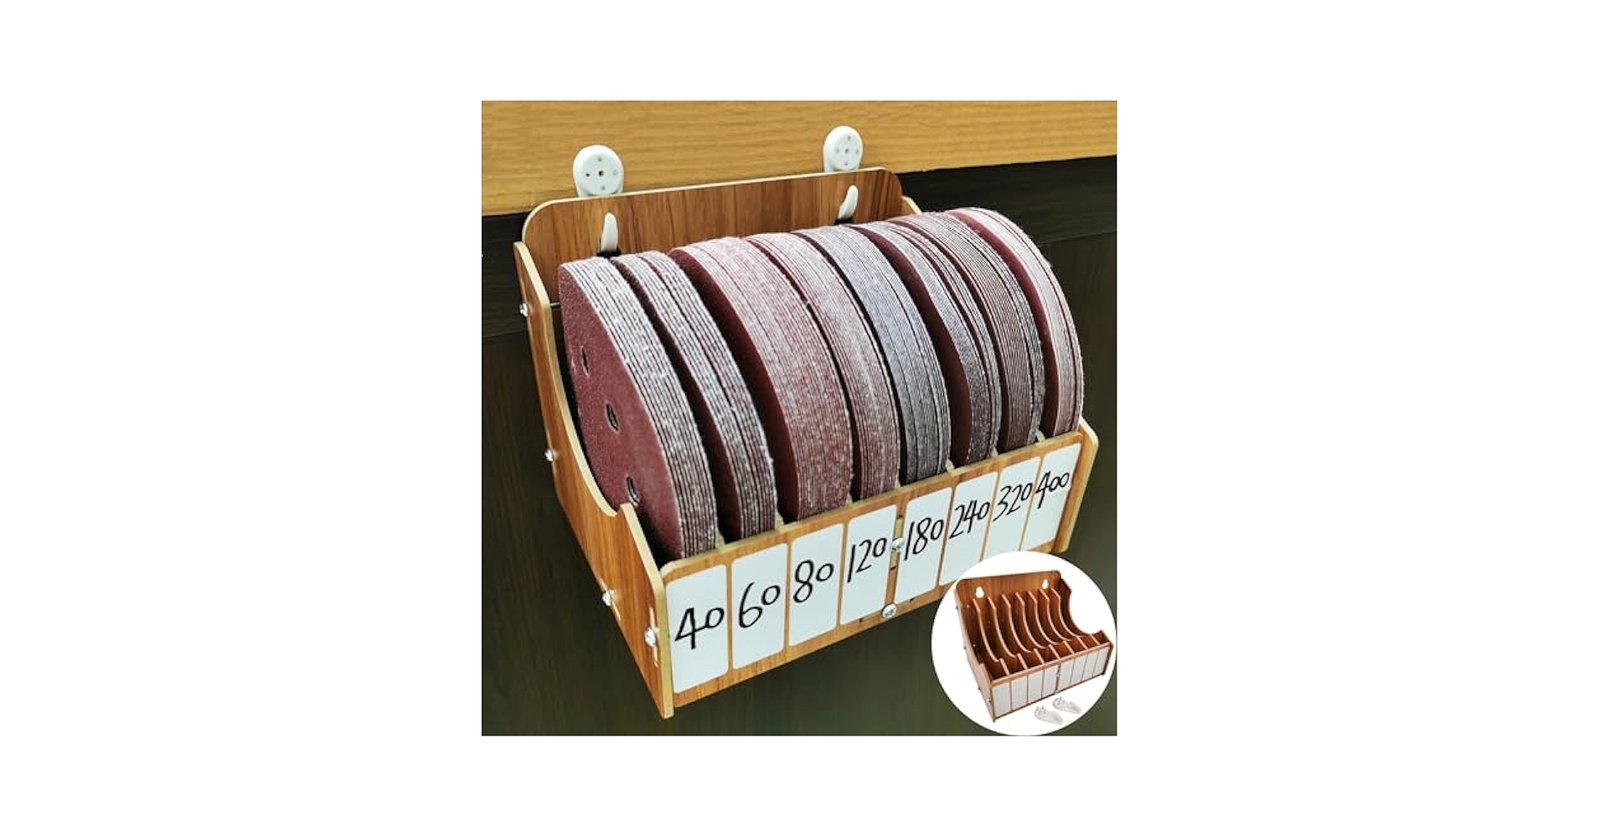
- Keep discs sorted by grit size for faster access
Sorting Sanding Discs
Keeping sanding discs organized saves time and effort. It helps you find the right disc fast. Sorting discs properly protects them from damage.
There are several ways to sort sanding discs. Sorting by grit size, disc diameter, and material compatibility works well. Each method makes your workspace neater.
By Grit Size
Sorting sanding discs by grit size is the most common way. Grit size shows how rough or smooth the disc is. Group discs from coarse to fine grit.
- Coarse grits remove material quickly
- Medium grits smooth surfaces
- Fine grits finish and polish
By Disc Diameter
Discs come in different diameters to fit various tools. Sorting by diameter helps you grab the correct size easily. Keep discs of the same diameter together.
- Small discs suit detail work
- Medium discs fit common power tools
- Large discs cover big surfaces faster
By Material Compatibility
Some sanding discs work better on specific materials. Sorting by material compatibility prevents damage and saves disc life. Separate discs for wood, metal, and plastic.
- Wood discs handle softer surfaces
- Metal discs resist heat and wear
- Plastic discs avoid melting or clogging
Labeling Techniques
Organizing sanding discs is easier with clear labeling. Good labels save time and prevent mistakes. They help find the right disc quickly.
Use simple methods to mark your sanding discs. This guide covers effective labeling, color codes, and digital options.
Effective Labeling Methods
Label each sanding disc or its storage container with key details. Write the grit size and type clearly. Use waterproof markers or printed stickers for durability.
- Use large, easy-to-read fonts
- Include grit number and disc material
- Write the date of purchase or first use
- Attach labels on both sides if possible
- Replace labels if they become faded or torn
Using Color Codes
Color coding speeds up disc selection. Assign colors to grit ranges or disc types. Use colored tape, dots, or stickers.
| Color | Grit Range | Disc Type |
| Red | 40-60 | Coarse |
| Blue | 80-120 | Medium |
| Green | 150-220 | Fine |
| Yellow | 240+ | Extra Fine |
Digital Inventory Options
Use a digital system to track sanding discs. Record details like quantity, grit, and location. Update the inventory when discs are used or added.
| Disc Name | Grit | Quantity | Storage Location |
|---|---|---|---|
| Aluminum Oxide | 80 | 50 | Bin A |
| Silicon Carbide | 120 | 30 | Bin B |
| Ceramic | 220 | 20 | Bin C |

Credit: www.amazon.com
Maintaining Disc Quality
Keeping sanding discs in good shape helps them last longer. Proper care makes sure they work well every time you use them.
This guide shows easy ways to handle and store discs to keep their quality high.
Proper Handling Practices
Handle sanding discs gently to avoid damage. Always hold them by the edges to stop bending or cracking.
- Keep discs flat and avoid dropping them.
- Use clean hands or gloves to prevent dirt buildup.
- Do not stack heavy objects on discs.
- Remove discs carefully from storage to avoid tearing.
Avoiding Moisture Damage
Moisture harms sanding discs by weakening their adhesive and surface. Store discs in dry places to keep them safe.
| Storage Condition | Recommended Practice |
| Humidity | Keep below 50% |
| Temperature | Store between 10°C and 25°C (50°F – 77°F) |
| Container | Use airtight boxes or sealed bags |
| Location | Avoid damp basements or outdoor sheds |
Regular Inspection Tips
Check sanding discs often for signs of wear or damage. Early detection helps avoid poor sanding results.
- Look for cracks or tears on the disc surface.
- Check if the adhesive backing is still sticky.
- Inspect for any warping or bends.
- Test a disc on scrap material before full use.
- Replace discs that show damage or reduced grip.
Maximizing Accessibility
Keeping sanding discs easy to reach saves time and effort. Organize them so you find the right disc fast.
Good organization helps keep your workspace tidy and improves safety.
Organizing For Frequent Use
Place the sanding discs you use most often within arm’s reach. This reduces bending and searching.
Sort discs by grit size and type for quick selection during projects.
- Use clear bins or containers labeled by grit
- Keep daily-use discs on open shelves or hooks
- Arrange discs vertically to see all types at once
Portable Storage Ideas
Use small cases or boxes to carry sanding discs to different work areas. This keeps them organized on the move.
Choose storage with compartments to separate grit sizes and prevent damage.
- Plastic cases with dividers work well
- Stackable containers save space
- Tool rolls with pockets hold discs neatly
Workstation Layout Tips
Design your workstation so sanding discs are near the sander and work surface. This cuts down on walking.
Use wall-mounted racks or pegboards to keep discs visible and accessible.
- Place frequently used discs at eye level
- Group discs by grit in the order of use
- Keep a small trash bin nearby for used discs
Safety And Cleanliness
Keeping sanding discs organized helps maintain safety and cleanliness. Proper care prevents accidents and extends the life of discs.
Follow these tips to store, clean, and dispose of sanding discs correctly. This keeps your workspace safe and tidy.
Safe Storage Practices
Store sanding discs in a dry, cool place away from direct sunlight. Avoid stacking discs loosely to prevent damage.
- Use labeled containers or racks for different disc sizes.
- Keep discs flat to stop warping or bending.
- Separate new and used discs clearly.
- Store away from chemicals or moisture.
Cleaning Discs Before Storage
Remove dust and debris from discs before storing. Clean discs work better and last longer.
| Cleaning Method | Details |
| Compressed Air | Blow off loose dust safely. |
| Soft Brush | Gently sweep off stuck debris. |
| Cloth Wipe | Use a dry cloth to clean surface. |
Disposal Of Worn Discs
Throw away discs that are cracked, torn, or no longer stick well. Using worn discs can be dangerous.
- Check discs before each use for damage.
- Dispose of broken discs in a safe trash container.
- Do not try to repair damaged discs.
- Follow local rules for disposing of abrasive materials.

Credit: www.amazon.com.au
Frequently Asked Questions
How Can I Store Sanding Discs To Save Space?
Store sanding discs in labeled, stackable containers or hanging organizers. This keeps them accessible, neat, and prevents damage.
What’s The Best Way To Sort Sanding Discs?
Sort sanding discs by grit size and type. Use dividers or separate trays for quick identification and easy access.
How Do I Prevent Sanding Discs From Getting Damaged?
Keep sanding discs dry and flat. Avoid stacking heavy items on them and store in a cool, dust-free area.
Can I Reuse Sanding Discs After Cleaning?
Yes, lightly used sanding discs can be cleaned with compressed air or a rubber cleaning stick for reuse.
Conclusion
Organizing sanding discs saves time and reduces frustration. Store them by size and grit for easy access. Use clear containers or labeled holders to keep discs visible. Keep your workspace neat to protect the discs from damage. Regularly check and discard worn-out discs.
A tidy system helps you work faster and better. Small efforts lead to big improvements in your projects. Stay consistent with your organization habits to enjoy lasting benefits. Simple steps make a noticeable difference every day.