Are you dealing with a table saw that just won’t cooperate? Whether you’re a seasoned woodworker or a DIY enthusiast, a malfunctioning table saw can throw a wrench in your plans.
But don’t worry—you’re not alone, and there’s a solution. You’ll discover easy-to-follow tips for repairing your table saw, ensuring it runs smoothly and safely. Imagine effortlessly cutting through wood with precision once more, without the headache of technical issues. Dive in, and unlock the secrets to getting your table saw back to its prime condition.
Your next project awaits!
Common Table Saw Issues
Table saws are useful tools for woodworking, but they can have problems. Knowing common issues helps you fix them quickly.
This guide covers typical problems and tips to repair them safely and effectively.
Blade Alignment Problems
Blade alignment is crucial for clean and accurate cuts. A misaligned blade can cause rough edges or kickbacks.
Check the blade alignment regularly with a square. Adjust the blade until it is parallel to the miter slot.
- Use a combination square to check blade alignment
- Adjust the trunnion bolts to move the blade
- Test cuts on scrap wood before use
Motor And Power Troubles
Motors may fail to start or lose power during use. Electrical problems or worn brushes are common causes.
Inspect the power cord and switch for damage. Clean or replace carbon brushes if the motor runs weakly.
- Check power source and outlet
- Inspect the power cord for cuts or frays
- Replace motor brushes if worn
- Clean motor vents to avoid overheating
Fence And Miter Gauge Malfunctions
The fence and miter gauge guide the wood for straight cuts. If they are loose or damaged, cuts become inaccurate.
Tighten loose screws and check for bent parts. Replace damaged components to keep the guides stable.
- Ensure the fence locks firmly in place
- Check the miter gauge for smooth movement
- Replace bent or broken fence rails
- Clean guide tracks to reduce friction
Dust Collection Blockages
Dust collection keeps your work area clean and safe. Blockages reduce suction and cause dust build-up.
Regularly inspect hoses and ports. Remove debris and clear clogs to maintain good airflow.
- Check dust hose for tears or blockages
- Clear sawdust from dust ports and collection bags
- Use compressed air to clean hard-to-reach areas
- Empty dust collection bags before full
Safety First
Repairing table saws needs care and attention. Safety comes before all work.
Following safety steps reduces accidents and protects your hands and eyes.
Power Off And Unplugging
Always turn off the table saw before repairs. This stops the blade from moving.
Unplug the saw from the power source. This stops any accidental starts or shocks.
- Switch off the power button.
- Pull out the power plug from the socket.
- Check the cord for damage before plugging back in.
Using Protective Gear
Wear safety gear to protect yourself. This keeps you safe from dust and cuts.
Use gloves, safety goggles, and ear protection during repairs.
- Gloves protect your hands from sharp parts.
- Goggles shield your eyes from dust and debris.
- Earplugs reduce noise from power tools.
Checking For Sharp Edges
Look for sharp edges on the blade and parts. Sharp edges can cause cuts.
Handle all sharp parts carefully. Use tools to avoid direct contact if possible.
- Inspect the blade for chips or cracks.
- Check the saw’s metal parts for rough edges.
- Use a cloth or tool when moving sharp pieces.
Quick Blade Fixes
Table saws need regular care to work well. Quick blade fixes help keep your saw sharp and safe.
Simple steps like replacing blades, adjusting height, and cleaning teeth improve cutting quality fast.
Replacing Dull Blades
Dull blades make cutting hard and unsafe. Change the blade when you see rough cuts or burn marks on wood.
Turn off the saw and unplug it before removing the blade. Use a wrench to loosen the arbor nut and take out the old blade.
- Wear gloves to protect your hands
- Match the new blade size with your saw
- Tighten the arbor nut firmly but not too tight
- Test the blade by making a small cut
Adjusting Blade Height And Angle
Proper blade height and angle give cleaner cuts. Set the blade height so it is just above the material thickness.
Use the saw’s adjustment wheel or lever to change the angle. Most cuts need a 90-degree angle, but bevel cuts require tilting the blade.
- Raise the blade about 1/8 inch above wood for safety
- Check the angle with a square or protractor
- Lock the blade settings before cutting
Cleaning Blade Teeth
Residue and pitch build-up dull blade teeth. Clean the teeth regularly to keep cuts smooth and reduce friction.
Use a brush and a cleaner made for saw blades. Soak the blade if needed, then scrub gently to remove gunk.
- Remove the blade from the saw before cleaning
- Wear gloves to avoid cuts
- Dry the blade fully to stop rust
- Reinstall the blade carefully after cleaning
Credit: www.woodpeck.com
Motor And Electrical Repairs
Table saws rely heavily on their motors and electrical parts. Fixing these parts keeps the saw working safely and smoothly.
Knowing how to check and repair these parts helps you avoid bigger problems later. Always turn off and unplug the saw before starting repairs.
Inspecting Power Cords
Look for cracks, cuts, or frayed wires on the power cord. Damaged cords can cause shocks or make the saw stop working.
Check the plug and the area near the cord for loose connections. Replace the cord if you see any damage to keep the saw safe.
- Unplug the saw before inspection.
- Look closely at the entire cord length.
- Replace cords with any visible damage.
- Use cords recommended by the saw maker.
Testing Motor Function
Check if the motor runs smoothly without strange noises or smells. A motor that struggles may need cleaning or repair.
Use a multimeter to test the motor’s electrical parts. This helps find broken wires or bad connections inside the motor.
- Unplug the saw before testing.
- Turn the motor by hand to feel for resistance.
- Listen for grinding or buzzing sounds.
- Use a multimeter to check motor windings.
- Call a professional for complex motor repairs.
Lubricating Moving Parts
Keep motor bearings and other parts moving smoothly with regular lubrication. This reduces wear and stops overheating.
Use a light machine oil or grease made for power tools. Avoid over-lubricating, as too much oil can attract dust and cause damage.
- Unplug the saw before lubricating.
- Apply oil or grease to motor bearings.
- Lubricate gears and shafts as needed.
- Wipe away extra lubricant to avoid dust buildup.
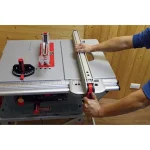
Fence And Miter Gauge Adjustments
Table saws need precise fence and miter gauge settings to cut accurately. Adjusting these parts helps you get clean and straight cuts.
Small misalignments can cause mistakes or unsafe cuts. Regular checks keep your saw working well.
Realigning The Fence
The fence guides your wood during cuts. If it is not aligned, your cuts will be off. Realign the fence to make sure it runs parallel to the blade.
First, unlock the fence and move it close to the blade without touching. Use a ruler or a square to check the distance at the front and back. Adjust the fence until both distances match.
- Unlock the fence lock
- Place the fence near the blade
- Measure the distance front and back
- Tighten the fence when aligned
Calibrating The Miter Gauge
The miter gauge controls angled cuts. It must be set correctly for accurate angles. Check the gauge with a reliable square to see if it shows 90 degrees.
If the angle is wrong, loosen the gauge’s adjustment screws. Move it until the angle reads true. Tighten the screws to hold it in place.
- Place a square against the blade
- Set the miter gauge to 90 degrees
- Loosen adjustment screws if needed
- Align the gauge with the square
- Tighten screws to fix position
Tightening Loose Components
Loose parts on your table saw can cause poor cuts or dangerous situations. Check the fence, miter gauge, and other parts regularly. Tighten any bolts or screws that feel loose.
Use the right tools and avoid over-tightening. Proper tightness keeps your saw steady and safe.
- Inspect fence and miter gauge bolts
- Use a wrench or screwdriver to tighten
- Check other moving parts for looseness
- Do not over-tighten to avoid damage

Credit: www.reddit.com
Improving Dust Management
Dust from table saws can cause health problems and make your workspace dirty. Managing dust well keeps the area clean and safe.
Good dust management also helps your saw work better and last longer. Use simple tips to clear dust and maintain your dust systems.
Clearing Dust Ports
Dust ports collect sawdust but can get clogged. Clean them often to keep dust flowing out properly.
- Turn off and unplug the saw before cleaning.
- Use a brush or compressed air to clear dust inside the ports.
- Check ports for cracks or damage and fix if needed.
- Remove any blockages that reduce airflow.
- Make cleaning part of your regular saw maintenance.
Maintaining Dust Collection Systems
Dust collection systems capture dust from your saw. Keep them in good shape to improve dust removal.
| Task | Frequency | Tips |
| Empty dust bags or bins | After every use or when full | Do not let bags overfill |
| Check hoses for cracks | Monthly | Replace damaged hoses quickly |
| Clean filters | Every 3 months | Follow manufacturer instructions |
| Inspect system connections | Weekly | Ensure tight seals for better suction |
Preventive Maintenance Tips
Keeping your table saw in good shape helps it work better and last longer. Simple maintenance tasks prevent big problems and keep you safe.
Use these tips to care for your table saw regularly. They focus on cleaning, checking, and storing the tool properly.
Regular Cleaning Routines
Dust and debris can cause your saw to work poorly. Clean it after each use to avoid buildup. Use a brush or air compressor for hard-to-reach spots.
- Remove sawdust from the blade and table surface
- Clean the motor vents to prevent overheating
- Wipe down the fence and rails to keep smooth movement
- Lubricate moving parts lightly with machine oil
- Check and clean the blade guard and riving knife
Scheduled Inspections
Set times to check your table saw for wear and damage. Look at the blade, power cord, and safety features closely. Replace or fix parts if needed.
| Inspection Item | What to Check | Frequency |
|---|---|---|
| Blade | Sharpness and any chips | Monthly |
| Power Cord | Frays or cracks | Monthly |
| Safety Guards | Proper fit and function | Before each use |
| Motor | Unusual noise or heat | Every 3 months |
Proper Storage Practices
Keep your table saw safe and dry when not in use. Store it in a clean, dry place to avoid rust and damage. Cover it to protect from dust.
Follow these tips for storage:
- Unplug and clean the saw before storing
- Cover the saw with a dust cover or cloth
- Keep it in a dry area with low humidity
- Store blades separately in a safe container
- Avoid placing heavy items on top of the saw

Credit: www.searspartsdirect.com
Frequently Asked Questions
How Do I Fix A Table Saw Blade That Won’t Spin?
Check the motor and belt for damage or wear. Tighten or replace the belt if loose. Clean debris around the blade. Ensure the arbor nut is secure. Inspect the switch and wiring for faults.
What Causes A Table Saw To Cut Unevenly?
Uneven cuts often result from a misaligned blade or fence. Check and adjust the blade angle and fence parallelism. Dull blades or warped tables also cause issues. Regular maintenance ensures smooth, precise cuts.
How Can I Reduce Table Saw Motor Overheating?
Overheating occurs due to overuse or poor ventilation. Allow the motor to cool between uses. Clean dust and debris from vents regularly. Use the saw within recommended duty cycles to avoid damage.
When Should I Replace The Table Saw Blade?
Replace the blade when cuts become rough or slow. Dull blades strain the motor and reduce accuracy. Inspect blades regularly for chipped or missing teeth. Proper blade choice improves performance and safety.
Conclusion
Repairing table saws can save time and money. Start with small checks and simple fixes. Always use the right tools and safety gear. Take your time to avoid mistakes. Regular maintenance keeps your saw working well. Remember, careful work leads to better results.
Keep learning and practicing for success. Your saw will last longer and cut better. Stay safe and enjoy your woodworking projects.