
Are you tired of uneven, rough spots ruining your furniture’s finish? Sanding furniture evenly can be tricky, but it’s the key to making your pieces look smooth and professional.
Whether you’re restoring an old chair or giving a fresh look to a table, the right sanding technique will save you time and frustration. You’ll discover simple, effective tips that help you get a flawless finish every time. Keep reading to transform your furniture sanding skills and achieve the perfect surface you’ve been aiming for.
Choosing The Right Sandpaper
Choosing the right sandpaper is important for sanding furniture evenly. The type and grit of sandpaper affect the smoothness and finish of your project. Understanding these choices helps you get better results.
Different sandpapers work best at different stages of sanding. Picking the right one makes your work easier and prevents damage to the wood.
Grit Levels And Their Uses
Sandpaper grit refers to the size of the abrasive particles. Lower grit numbers mean rougher sandpaper. Higher grit numbers mean finer sandpaper. Each grit level has a purpose.
- Coarse Grit (40-60):Removes old paint or varnish quickly.
- Medium Grit (80-120):Smooths rough wood and removes small marks.
- Fine Grit (150-180):Prepares surface for finishing by making it smooth.
- Very Fine Grit (220+):Used for sanding between coats of finish for a polished look.
Selecting Between Aluminum Oxide And Silicon Carbide
Aluminum oxide and silicon carbide are two common sandpaper materials. Each works best on different surfaces and tasks.
| Material | Best For | Durability | Cost |
|---|---|---|---|
| Aluminum Oxide | Wood, metal, and painted surfaces | Long-lasting | Moderate |
| Silicon Carbide | Finishing, sanding plastics and wet sanding | Sharp but wears faster | Higher |
Credit: www.aosom.com
Preparing The Furniture Surface
Preparing the furniture surface is important for even sanding. It helps you get a smooth and clean finish.
Taking time to prepare the surface makes sanding easier and improves the final look of the wood.
Cleaning And Removing Old Finish
Start by cleaning the furniture to remove dust and dirt. Use a soft cloth or brush for this task.
Remove any old paint or varnish by using a chemical stripper or sanding carefully. This clears the way for smooth sanding.
- Wipe off dust with a damp cloth
- Use a paint stripper for old finishes
- Sand rough spots lightly before full sanding
- Wear gloves and work in a ventilated area
Checking For Imperfections
Look closely for dents, scratches, or cracks in the wood. These can affect how even your sanding will be.
Fill small holes or cracks with wood filler. Let it dry and then sand gently to make the surface flat.
- Inspect the wood under good light
- Mark problem areas with a pencil
- Apply wood filler to dents and holes
- Sand filled spots smooth before full sanding
Sanding Techniques For Evenness
Sanding furniture evenly helps you get a smooth, professional finish. Using the right methods will save you time and prevent damage.
Try these simple sanding techniques to keep your work consistent and clean.
Sanding With The Grain
Sanding with the grain means moving your sandpaper in the same direction as the wood fibers. This helps avoid scratches and rough spots.
Always check the wood’s pattern before you start sanding. Move your hand or tool along the grain, not across it.
Using Consistent Pressure
Apply the same amount of pressure throughout your sanding. Pressing too hard creates uneven surfaces and can damage the wood.
- Hold the sandpaper or block firmly but gently.
- Use smooth, even strokes over the surface.
- Check your progress often to keep the finish level.
- Change sandpaper when it becomes worn to keep pressure steady.
Avoiding Over-sanding
Over-sanding removes too much wood and ruins your furniture’s shape. It also makes finishing harder.
| Signs of Over-Sanding | How to Prevent |
|---|---|
| Uneven surfaces | Sand lightly and check often |
| Rough patches | Use finer grit sandpaper |
| Loss of detail on edges | Sand carefully around corners |

Credit: serwalloutdoor.com
Tools For Smooth Sanding
Sanding furniture evenly is key to a smooth finish. Choosing the right tools helps you achieve this. The right sanding tools save time and effort.
Different tools work best for different parts of the furniture. Using the correct tool gives better control and results.
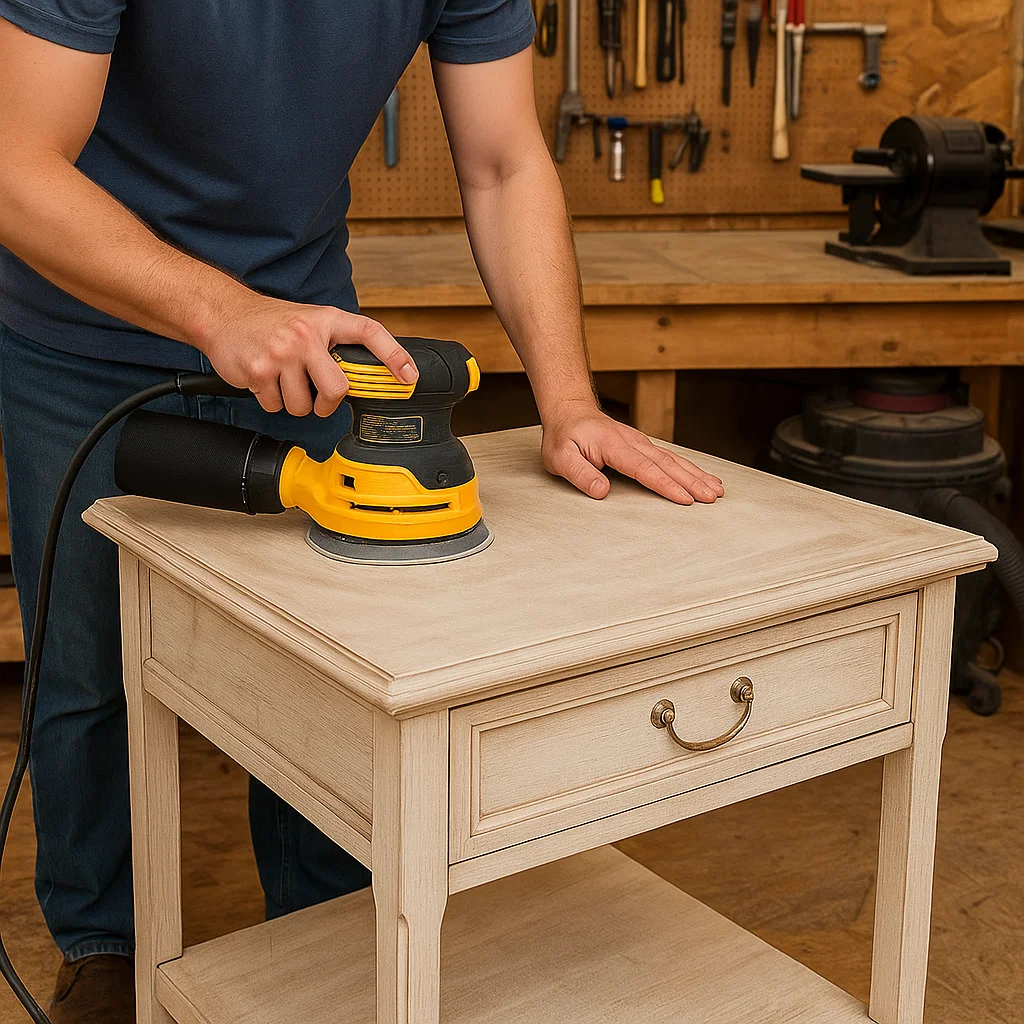
Hand Sanding Vs. Power Sanders
Hand sanding gives you more control on small or detailed areas. It is slower but careful for delicate parts.
Power sanders work faster on large surfaces. They remove more material quickly but need a steady hand.
- Hand sanding suits curves and corners
- Power sanders are best for flat surfaces
- Hand sanding reduces the risk of damage
- Power sanders need even pressure for smooth results
Using Sanding Blocks And Sponges
Sanding blocks help keep sandpaper flat and even. They make it easier to apply steady pressure.
Sanding sponges are flexible and fit curved or detailed surfaces. They last longer and can be rinsed clean.
- Use sanding blocks for flat surfaces and edges
- Use sanding sponges on curves and irregular shapes
- Both tools help avoid uneven sanding marks
- Choose the right grit sandpaper for your block or sponge
Step-by-step Sanding Process
Sanding furniture evenly helps to create a smooth surface. It prepares wood for painting or staining.
This guide shows how to sand furniture in clear, easy steps. Follow each stage carefully for best results.
Starting With Coarse Grit
Begin sanding with coarse grit sandpaper. This removes old finish and rough spots fast.
Use a sanding block or electric sander. Move with the wood grain for even results.
- Choose 60 to 80 grit sandpaper
- Sand all surfaces evenly
- Apply light pressure to avoid gouges
- Check for smoothness before next step
Progressing To Fine Grit
Switch to medium and fine grit sandpaper after coarse sanding. This smooths the wood further.
Follow the wood grain and sand lightly. This removes scratches from coarse grit.
- Use 120 to 220 grit sandpaper
- Sand until surface feels smooth
- Keep an even sanding pattern
- Wipe dust off before next grit
Final Touches For A Flawless Finish
Use very fine grit sandpaper to finish. This creates a perfect base for paint or stain.
Sand gently to avoid removing too much wood. Clean all dust before applying finish.
- Choose 320 grit or finer
- Sand lightly and evenly
- Remove all dust with a cloth
- Inspect surface for smoothness
Tips To Prevent Common Sanding Mistakes
Sanding furniture is key to a smooth finish. Mistakes can ruin the look and waste time. Follow these tips to sand evenly and avoid common problems.
Taking care during sanding helps your project look professional. Pay attention to details like even pressure and clean surfaces.
Avoiding Uneven Spots
Uneven sanding leaves rough or shiny patches. These spots show after painting or staining. To avoid this, use steady, even strokes across the surface.
Change your sanding direction with each grit. Start sanding along the grain, then cross-grain for smoothness. Use light pressure to prevent gouges or dips.
- Keep the sanding block flat on the surface
- Move the sander in slow, steady motions
- Check your work often under good light
- Replace sandpaper when it clogs or wears out
Managing Dust And Debris
Dust and debris can scratch the wood or clog your sandpaper. Clean the surface often while sanding. Use a vacuum or a soft brush to remove dust.
Wear a mask to avoid breathing in dust. Work in a well-ventilated area. Keeping your workspace clean helps you see the wood clearly.
- Vacuum the furniture after each sanding grit
- Wipe the surface with a tack cloth to catch fine dust
- Keep sandpaper clean by tapping it regularly
- Store sanding tools in a dust-free place
Post-sanding Care
After sanding furniture evenly, taking care of the surface is key. Proper post-sanding care prepares the wood for the next steps.
This helps to achieve a smooth finish and long-lasting results for your project.
Cleaning The Surface
Remove all dust and debris left from sanding. Dust can affect the finish and cause bumps or uneven spots.
- Use a vacuum with a brush attachment to clear loose dust
- Wipe the surface with a tack cloth to pick up fine particles
- If needed, use a damp cloth but ensure the wood dries fully before the next step
- Check corners and crevices carefully for leftover dust
Preparing For Staining Or Painting
Once clean, the surface needs preparation for stain or paint. This step improves adhesion and appearance.
| Preparation Step | Purpose | Tips |
| Apply wood conditioner | Prevents blotchy stain | Follow product instructions carefully |
| Sand lightly with fine grit sandpaper | Smooths raised grain after cleaning | Use 220-grit or finer |
| Remove sanding dust again | Ensures clean surface | Use tack cloth or vacuum |
| Apply primer (for painting) | Improves paint adhesion | Use primer suited for wood |

Credit: www.angi.com
Frequently Asked Questions
How Do I Sand Furniture Evenly Without Scratches?
Use fine-grit sandpaper and sand with the grain. Apply even pressure and keep the sanding tool moving constantly to avoid scratches.
What Grit Sandpaper Is Best For Furniture Sanding?
Start with 120-grit for rough surfaces, then move to 220-grit for a smooth finish. Finer grits help achieve an even surface.
Should I Sand Furniture By Hand Or With A Machine?
Hand sanding offers more control for detailed areas. Machines work faster for large, flat surfaces but require careful handling to avoid uneven sanding.
How Can I Avoid Uneven Sanding Marks On Furniture?
Sand in consistent, overlapping strokes and always follow the wood grain. Check your progress frequently under good lighting to spot uneven areas.
Conclusion
Sanding furniture evenly takes patience and practice. Start with the right tools. Choose the correct sandpaper grit. Work with the grain, not against it. Check your progress frequently. Don’t rush the process. Use consistent pressure for a smooth finish. Mistakes happen, but they teach valuable lessons.
Remember, every piece of furniture is unique. Enjoy the process and the results. With these tips, sanding becomes easier and more effective. Happy sanding!