If you’re ready to give your furniture a smooth, professional finish, a belt sander can be your best friend. But using one without the right know-how can lead to scratches, uneven surfaces, or even damage.
What if you could avoid those common mistakes and make your sanding tasks faster and easier? You’ll discover simple, practical tips that will help you master your belt sander and transform your furniture projects with confidence. Keep reading, and you’ll soon see how small changes in your technique can make a big difference in your results.

Credit: icocea.org
Choosing The Right Belt Sander
A belt sander is a useful tool for smoothing furniture surfaces quickly. Picking the right one helps you work better and safer.
Understanding different types and features can guide you to the best choice for your furniture projects.
Types Of Belt Sanders
There are various belt sanders designed for specific tasks. Knowing each type helps you pick the best for your needs.
- Handheld Belt Sanders:Portable and easy to use on small to medium furniture pieces.
- Stationary Belt Sanders:Large and fixed, best for heavy sanding jobs in workshops.
- Detail Belt Sanders:Small and narrow belts for sanding tight spots and edges.
Selecting The Correct Grit
Choosing the right sanding belt grit makes your work smooth and efficient. Different grits serve different purposes.
- Coarse Grit (40-60):Removes old paint or rough surfaces fast.
- Medium Grit (80-120):Smooths wood and removes small scratches.
- Fine Grit (150-220):Prepares furniture for finishing and polishing.
Safety Features To Look For
Safety is important when using a belt sander. Certain features help protect you from accidents.
- Automatic Belt Tracking:Keeps the belt aligned to avoid slipping off.
- Dust Collection Port:Connects to a vacuum to reduce dust in the air.
- Safety Switch:Prevents accidental start-up of the sander.
- Ergonomic Handles:Provide a firm grip and reduce hand fatigue.

Credit: www.homebuilding.co.uk
Preparing Your Workspace
Setting up your workspace is important before using a belt sander on furniture. A clean and well-lit area helps you work safely and efficiently.
Taking time to prepare will make sanding easier and protect your furniture from damage.
Clearing And Organizing
Remove any clutter from your workspace. Clear surfaces and floors around your sanding area. Keep tools and materials organized to avoid accidents.
- Move furniture or items not being sanded out of the way
- Arrange sanding tools within easy reach
- Keep cords and hoses untangled and out of walk paths
- Have a stable workbench or platform for your furniture
Proper Lighting Setup
Good lighting helps you see the surface clearly and avoid missing spots. Use bright, even lights without shadows to inspect your work.
| Lighting Type | Best Use |
| Overhead LED Lights | General workspace illumination |
| Adjustable Desk Lamp | Focus on detailed areas |
| Natural Daylight | True color and surface view |
Dust Collection Methods
Sanders create a lot of dust that can harm your lungs and make a mess. Use dust collection tools to keep the air clean and your workspace tidy.
- Connect a vacuum to your belt sander if possible.
- Wear a dust mask or respirator for safety.
- Use plastic sheets or tarps to catch dust on floors.
- Clean dust regularly during breaks to avoid buildup.
Setting Up The Belt Sander
Using a belt sander for furniture needs careful setup. Proper setup helps you work safely and get smooth results.
This guide covers installing the sanding belt, adjusting belt tension, and checking belt tracking.
Installing The Sanding Belt
Turn off and unplug the sander before installing the belt. Open the belt cover to access the rollers.
Slide the sanding belt onto the rollers. Make sure the arrows on the belt point in the correct direction.
- Wear gloves to protect your hands.
- Check the belt size matches your sander.
- Close the cover tightly after installation.
Adjusting Belt Tension
Proper belt tension keeps the sanding belt tight. Too loose or too tight can cause poor sanding or damage.
Use the tension knob or lever on your sander. Turn it until the belt feels firm but can still move freely.
- Check your sander’s manual for correct tension settings.
- Adjust slowly and test belt movement by hand.
- Do not force the belt if it is too tight.
Checking Belt Tracking
Belt tracking controls how the belt moves on the rollers. Good tracking keeps the belt centered.
Turn the sander on briefly and watch the belt. Use the tracking knob to move the belt left or right as needed.
- Stop the sander before adjusting tracking.
- Make small adjustments for smooth belt movement.
- Proper tracking prevents belt slipping off the rollers.
Techniques For Effective Sanding
Using a belt sander on furniture needs care and good techniques. Sanding well makes the wood smooth and ready for finish.
Follow these tips to use your belt sander safely and get great results on your furniture projects.
Maintaining Consistent Pressure
Keep steady pressure on the belt sander while working. Too much pressure can damage the wood.
Let the sander do the work by moving it evenly over the surface. Pressing hard will make uneven spots.
- Hold the sander firmly but not too tight
- Move the sander at a steady speed
- Check the surface often for smoothness
Sanding With The Grain
Always sand in the direction of the wood grain. This prevents scratches and keeps the surface smooth.
Sanding across the grain leaves marks that are hard to fix later. Follow the lines of the wood fibers.
- Look for the wood grain direction before sanding
- Move the sander along the grain length
- Use lighter pressure on edges and curves
Avoiding Gouges And Dents
Keep the sander flat on the surface to avoid deep marks. Tilting it can cause gouges and dents.
Do not stop the sander while it touches the wood. Lift it first before moving to a new spot.
- Hold the sander flat and steady
- Lift the sander when changing position
- Check the wood often for damage
Handling Different Furniture Surfaces
Using a belt sander on furniture requires care and skill. Different surfaces need different sanding techniques.
Knowing how to handle flat, curved, and delicate areas helps protect the furniture and get smooth results.
Sanding Flat Surfaces
Flat surfaces are the easiest to sand with a belt sander. Keep the sander flat and move it evenly across the wood.
Use long, steady strokes to avoid leaving marks. Let the sander do the work without pressing too hard.
- Start with coarse grit to remove rough spots
- Switch to finer grit for a smooth finish
- Always sand with the grain of the wood
Working On Curves And Edges
Curves and edges need gentle handling. The belt sander can be too aggressive in these areas.
Use light pressure and keep the sander moving to avoid gouges or uneven sanding.
- Sand edges at a slight angle
- Use finer grit sandpaper for curves
- Consider hand sanding tight spots after
Dealing With Veneer And Delicate Areas
Veneer and delicate parts can easily get damaged by a belt sander. Use extra caution in these spots.
Lower the speed and apply very light pressure. Test on a small area first to avoid mistakes.
- Avoid sanding too long in one place
- Use very fine grit sandpaper
- Hand sand if the area feels too fragile
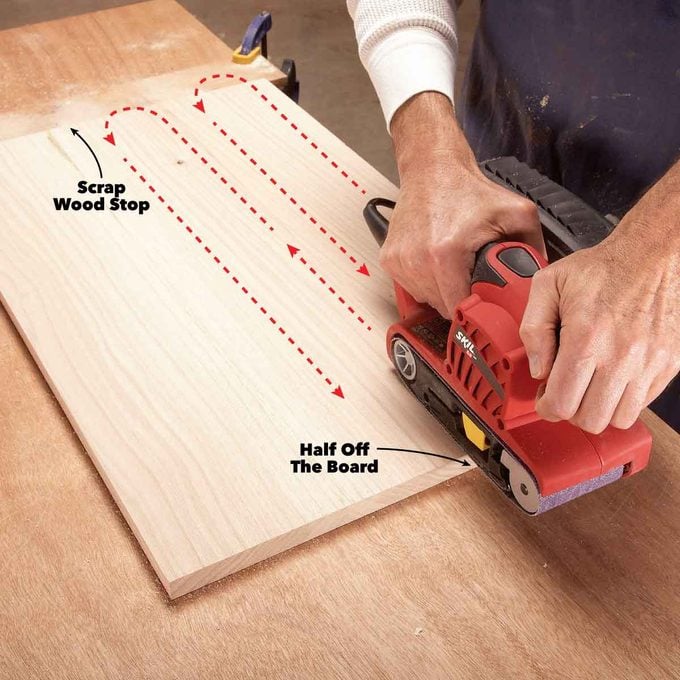
Credit: www.familyhandyman.com
Finishing Touches After Sanding
After sanding furniture with a belt sander, the work is not done. You need to clean, check, and prepare the surface before applying any finish.
This guide covers key steps to make your furniture ready for staining or painting. These steps help achieve a smooth and clean finish.
Removing Dust Residue
Dust left on wood can ruin paint or stain. Use a soft brush or vacuum to remove loose dust. Then wipe the surface with a damp cloth or tack cloth for best results.
Inspecting For Smoothness
Check the surface carefully for rough spots or scratches. Run your hand lightly over the wood to feel for uneven areas. Sand any rough patches again with fine-grit sandpaper.
- Look for gouges or deep scratches
- Sand those areas gently
- Remove sanding dust again
- Repeat inspection until smooth
Preparing For Staining Or Painting
| Preparation Step | Purpose | Tips |
| Clean Surface | Remove dust and oils | Use tack cloth or damp rag |
| Apply Wood Conditioner | Even stain absorption | Use on soft woods like pine |
| Choose Proper Primer | Better paint adhesion | Match primer to paint type |
| Test Finish | Check color and coverage | Apply on hidden spot first |
Maintaining Your Belt Sander
Keeping your belt sander in good shape helps it work longer and better. Regular care prevents problems and saves time on repairs.
Simple maintenance steps will keep your tool safe and efficient for all furniture projects.
Cleaning The Tool
Clean your belt sander after each use to remove dust and debris. This keeps parts from clogging and stops overheating.
- Unplug the sander before cleaning.
- Use a soft brush to clear dust from vents and rollers.
- Wipe the outside with a dry cloth.
- Check for dust buildup under the sanding belt.
- Use compressed air to blow out hard-to-reach areas.
Replacing Worn Belts
Change sanding belts once they look worn or tear. Old belts reduce sanding quality and can damage your furniture.
| Signs to Replace Belt | What to Do |
| Frayed edges | Remove and discard the belt safely. |
| Loss of grit | Install a new belt for better sanding. |
| Slipping belt | Adjust tension or replace the belt. |
| Visible tears or holes | Do not use; replace immediately. |
Regular Maintenance Tips
Routine checks help catch small problems before they grow. Keep your sander ready for any job with these tips.
- Check the power cord for cracks or damage.
- Test the switch and safety features regularly.
- Lubricate moving parts as instructed in the manual.
- Tighten any loose screws or bolts.
- Store the sander in a dry, clean place.
Frequently Asked Questions
How Do You Use A Belt Sander Safely?
To use a belt sander safely, always wear protective eyewear and a dust mask. Ensure the work area is clean and well-lit. Secure your furniture piece before sanding. Hold the sander firmly with both hands and keep cords away from the sanding area to avoid accidents.
What Grit Sandpaper For Furniture Sanding?
For furniture sanding, start with 80-grit sandpaper to remove old finishes. Progress to 120-grit for smoothing surfaces. Finish with 180-grit or 220-grit for a polished look. Adjust grit based on the wood type and desired finish, ensuring a smooth and even surface.
Can A Belt Sander Remove Paint From Wood?
Yes, a belt sander can remove paint from wood efficiently. Start with a coarse grit to strip paint layers. Gradually switch to finer grits for smoothing. Ensure consistent movement to avoid gouging. Always check the wood’s condition and adjust pressure to prevent damage during the paint removal process.
How To Maintain A Belt Sander?
To maintain a belt sander, regularly clean the dust bag and vents to prevent clogging. Inspect the sanding belt for wear and replace it as needed. Check and tighten any loose screws or bolts. Store the sander in a dry place to avoid moisture damage and ensure its longevity.
Conclusion
Using a belt sander can make furniture sanding faster and easier. Always keep the sander moving to avoid uneven spots. Choose the right sandpaper grit for smooth results. Wear safety gear to protect your eyes and hands. Take your time and work patiently for the best finish.
These tips help you use a belt sander safely and well. Enjoy creating beautiful furniture with confidence and care.