Are you looking to plant seeds more easily and with better results? A garden dibber might be just what you need.
This simple tool helps you make perfect holes in the soil for your seeds, saving you time and effort. But using it the right way can make all the difference in your garden’s success. Keep reading to discover practical tips that will help you get the most out of your garden dibber and watch your plants thrive from the very start.
Your garden will thank you!
Choosing The Right Dibber
A garden dibber helps plant seeds or seedlings easily. Picking the right dibber makes your planting work faster and neater.
Look at materials, sizes, and special features to find a dibber that suits your garden and comfort needs.
Materials And Sizes
Dibbers come in different materials like wood, plastic, and metal. Each type has its benefits and drawbacks.
| Material | Pros | Cons |
| Wood | Natural feel, durable | Can crack or warp |
| Plastic | Lightweight, cheap | Less durable, can break |
| Metal | Strong, long-lasting | Heavier, can rust |
Sizes vary to match different seed depths and soil types. Pick a size that fits the plants you grow most.
Types Of Dibbers
- Pointed dibbers for small seeds and tight spaces
- Hollow dibbers to make holes for bulbs or larger seeds
- Multi-hole dibbers to plant many seeds at once
- Adjustable dibbers with depth markers for precision
Choose a type based on the seeds you plant and how deep they need to go in the soil.
Ergonomic Features
Ergonomic dibbers reduce hand strain and improve comfort. Look for features like soft handles or angled grips.
- Rubber or padded handles for better grip
- Curved shapes to fit the hand naturally
- Lightweight design to avoid fatigue
- Non-slip surfaces for use in wet soil
Preparing The Soil
Preparing the soil is important before using a garden dibber for seed planting. Good soil helps seeds grow strong and healthy.
Taking time to prepare the soil makes planting easier and improves seed success.
Soil Texture And Moisture
Soil texture affects how well seeds can grow. Loamy soil with a mix of sand, silt, and clay works best.
Soil should be moist but not too wet. Moist soil helps the dibber create holes easily.
- Test soil by feeling it between fingers
- Soil that crumbles easily is ideal
- Water soil lightly if it feels dry
- Avoid planting in waterlogged soil
Clearing Debris
Remove sticks, stones, and old roots from the soil. These can block the dibber and damage seeds.
Clearing debris gives seeds space to grow and helps the dibber make clean holes.
- Use a rake or your hands to clear the soil surface
- Pick out any large stones or plant remains
- Break up large clumps of soil
Creating Optimal Conditions
Prepare the soil bed so it is level and loose. This helps the dibber work well and seeds to settle.
Lightly firm the soil after making holes to keep seeds in place and protect them from birds.
- Use a garden fork or hoe to loosen soil
- Level the surface with a rake
- Make holes with the dibber at the right depth
- Press soil gently around planted seeds
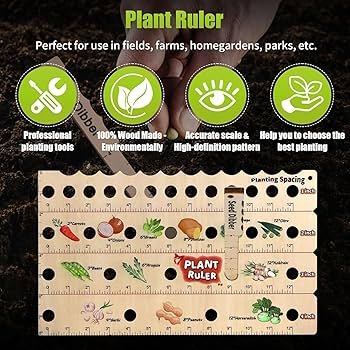
Marking Planting Spots
Using a garden dibber helps you mark exact spots for planting seeds. It makes your garden neat and organized.
Proper marking saves time and ensures plants grow well without crowding each other.
Spacing Seeds Accurately
A garden dibber helps keep space between seeds just right. Correct spacing stops plants from competing for sunlight and nutrients.
Mark spots at the right distance before planting. This makes it easier to place seeds evenly.
- Use the dibber to poke holes at set intervals
- Follow seed packet spacing instructions
- Measure distance with a ruler or tape
- Mark each spot clearly for easy planting
Using Dibber Depth Guides
Planting seeds at the right depth helps them grow strong. A dibber with depth marks makes this simple.
Use the depth guide to push holes to the correct level. This keeps seeds safe and encourages healthy roots.
- Check seed packet for recommended depth
- Use dibber’s depth marks as a guide
- Press dibber straight down to make holes
- Fill holes gently after planting seeds

Credit: www.amazon.ca
Planting Seeds With A Dibber
A garden dibber is a simple tool used to make holes in soil. It helps plant seeds evenly and quickly.
Using a dibber saves time and ensures seeds are planted at the right depth. This improves seed growth.
Creating Uniform Holes
Make holes that are the same size and shape for even seed planting. Use the dibber straight down into the soil.
Space the holes evenly to give each seed enough room to grow. This helps plants stay healthy.
- Hold the dibber vertically
- Press firmly into the soil
- Pull out carefully to keep the hole intact
- Repeat at regular distances
Adjusting Depth For Seed Type
Different seeds need different depths for planting. Use the dibber to control how deep you make the holes.
Check the seed packet for the recommended depth. Adjust the dibber’s insertion depth to match this advice.
- Small seeds: shallow holes, about 1/4 inch
- Medium seeds: moderate depth, 1/2 inch
- Large seeds: deeper holes, 1 inch or more
Inserting Seeds Properly
Place the seeds gently into the holes made by the dibber. Avoid dropping seeds from a height.
Cover the seeds with soil lightly. Press the soil down softly to keep seeds in place without harming them.
- Use fingers or a small tool to place seeds
- Cover holes with loose soil
- Pat soil gently to secure seeds
- Water seeds carefully after planting
Maintaining Your Dibber
A garden dibber helps you plant seeds easily. Keeping it clean and sharp makes planting better. Good care also makes your dibber last longer.
Here are tips on cleaning, storing, and fixing your dibber. Follow these to keep your tool in top shape.
Cleaning Techniques
Clean your dibber after each use. Dirt and sap can build up and cause damage. Use water and a soft brush to remove soil. Dry it well before storing.
- Rinse dibber with water right after use
- Use a brush to clean stuck soil
- Dry thoroughly to stop rust
- Apply a light coat of oil for metal dibbers
Storage Tips
Store your dibber in a dry place to keep it from rusting or rotting. Hang it or keep it in a toolbox. Avoid leaving it outside in rain or sun.
| Storage Method | Benefit |
| Hanging on a wall hook | Keeps tool dry and off the ground |
| In a toolbox | Protects from dust and moisture |
| Wrapped in cloth | Prevents scratches and moisture |
Sharpening And Repairs
A sharp dibber pierces the soil easily. Check the tip for damage before use. Use a file or sandpaper to sharpen the point. Repair wooden handles if they crack.
- Check the dibber tip for dullness or cracks
- Use a metal file to sharpen metal tips
- Sand wooden points smooth before sharpening
- Glue or replace cracked wooden handles
- Test sharpness by pressing lightly into soft soil

Credit: www.amazon.ca
Common Mistakes To Avoid
Using a garden dibber helps plant seeds quickly and neatly. Many gardeners make simple errors that harm seed growth. Avoiding these mistakes improves your garden’s success.
Read these tips on common mistakes to avoid when planting seeds with a dibber. Correct use leads to better germination and stronger plants.
Incorrect Depth
Planting seeds too deep or too shallow is a common error. The seed may not get enough light or moisture to sprout well. Use the dibber to make holes at the right depth for each seed type.
- Check seed packet instructions for recommended depth
- Adjust dibber depth carefully before planting
- Mark the dibber handle to measure depth if needed
- Plant small seeds shallower than larger ones
Overcrowding Seeds
Putting too many seeds in one hole causes overcrowding. Plants compete for water, nutrients, and space. This weakens growth and increases disease risk.
| Common Seed | Recommended Seeds per Hole | Spacing Between Holes |
|---|---|---|
| Carrot | 1-2 | 2-3 inches |
| Radish | 2-3 | 1-2 inches |
| Peas | 3-4 | 3-4 inches |
Ignoring Soil Conditions
Using a dibber without checking soil can cause poor seed growth. Soil that is too hard or too wet affects planting depth and seed health.
Tips to prepare soil before using a dibber:
- Loosen soil to a fine texture for easy dibber use
- Remove rocks and debris that block the dibber
- Ensure soil is moist but not waterlogged
- Test soil drainage to avoid standing water
Advanced Planting Techniques
Using a garden dibber can speed up planting and help with seed depth. It also makes planting bulbs and cuttings easier. Advanced techniques improve your garden’s growth.
Learn how to use dibbers with different tools and for various plants. These tips save time and improve your planting results.
Using Dibbers For Bulbs And Cuttings
A dibber creates perfect holes for bulbs and cuttings. It controls the depth and keeps soil loose around the plant base. This helps roots grow better.
- Choose a dibber size that fits the bulb or cutting.
- Push the dibber straight down to the correct depth.
- Place the bulb or cutting gently into the hole.
- Fill the hole with soil, pressing lightly to hold the plant.
- Water the planted area immediately to settle the soil.
Combining Tools For Efficiency
Use a dibber with other tools to speed up planting. For example, pair it with a hand trowel or soil scoop. This combination saves time and effort.
| Tool Combination | Use |
| Dibber + Hand Trowel | Dig holes and move soil quickly |
| Dibber + Soil Scoop | Place seeds and cover with soil easily |
| Dibber + Garden Fork | Loosen soil before planting |
| Dibber + Watering Can | Water seeds after planting |

Credit: www.amazon.ca
Frequently Asked Questions
What Is A Garden Dibber Used For?
A garden dibber creates holes in soil for planting seeds or seedlings. It ensures correct depth and spacing for healthy growth.
How Do I Use A Garden Dibber For Seeds?
Press the dibber into soil to make holes. Drop seeds in, then cover with soil. This helps seed germination and root development.
What Are The Benefits Of Using A Garden Dibber?
A dibber saves time, ensures uniform planting depth, and reduces seed waste. It promotes better seed-to-soil contact for improved germination.
Can A Garden Dibber Be Used For All Seed Types?
Yes, a dibber works well with most seeds and seedlings. Adjust hole depth based on seed size and plant requirements.
Conclusion
Mastering the use of a garden dibber enhances your planting process. This simple tool ensures seeds are planted at the right depth. You’ll notice healthier plant growth. Consistency is key. Practice makes perfect. Start with small areas and gradually increase.
Soon, you’ll plant like a pro. Remember to clean the dibber after use. It prolongs its life. A well-maintained garden tool serves you better. Happy planting! Enjoy watching your garden thrive with each seed planted just right.