If you’ve ever tried installing crown molding, you know how tricky those angled cuts can be. Using a miter saw for crown molding might seem intimidating, but with the right tips, you can make clean, precise cuts that fit perfectly.
Imagine the satisfaction of seeing your crown molding look professionally done—no gaps, no mistakes. You’ll discover simple, effective tips that will help you master your miter saw and get your crown molding projects done faster and easier. Ready to take your skills to the next level?
Let’s dive in.
Credit: sawdustgirl.com
Choosing The Right Miter Saw
Choosing the right miter saw is important for cutting crown molding accurately. The right saw helps you make clean, precise cuts easily.
There are many types of miter saws and blades. Safety features also matter when working with sharp tools.
Types Of Miter Saws
Miter saws come in three main types. Each type suits different cutting needs for crown molding.
- Standard Miter Saw: Cuts angles left and right. Good for simple projects.
- Compound Miter Saw: Tilts to cut bevels and angles. Useful for angled crown molding.
- Sliding Compound Miter Saw: Has a sliding arm to cut wider boards. Best for large crown molding pieces.
Blade Selection For Crown Molding
Blade choice affects the smoothness of cuts on crown molding. Use blades designed for fine woodworking.
- Choose a blade with 60 to 80 teeth for clean cuts.
- Look for carbide-tipped blades for longer life and sharpness.
- Thin kerf blades reduce waste and make smoother cuts.
Safety Features To Consider
Safety is key when using miter saws. Look for saws with built-in safety features to protect yourself.
- Blade guards cover the blade when not cutting.
- Electric brakes stop the blade quickly after cutting.
- Clamps hold the molding firmly in place.
- Non-slip bases keep the saw steady during use.
Credit: sawdustgirl.com
Preparing Your Workspace
Using a miter saw for crown molding needs a clean and safe workspace. Preparing your area helps you work faster and safer.
Good preparation reduces mistakes and keeps your project on track. Focus on setting up your tools and space well.
Setting Up A Stable Workbench
A stable workbench holds your miter saw firmly. It stops the saw from moving while you cut.
Check that the bench is level and strong. Use clamps to secure your molding pieces during cuts.
- Choose a flat, sturdy surface
- Use non-slip mats or pads
- Clamp down your workpieces
- Keep the bench clear of clutter
Organizing Tools And Materials
Keep all your tools and molding close by. This saves time and stops distractions.
Arrange your saw blades, measuring tape, pencil, and safety gear within easy reach.
- Group measuring tools together
- Place saw blades near the saw
- Keep pencils and markers handy
- Store safety glasses and gloves nearby
Ensuring Proper Lighting
Bright light helps you see cut lines clearly. It lowers the chance of mistakes.
Use natural light or add lamps to brighten your work area. Avoid shadows on your workbench.
- Work near windows if possible
- Use adjustable LED lamps
- Check lighting before starting cuts
- Remove objects that cast shadows
Measuring And Marking Crown Molding
Measuring and marking crown molding correctly is key for a neat finish. It helps you cut pieces that fit perfectly together.
Using the right tools and techniques makes the job easier and reduces waste. Let’s look at how to measure and mark crown molding properly.
Accurate Measurements
Start by measuring the wall length where the crown molding will go. Use a tape measure that is easy to read.
Measure twice to avoid mistakes. Mark the exact length on the molding before cutting.
- Hold the tape measure straight along the wall
- Note the length at the corner points
- Mark the molding with a pencil clearly
Marking Angles Correctly
Crown molding usually meets at corners with angled cuts. Mark the angles on the molding before cutting to match the wall corners.
Use a protractor or angle finder to get the correct angle. Mark the cut line clearly with a pencil.
- Place the angle tool on the corner
- Read the angle measurement
- Transfer the angle to the molding piece
- Draw a straight line for the saw guide
Using Templates And Guides
Templates and guides help make consistent and precise marks. They are especially useful for complex angles and repeated cuts.
Buy or make a template that fits your molding size. Use it to mark all pieces before cutting to save time.
- Trace the template outline on the molding
- Use a guide block on the saw to keep cuts straight
- Check each marked piece against the template before cutting
Adjusting Miter And Bevel Angles
Cutting crown molding needs precise angle adjustments on your miter saw. Setting the right miter and bevel angles helps create clean, perfect joints. This guide explains how to adjust these angles for crown molding.
Understanding common angles and bevel directions improves your cutting accuracy. Always double-check your settings before making cuts to avoid mistakes and wasted materials.
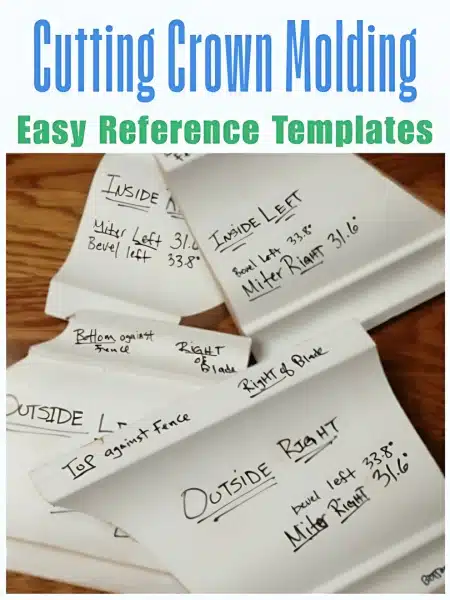
Common Angles For Crown Molding
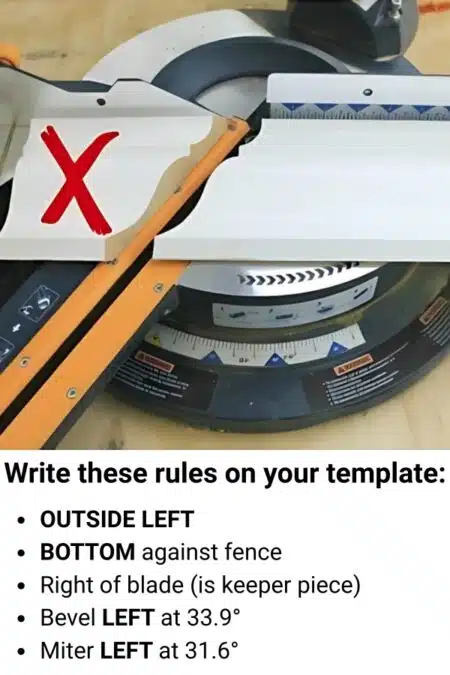
Crown molding usually fits at a 45-degree angle, but the exact miter and bevel settings depend on the wall angle and molding spring angle. Most walls are 90 degrees, but some may vary.
- Miter angle: 31.6 degrees
- Bevel angle: 33.9 degrees
- Common spring angle of molding: 38 degrees
- Wall angle: typically 90 degrees
These angles work for standard crown molding with a 38-degree spring. Adjust if your molding or wall angles differ.
Setting Positive And Negative Bevels
The bevel angle tilts the saw blade inward or outward. A positive bevel tilts the blade to the right. A negative bevel tilts it to the left. This tilt helps match the crown molding’s profile.
- Positive bevel: blade tilts right
- Negative bevel: blade tilts left
- Adjust bevel based on the corner and molding side
- Check molding orientation before setting bevel
Use the right bevel direction to avoid gaps in corners. Mark your molding and test cuts to confirm the correct bevel.
Double Checking Angles Before Cutting
Always check your miter and bevel angles twice before cutting. Mistakes waste molding and time. Use a protractor or angle finder to verify angles.
- Set the saw to the desired miter and bevel
- Use a scrap piece of molding to test the cut
- Hold test cuts together to check fit
- Adjust angles if the joint does not fit tightly
- Only cut the final piece when test cuts fit perfectly
Taking time to double-check helps you avoid costly errors and ensures your crown molding looks professional.
Cutting Techniques For Precision
Cutting crown molding with a miter saw needs care and accuracy. Precise cuts help the molding fit snugly and look neat.
This guide covers key tips to improve your cutting skills. You will learn how to position the molding, make test cuts, and handle tricky corners.
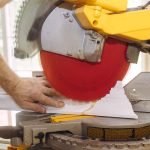
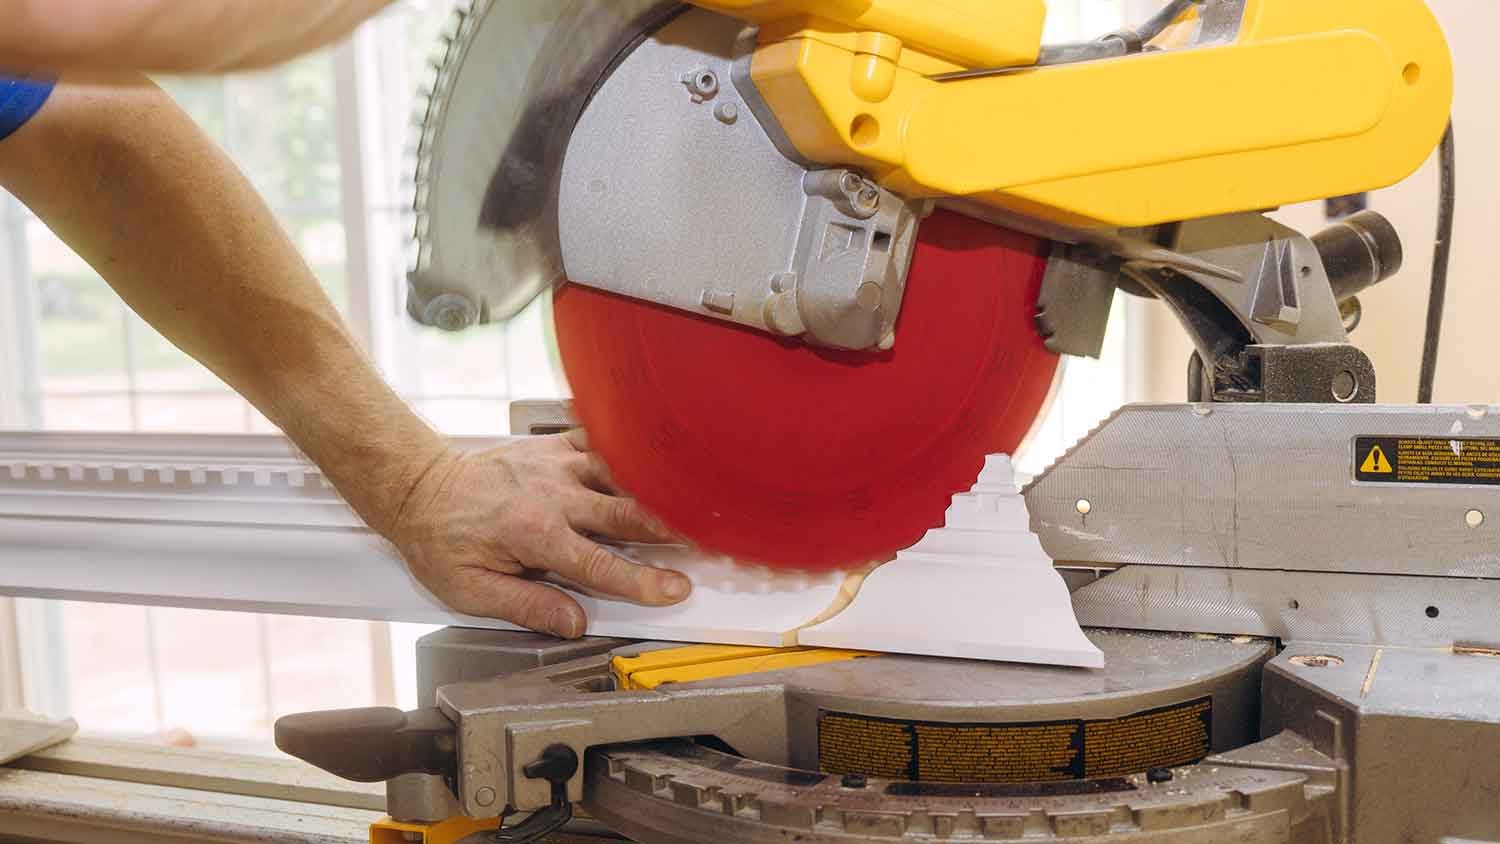
Positioning The Crown Molding
Hold the crown molding the same way it will sit on the wall. The back edges should touch the saw fence and base.
Keep the molding upside down on the saw. This matches how it will sit on the wall and helps make accurate cuts.
- Place the bottom edge against the saw base
- Press the top edge against the fence
- Secure the molding so it does not move
Making Test Cuts
Test cuts help check your angles before cutting the real molding. Use scrap wood or extra pieces for tests.
Adjust the saw angles if the test cuts do not fit well. Take your time with this step to avoid mistakes.
- Cut scrap molding at the same angle
- Check if the pieces fit together tightly
- Fine-tune the saw angle as needed
Handling Inside And Outside Corners
Inside corners need a different angle than outside corners. Set your saw to the correct miter and bevel angles.
Cut the molding with the crown upside down and test both corners carefully. Small angle changes can improve the fit.
- Inside corners: cut with opposite angles on each piece
- Outside corners: cut pieces to wrap around the corner
- Use test cuts to check corner fits before final cuts
Joining And Fitting Crown Molding
Fitting crown molding requires careful cuts and precise joining. Using a miter saw helps create clean angles for corners and joints.
Proper alignment and secure fastening ensure the molding looks seamless and professional.
Aligning Cut Pieces
Make sure the cut edges meet tightly at the corners. Check that the molding sits flush against the wall and ceiling.
Use clamps or a helper to hold pieces in place before fastening. Small adjustments can fix uneven cuts or angles.
Using Adhesives And Fasteners
Apply wood glue along the cut edges for a strong bond. Nail the molding to the wall studs or ceiling joists to hold it firmly.
- Apply a thin layer of wood glue on the joint surfaces.
- Press the molding pieces together and wipe off excess glue.
- Use finishing nails to attach the molding to the wall or ceiling.
- Drive nails at an angle to avoid splitting the wood.
- Fill nail holes with wood putty for a smooth finish.
Filling Gaps And Seams
Small gaps between molding pieces are normal. Use wood filler or caulk to close these gaps before painting.
| Material | Use For | Tip |
| Wood Filler | Small nail holes and wood gaps | Sand smooth after it dries |
| Painter’s Caulk | Gaps between molding and wall | Apply with a caulk gun for control |
| Spackle | Minor surface cracks | Paint over after it hardens |
Maintaining And Caring For Your Miter Saw
Taking good care of your miter saw keeps it working well and safe. Regular maintenance helps you make precise cuts every time.
Simple habits like cleaning, blade care, and calibration extend the life of your saw. These tips will guide you through basic maintenance tasks.
Regular Cleaning
Dust and debris build up after each use. Clean your miter saw often to stop damage and keep it running smoothly.
Use a brush or compressed air to remove sawdust from the blade, table, and moving parts. Wipe down surfaces with a dry cloth.
- Disconnect power before cleaning
- Remove sawdust from vents and motor area
- Keep the table surface free of sticky residue
- Clean the fence and bevel adjustment points
Blade Maintenance
A sharp, clean blade cuts better and is safer. Check the blade for dullness or damage before each use.
Remove the blade to clean it with a soft brush and mild detergent. Replace the blade if teeth are broken or worn out.
- Use the right blade for crown molding
- Keep blades dry to prevent rust
- Tighten the blade securely after cleaning
- Wear gloves when handling the blade
Calibrating The Saw
Calibration ensures your cuts are accurate. Check your saw’s angle settings regularly to avoid mistakes.
Use a square or angle finder to test the blade angle and fence alignment. Adjust screws or dials to fix any errors.
- Check the 0-degree miter and bevel settings
- Test cuts on scrap wood before working on molding
- Tighten all locking knobs after adjustments
- Recalibrate after moving or transporting the saw
Credit: sawdustgirl.com
Frequently Asked Questions
What Is The Best Miter Saw For Crown Molding?
When choosing a miter saw for crown molding, consider a sliding compound miter saw. These offer versatility and precision. Ensure it has a laser guide for accuracy. A 10 or 12-inch blade size is ideal. Look for features like positive stops for common angles.
This ensures smooth and accurate cuts.
How Do You Cut Crown Molding Corners?
To cut crown molding corners, use a miter saw. Set the saw to a 45-degree angle. Position the molding upside down against the saw fence. Make sure the edge of the molding is flush. Cut slowly for a clean edge.
Practice on scrap pieces first to perfect your technique.
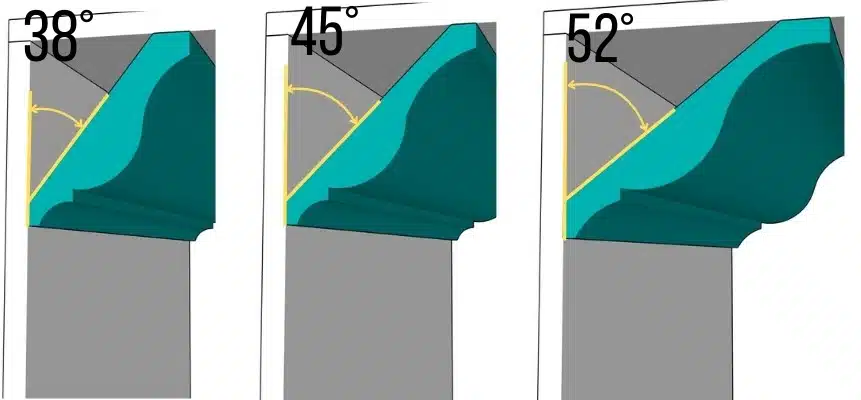
What Angle Do You Cut Crown Molding?
When cutting crown molding, the common angle is 45 degrees. However, some crown moldings require adjustments. The spring angle, typically 38, 45, or 52 degrees, affects this. Check the manufacturer’s recommendation for the exact angle. Use your miter saw’s adjustable settings to achieve the best fit.
Can You Use A Miter Saw For Inside Corners?
Yes, a miter saw is perfect for inside corners. Set the saw to 45 degrees to cut two pieces. Position one piece upright against the saw fence. Cut slowly to ensure a clean edge. For a perfect fit, test the cuts before final installation.
Conclusion
Using a miter saw for crown molding takes practice and care. Always measure twice and cut once to avoid mistakes. Keep the saw blade sharp and clean for smooth cuts. Take your time to set angles correctly before cutting. Safety matters—wear goggles and keep hands clear.
With patience and these tips, your crown molding will fit nicely and look great. Enjoy creating a polished finish for your room with confidence and ease.