Are you ready to transform your woodworking projects from ordinary to extraordinary? If you’ve ever struggled with getting that perfectly smooth finish on your wood pieces, a power planer might just be your new best friend.
This tool is not just for the seasoned carpenter; it’s a game-changer for anyone who loves working with wood. Imagine effortlessly gliding over surfaces, removing imperfections, and achieving a professional quality finish. In this guide, you’ll discover essential tips that will not only help you use a power planer effectively but also enhance the quality of your work.
Stick around, because mastering this tool could be the secret to elevating your woodworking skills to a whole new level.

Credit: www.familyhandyman.com
Choosing The Right Power Planer
Using a power planer can help you shape wood quickly and smoothly. Picking the right one makes your work easier and better.
There are different types of power planers. Each has features that fit certain tasks. Knowing these helps you choose the best tool.
Types Of Power Planers
Power planers come in handheld and benchtop styles. Handheld planers are easy to carry and good for small jobs.
Benchtop planers are larger and fit on a table. They are best for big wood pieces and heavy work.
- Handheld planers: light, portable, for small or detailed work
- Benchtop planers: heavy, stable, for large or thick wood
Blade Selection
Blades are key parts of a power planer. Sharp blades cut wood cleanly and smoothly. Dull blades make rough cuts and slow work.
Look for blades made of strong steel. Some blades last longer and stay sharp with less effort.
- High-speed steel blades: affordable and good for soft wood
- Tungsten carbide blades: last longer and cut hard wood well
- Replace or sharpen blades often for best results
Power And Size Considerations
Planer power affects how well it cuts wood. Higher power helps cut thick or hard wood faster. Lower power suits thin or soft wood.
The size of the planer also matters. A wider cutting width lets you work on bigger boards quicker. A smaller planer is easier to control on tight spots.
| Feature | What to Consider |
|---|---|
| Power (Amps or Watts) | Choose higher power for tough wood and big jobs |
| Cutting Width | Wider blades cut more wood in one pass |
| Weight and Size | Lighter planers are easier to handle on small projects |

Credit: www.findbuytool.com
Preparing Wood For Planing
Preparing wood correctly helps you get the best results from your power planer. Proper preparation protects your tools and makes your work easier.
Start by checking the wood and clearing any obstacles. Mark areas that need planing to guide your work. Follow these tips to prepare well.
Checking Wood Moisture
Wood with too much moisture can clog blades and cause rough finishes. Dry wood planes smoother and lasts longer.
- Use a moisture meter to check wood moisture level.
- Ideal moisture content is usually between 6% and 8% for indoor projects.
- Let wood dry in a well-ventilated area if moisture is too high.
Removing Nails And Debris
Check wood for nails, screws, or other metal objects. These can damage your planer blades and cause accidents.
| Tools to Remove Nails and Debris | Purpose |
| Magnet | Find hidden nails or screws |
| Pliers | Pull out nails and small debris |
| Hammer | Remove embedded nails carefully |
Marking Planing Areas
Mark the areas you want to plane to keep your work precise. Clear marks help you avoid over-planing or missing spots.
- Use a pencil to draw light lines on the wood surface.
- Mark edges and corners that need smoothing.
- Check your marks often during planing to stay on track.
Setting Up The Power Planer
Setting up your power planer correctly helps you work safely and accurately. It prepares you for smooth and even wood surfaces.
Learn how to adjust the depth, secure the wood, and use safety gear before you start planning.
Adjusting Depth Settings
Set the depth of cut to control how much wood the planer removes. Start with a shallow cut to avoid damage.
- Turn off and unplug the planer before adjusting.
- Locate the depth adjustment knob or lever.
- Move the knob to set a small depth for the first pass.
- Test on scrap wood and adjust if needed.
Securing The Workpiece
Hold the wood firmly to keep it still while planing. This avoids slips and uneven cuts.
- Use clamps to fix the wood on your workbench.
- Check that the wood is flat and stable.
- Do not hold the wood with your hands alone.
- Clear the work area of any obstacles.
Safety Gear Essentials
Wear the right safety gear to protect yourself from dust and sharp blades.
| Safety Item | Purpose |
| Safety Glasses | Protect eyes from flying wood chips. |
| Dust Mask | Prevent inhaling fine wood dust. |
| Hearing Protection | Reduce noise from the power planer. |
| Gloves | Protect hands but avoid loose gloves that catch blades. |
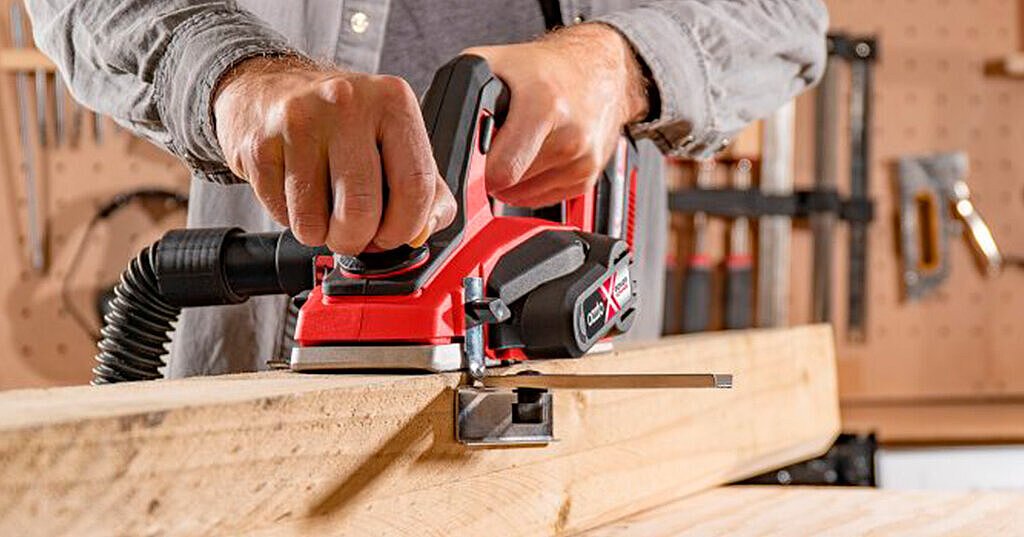
Techniques For Smooth Planing
Using a power planer correctly helps create smooth wood surfaces. Good technique makes your work look clean and professional.
Focus on steady movements and proper handling. These tips improve your planing results and prevent mistakes.
Maintaining Consistent Pressure
Keep even pressure on the planer during the entire pass. Uneven pressure can cause grooves or uneven surfaces.
Use both hands to hold the planer firmly. Let the weight of the tool help you, but guide it steadily.
- Hold the front handle to guide direction
- Apply steady pressure on the back handle
- Avoid pushing too hard, let the blade do the work
Planing With The Grain
Always plane in the direction of the wood grain. Planing against the grain can cause tear-out and rough patches.
Look closely at the wood fibers to find the grain direction. Follow it carefully for a smooth finish.
- Check wood ends for grain lines
- Start planing where the grain begins
- Adjust your angle if grain changes direction
Controlling Speed And Movement
Move the planer at a steady speed. Going too fast may cause rough surfaces, and too slow can dig deep grooves.
Keep your movements smooth and straight. Avoid sudden stops or turns to ensure even planing.
- Start with a slow, steady pace
- Increase speed as you feel comfortable
- Keep the planer flat and level
- Lift the planer at the end of the pass smoothly
Troubleshooting Common Issues
Using a power planer can save time and improve wood surface quality. Still, some common problems may occur. Knowing how to fix these issues helps keep your work smooth.
This guide covers simple tips to solve tear-out, uneven surfaces, and blade problems.
Dealing With Tear-out
Tear-out happens when wood fibers split or chip during planing. It makes the surface rough and uneven.
Use these tips to reduce tear-out:
- Plane with the wood grain, not against it.
- Use a sharp blade for clean cuts.
- Lower the depth of cut to remove less material each pass.
- Consider using a backer board to support the wood edges.
- Slow down the feed rate for better control.
Fixing Uneven Surfaces
Uneven surfaces happen if the planer is not steady or set correctly. It can leave ridges or dips.
Try these fixes to get a smooth surface:
- Check the planer’s base is flat and clean before use.
- Hold the planer firmly and move it at a steady speed.
- Adjust the depth setting evenly for consistent cuts.
- Make multiple light passes instead of one deep cut.
- Use a straight edge to check the surface and plane again if needed.
Blade Maintenance Tips
Sharp blades make planing easier and safer. Dull blades cause rough cuts and stress the motor.
Follow these tips to keep your blades in good condition:
- Clean blades regularly to remove resin and dust.
- Sharpen blades using the correct tools or replace them if needed.
- Check blade alignment to ensure even cutting.
- Store blades safely to avoid damage.
- Wear gloves when handling blades to avoid cuts.
Advanced Tips For Expert Results
Using a power planer can give your woodworking projects a smooth and professional finish. This guide shares advanced tips to help you get expert results every time you plane wood.
Follow these techniques to improve your accuracy and combine tools for better efficiency. Proper finishing after planing will also enhance the final look of your work.
Using Guide Fences
Guide fences help you keep the planer straight and steady. Attach a fence to the planer or clamp one to the wood piece. This stops the planer from drifting off course.
- Choose a straight and sturdy fence for best control.
- Adjust the fence so it runs along the edge of the wood.
- Check the fence alignment before starting the planing.
- Use clamps to secure the wood piece firmly to your workbench.
- Make light passes with the planer to avoid gouging the wood.
Combining Planing With Other Tools
Planing works well with other woodworking tools. Use a jointer, hand plane, or sanding block to prepare or finish the wood for better results.
| Tool | Purpose | Tip |
| Jointer | Flatten edges before planing | Make sure blades are sharp and aligned |
| Hand Plane | Fine tune small areas | Use light pressure and smooth strokes |
| Sanding Block | Remove small imperfections after planing | Sand with the grain to avoid scratches |
Finishing Touches After Planing
After planing, the wood surface may still need smoothing and protection. Clean the surface and apply finish to enhance durability and appearance.
Try these finishing steps:
- Use a vacuum or brush to remove dust and shavings.
- Lightly sand the surface with fine-grit sandpaper.
- Apply wood conditioner if staining.
- Choose an appropriate finish like oil, varnish, or wax.
- Apply finish evenly with a brush or cloth.
- Let each coat dry fully before adding another.

Credit: www.youtube.com
Frequently Asked Questions
How Do I Choose The Right Power Planer For Woodworking?
Select a power planer based on size, motor power, and blade quality. Consider your project needs. Lightweight models suit small jobs, while powerful ones handle larger tasks efficiently.
What Safety Tips Should I Follow Using A Power Planer?
Always wear safety goggles and ear protection. Keep hands clear of blades. Secure the wood firmly. Work in a well-lit area. Disconnect power when adjusting or changing blades.
How Can I Prevent Tear-out When Planing Wood?
Use sharp blades and take shallow passes. Plane in the wood grain direction. Apply masking tape on edges to reduce splintering. Slow, steady feed helps achieve smooth surfaces.
How Do I Maintain And Clean A Power Planer?
Regularly clean dust and debris from blades and vents. Check blade sharpness and replace if dull. Lubricate moving parts per manufacturer instructions. Store in a dry, safe place to avoid damage.
Conclusion
Using a power planer can make woodworking easier and faster. Always follow safety steps to avoid accidents. Keep the blades sharp for smooth cuts. Take your time and work with care. Practice on scrap wood to build confidence. These tips help you get good results every time.
Enjoy shaping wood with your power planer.