Are you struggling to measure angles accurately with a protractor? You’re not alone.
Many people find it tricky to line up the tool correctly or read the numbers without confusion. But what if you could master this simple skill quickly and confidently? You’ll discover clear, easy-to-follow tips that make using a protractor a breeze.
Whether you’re a student, a DIY enthusiast, or just curious, these tips will help you save time and avoid mistakes. Keep reading, and you’ll soon feel like a pro at measuring angles!

Credit: www.youtube.com
Choosing The Right Protractor
Using a protractor helps you measure angles accurately. Picking the right protractor makes your work easier.
There are many types, materials, and sizes to choose from. Understanding these options helps you find the best protractor.
Types Of Protractors
Protractors come in different shapes and designs. Each type fits specific needs and tasks.
- Half-circle protractors measure angles up to 180 degrees.
- Full-circle protractors measure up to 360 degrees.
- Digital protractors show angle measurements on a screen.
- Adjustable protractors have movable arms for drawing angles.
Materials And Durability
Protractors are made from various materials. Choose one that lasts and fits your use.
Plastic protractors are common and lightweight. Metal ones are stronger and last longer.
- Plastic is affordable and easy to handle.
- Metal resists bending and breaking.
- Transparent materials help see the paper beneath.
- Some protractors have rubber grips for better hold.
Size And Scale Options
Protractors come in various sizes and scales. Pick one that fits your project size.
Smaller protractors are easy to carry. Larger ones offer more precise readings.
- Small protractors suit quick measurements and schoolwork.
- Large protractors are good for technical drawings.
- Look for clear number markings and angle steps.
- Some have dual scales for degrees and radians.
Preparing For Angle Measurement
Using a protractor correctly starts with good preparation. This helps you get accurate angle readings every time.
Follow simple steps before measuring angles. These steps ensure the protractor is in the right place and stable.
Positioning The Protractor Correctly
Place the protractor so that its center hole or midpoint is exactly over the angle’s vertex. This is the point where the two lines meet.
Make sure the protractor lies flat and faces you directly. This avoids mistakes in reading the scale.
Aligning The Baseline
The baseline of the protractor must line up with one side of the angle. This side is called the initial side.
- Place the zero mark of the protractor on the initial side.
- Check that the baseline is straight and follows the angle’s edge.
- Hold the protractor so it does not move during measurement.
Ensuring A Stable Surface
Work on a flat, steady surface to avoid shaking or slipping. This helps keep the protractor in place.
| Surface Type | Suitability for Measuring |
|---|---|
| Wooden desk | Good – stable and flat |
| Soft fabric | Poor – causes slipping |
| Glass table | Good – smooth and flat |
| Uneven floor | Poor – unstable |
Measuring Angles Accurately
Using a protractor correctly helps you measure angles with precision. It is important to know how to read the tool well.
Accurate angle measurement is key in math, art, and construction projects. Simple tips can improve your results.
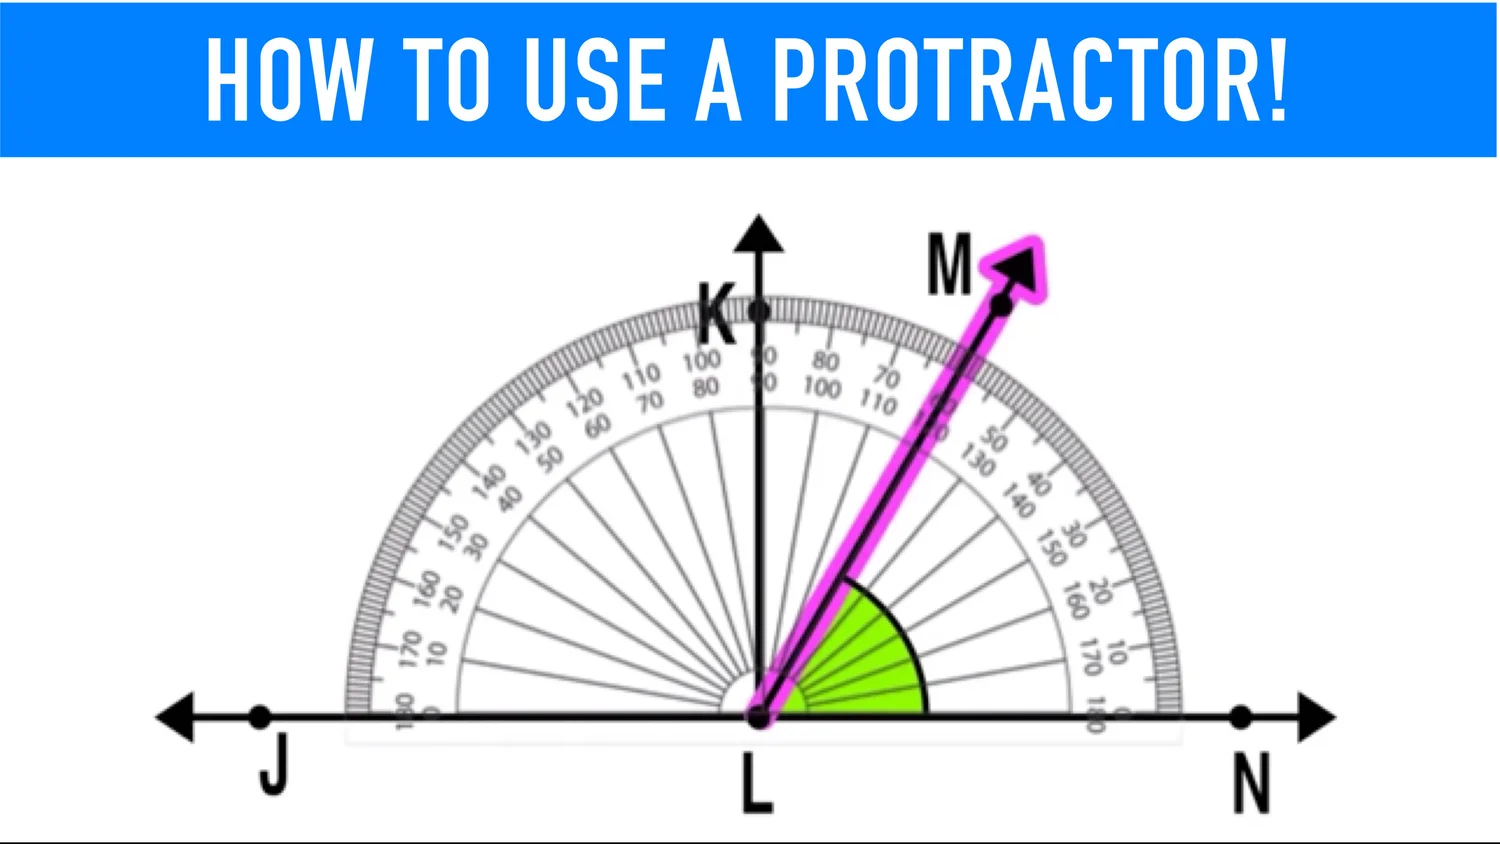
Reading Inner And Outer Scales
Most protractors have two sets of numbers around the edge. These are the inner and outer scales. You must choose the right one to measure your angle.
Start counting from zero on the scale that matches your angle’s opening. This prevents errors and gives the correct angle size.
- The inner scale usually starts at 0° on the right side.
- The outer scale starts at 0° on the left side.
- Check the direction of the angle to pick the correct scale.
Identifying The Vertex
The vertex is the point where the two lines of the angle meet. Aligning the protractor’s center hole with the vertex is essential.
If the vertex is not exactly at the center, the measurement will be wrong. Take your time to place the protractor carefully.
- Locate the angle’s vertex clearly.
- Place the protractor’s center hole over the vertex.
- Keep the protractor steady during measurement.
Avoiding Common Mistakes
Simple mistakes can cause wrong angle readings. Watch out for these common errors to get accurate results every time.
- Do not guess the angle; use the protractor’s numbers.
- Make sure the baseline of the protractor lines up with one side of the angle.
- Read the scale at the exact point where the other side crosses.
- Keep your eyes level with the protractor to avoid parallax error.
Using The Protractor For Different Angles
A protractor is a simple tool to measure and draw angles. It helps you understand how big or small an angle is.
You can use a protractor for many types of angles. Knowing how to use it for each angle type is important.
Acute Angles
Acute angles are less than 90 degrees. They look sharp and narrow. You can use a protractor to check their size.
Place the center point of the protractor on the angle’s vertex. Align the base line with one side of the angle. Read the number where the other side crosses the protractor.
- Make sure the zero line matches one angle side
- Use the inner scale for angles under 90 degrees
- Write down the measured degree
Right Angles
Right angles measure exactly 90 degrees. They form a perfect corner. A protractor can confirm if an angle is right or not.
Align the protractor base with one angle side and center it on the vertex. The other side should line up with the 90-degree mark if it is a right angle.
- Check that the zero line matches one side
- Look for the angle side on the 90-degree mark
- If it matches, the angle is right
Obtuse Angles
Obtuse angles are bigger than 90 degrees but less than 180 degrees. They look wide and open. Measuring them needs care with the protractor.
Place the protractor center on the vertex. Align the base line with one side of the angle. Read the outer scale where the other side crosses.
- Use the outer scale for angles greater than 90 degrees
- Make sure the zero line is on one side
- Note the degree shown on the outer edge
Tips For Drawing Angles With A Protractor
Using a protractor helps you draw angles accurately. It is a simple tool but needs care for best results.
Follow these tips to make your angle drawings clear and precise with a protractor.
Marking Points Precisely
Place the protractor carefully with its center on the angle’s vertex point. This ensures accuracy.
Mark the exact degree on the protractor edge with a sharp pencil dot. Avoid thick marks.
- Use the small hole or center mark on the protractor as a guide.
- Keep the protractor steady while marking points.
- Make light marks to adjust if needed.
Drawing Clear Lines
Use a ruler to connect the vertex to the marked point. This creates straight, clean lines.
Draw slowly and steadily. Clear lines help show the angle and avoid confusion.
- Start lines exactly at the vertex.
- Use a sharp pencil for thin lines.
- Erase stray marks for clarity.
Double-checking Measurements
After drawing, check the angle again with the protractor. This confirms the accuracy.
Measure from both sides if possible. This helps catch any mistakes early.
- Place the protractor back on the vertex.
- Read the angle from the correct scale on the protractor.
- Adjust lines if the measurement is off.

Credit: www.teacherspayteachers.com
Maintaining Your Protractor
A protractor is a useful tool for measuring angles. Keeping it clean and safe helps it last longer.
Proper care makes sure your measurements stay accurate every time you use it.
Cleaning Techniques
Clean your protractor regularly to remove dust and dirt. Use soft materials to avoid scratches.
- Wipe with a soft, damp cloth
- Use mild soap if needed
- Dry with a clean, soft towel
- Avoid harsh chemicals or abrasive pads
Storage Suggestions
Store your protractor in a safe place to prevent damage. Keep it flat and away from heavy items.
- Use a protective case or pouch
- Keep it in a dry area to avoid moisture
- Place it in a drawer or on a desk
- Avoid bending or putting pressure on it
When To Replace
Replace your protractor if it becomes hard to read or damaged. Cracks or faded markings affect accuracy.
- Markings are worn off or unclear
- The protractor is cracked or broken
- It does not lie flat on surfaces
- Measurements seem incorrect or off

Credit: www.youtube.com
Frequently Asked Questions
How Do You Correctly Align A Protractor For Measuring Angles?
Place the protractor’s center hole over the angle’s vertex. Align the baseline with one side of the angle. This ensures accurate angle measurement.
What Is The Best Way To Read Angles On A Protractor?
Read the inner scale for angles opening right, outer for left. Use the scale starting at zero on the baseline. This avoids confusion and errors.
Can A Protractor Measure Angles Larger Than 180 Degrees?
Standard protractors measure up to 180 degrees only. For angles larger than 180 degrees, use a full-circle protractor or calculate the reflex angle by subtraction.
How To Avoid Common Mistakes When Using A Protractor?
Ensure the protractor is flat and aligned properly. Read the correct scale and double-check measurements. Avoid parallax errors by viewing straight above.
Conclusion
Using a protractor becomes easy with practice. Remember to align it properly. Ensure the center point matches the angle’s vertex. Read the scale carefully to avoid mistakes. Start with basic angles to build confidence. Gradually move to complex ones. Consistent practice leads to accuracy.
Don’t rush the process. Take your time to understand each step. A well-measured angle makes a difference in results. Keep a calm mind and focus. With these tips, measuring angles can be simple and straightforward. Happy measuring!