Are you ready to enhance your woodworking projects with precision and confidence? Mastering the use of a tape measure is a game-changer for any woodworking enthusiast.
You might think you know how to use this simple tool, but there’s more to it than meets the eye. Imagine your projects fitting together perfectly, with no gaps or misalignments. Sounds satisfying, right? We’ll reveal essential tips and techniques that will transform how you measure, ensuring every cut is spot-on.
Dive in and discover how a tape measure can become your secret weapon for achieving flawless craftsmanship.

Credit: www.youtube.com
Choosing The Right Tape Measure
Using a tape measure correctly is very important in woodworking. Picking the right tape measure helps you get accurate cuts.
Different tape measures have different features. Choose one that fits your woodworking needs well.
Tape Length And Width
Tape length should match your typical project size. Longer tapes are good for large pieces.
Width matters for stability. Wider tapes stay straight and are easier to read.
- Short tapes (6-10 feet) for small projects
- Long tapes (25 feet or more) for big projects
- Wide tapes (1 inch or more) for better stiffness
Material And Durability
Tape measure materials affect how long they last. Metal tapes are strong but can rust.
Plastic-coated tapes resist wear and tear. Choose one that can handle workshop use.
- Steel tapes offer good strength
- Plastic or nylon coating prevents rust
- Durable cases protect the tape inside
Measurement Markings
Clear markings help you read measurements fast. Look for tape measures with bold and easy-to-see numbers.
Some tapes have both metric and imperial units. This can help if you work with different measurement systems.
- Bold, high-contrast numbers for easy reading
- Both inches and centimeters for flexibility
- Fractional markings for precise cuts
Preparing For Accurate Measurements
Accurate measurements are key in woodworking. Without them, your project can go wrong.
Preparing your tape measure and work area helps you get precise results every time.
Clearing The Work Surface
Remove clutter and dust from your workbench. A clean surface stops the tape from catching or slipping.
- Clear away tools and scraps
- Wipe the surface to remove dust
- Ensure the wood piece lies flat
- Check for nails or screws sticking out
Checking Tape Condition
Inspect your tape measure before use. Damage can cause wrong readings.
| Check Item | What to Look For |
| Tape Blade | Clean, no bends or cracks |
| Hook End | Secure and not loose |
| Lock Mechanism | Works smoothly |
| Numbers and Marks | Clear and readable |
Setting A Reliable Zero Point
Start your measurement from the right place. The zero point must match the edge of your wood.
- Use the tape hook to catch the edge
- Check that the hook moves slightly for inside and outside measurements
- Line up the zero mark exactly with the wood edge
- Hold the tape steady before reading
Measuring Techniques For Woodworking
Accurate measuring is key to good woodworking. Using a tape measure properly helps you get exact cuts and fits.
Learn simple tips to read your tape measure well. This will make your projects look clean and professional.
Using The Hook Correctly
The hook at the end of the tape measure moves slightly. This movement helps you measure inside and outside edges.
When measuring outside edges, pull the hook tight. For inside edges, press the hook against the surface.
- The hook slides to add or subtract its thickness
- This keeps measurements accurate on different surfaces
- Always check the hook moves freely before measuring
Accounting For Tape Thickness
The tape blade has thickness that can affect accuracy. If you don’t account for it, your cuts may be off.
Place the tape so the edge matches your mark. Use the hook’s movement to adjust for thickness.
- For outside measurements, hook over the edge
- For inside measurements, press hook against the surface
- This adjustment accounts for the tape’s thickness
Reading Fractional Increments
Tape measures show inches divided into smaller fractions. Knowing these helps you measure more precisely.
Common fractions on tape measures include halves, quarters, eighths, and sixteenths of an inch.
| Fraction | Decimal Equivalent |
|---|---|
| 1/2 | 0.5 |
| 1/4 | 0.25 |
| 1/8 | 0.125 |
| 1/16 | 0.0625 |
Practice reading these marks to improve your cutting and fitting accuracy.
Common Mistakes To Avoid
Using a tape measure in woodworking seems simple. Yet, many make mistakes that affect the accuracy of their work. Avoiding these errors saves time and materials.
Focus on how you handle the tape. Small errors can lead to big problems in your project.
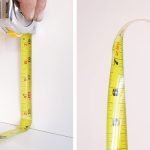
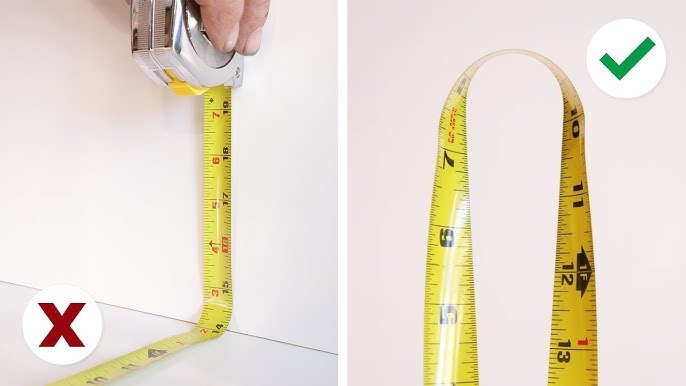
Bending The Tape
Bending the tape measure while taking a measurement can cause wrong readings. The tape should lie flat and straight along the wood surface.
- Do not force the tape around tight corners.
- Use a helper to hold the tape for long distances.
- Check that the tape is not twisted or curled.
Ignoring Tape Sag
When measuring long lengths, the tape may sag under its own weight. This makes the measurement longer than it really is.
| Effect | Reason | Solution |
|---|---|---|
| Too long measurement | Tape sags between points | Support tape every few feet |
| Inaccurate cuts | Sag adds extra length | Use a straight edge or rigid tape |
| Material waste | Cut based on wrong size | Double-check measurements before cutting |
Misreading Numbers
Reading the wrong number on the tape measure is a common error. This happens when you look at the wrong side or confuse fractions.
- Always check which side of the tape you use.
- Learn basic fraction equivalents to decimals.
- Mark the measurement point clearly on the wood.
- Take your time to read the numbers carefully.
Advanced Hacks For Precision
Using a tape measure well improves your woodworking projects. Small mistakes can cause big problems. These tips help you measure with more accuracy.
Focus on precise marking, checking right angles, and double-checking your numbers. These tricks save time and reduce errors.
Marking With A Pencil
Use a sharp pencil to mark measurements clearly. A fine point gives better detail for cutting and joining wood.
Hold the pencil at a low angle to the wood. This helps you make thin, precise lines that do not hide the actual measurement.
- Use a mechanical pencil for consistent line width
- Mark on the edge of the wood for easy reading
- Make small tick marks instead of thick lines
Using A Square For Right Angles
A square tool helps check that your corners and cuts are exactly 90 degrees. This is crucial for strong joints.
Place the square firmly against the wood edge. Draw your lines along the square’s edge to keep the angle perfect.
- Use a combination square for measuring and marking
- Check corners twice before cutting
- Keep your square clean for accurate readings
Double-checking Measurements
Always measure twice before cutting. This simple habit prevents costly mistakes and wasted materials.
Use the tape measure from different points on the wood. Compare the numbers to be sure they match.
- Read the tape measure at eye level to avoid errors
- Verify measurements with a ruler or caliper
- Write down measurements clearly to avoid confusion

Credit: www.reddit.com
Maintaining Your Tape Measure
Keeping your tape measure in good shape helps it last longer. Regular care ensures it works smoothly and gives accurate readings.
Simple maintenance tasks can prevent damage and save you money on replacements. Focus on cleaning, lubrication, and part replacement.
Cleaning And Storage Tips
Remove dirt and dust from your tape measure after each use. Wipe the blade with a dry cloth to avoid rust. Store it in a dry place to protect it from moisture.
- Clean the blade with a soft cloth
- Keep the tape retracted when not in use
- Store the tape measure in a toolbox or drawer
- Avoid leaving it in damp or hot areas
Lubricating The Blade
Lubrication helps the tape blade slide out and retract smoothly. Use a light oil or silicone spray. Apply it sparingly along the blade and wipe off excess.
| Type of Lubricant | Benefits | How to Apply |
|---|---|---|
| Light Machine Oil | Reduces friction, prevents rust | Apply a drop, spread evenly |
| Silicone Spray | Dries fast, no sticky residue | Spray lightly, wipe blade |
| WD-40 | Multi-use, cleans and lubricates | Spray and wipe clean |
Replacing Worn Parts
Check the tape measure for worn or damaged parts. Replace the hook if it bends or breaks. Change the spring if the tape does not retract well.
- Inspect the blade hook for damage
- Test the retraction spring regularly
- Replace parts with original or compatible pieces
- Use small screwdrivers to remove and install parts safely

Credit: www.youtube.com
Frequently Asked Questions
How Do I Read A Tape Measure In Woodworking?
Read the tape measure by aligning the zero mark with your starting point. Use the marked increments for precise measurements. Note both inches and fractions carefully to ensure accuracy in your woodworking projects.
What Tape Measure Length Is Best For Woodworking?
A 25-foot tape measure is ideal for most woodworking tasks. It offers enough length for furniture and small projects. Choose one with clear, easy-to-read markings for better precision.
How Can I Prevent Tape Measure Errors?
Ensure the tape measure is straight and taut while measuring. Avoid bending or twisting the tape. Double-check measurements to prevent mistakes and maintain accuracy in your woodworking.
Why Use The Hook On A Tape Measure?
The hook helps secure the tape at the edge of materials. It allows for accurate inside and outside measurements. Using the hook properly improves measurement reliability.
Conclusion
Using a tape measure well makes woodworking easier and more precise. Always take your time to measure twice and cut once. Keep the tape straight and read the numbers clearly. Practice these tips to avoid mistakes and save materials. Good measurements lead to better projects and less waste.
Trust your tools and your skills. With steady hands and careful measuring, your woodworking will improve step by step. Keep learning and enjoy your craft every day.