If you want your woodworking projects to turn out perfect, using clamps the right way is key. You might have the best wood and tools, but without proper clamping, your pieces can slip, shift, or end up uneven.
Imagine finishing a project only to find glue spots everywhere or joints that don’t hold tight. That’s frustrating, and it wastes time and materials. You’ll discover simple tips to use woodworking clamps like a pro. These tricks will help you keep your work steady, save you headaches, and make your finished pieces look sharp and strong.
Keep reading, and you’ll soon handle your clamps with confidence and ease.

Credit: www.familyhandyman.com
Choosing The Right Clamp
Using the right woodworking clamp makes your projects easier and safer. Clamps hold pieces firmly while you work.
Choosing the correct clamp depends on your project size, clamp type, and material quality.
Types Of Woodworking Clamps
There are many clamp types, each designed for different tasks. Some common clamps include bar clamps, C-clamps, and spring clamps.
- Bar Clamps:Best for large projects and wide surfaces.
- C-Clamps:Good for strong, tight holding in smaller spaces.
- Spring Clamps:Easy to use for quick, light pressure.
- Pipe Clamps:Adjustable length for long pieces.
- Corner Clamps:Hold corners at right angles.
Selecting Based On Project Size
Project size affects the clamp you need. Small projects need smaller clamps. Large projects need bigger or longer clamps.
| Project Size | Recommended Clamp Type | Clamp Length or Capacity |
|---|---|---|
| Small | C-Clamps or Spring Clamps | Up to 4 inches |
| Medium | Bar Clamps or Pipe Clamps | 6 to 24 inches |
| Large | Long Bar Clamps or Pipe Clamps | 24 inches and above |
Material And Build Quality
Choose clamps made from strong materials like steel or cast iron. These last longer and hold tightly.
- Steel clamps resist bending and breakage.
- Cast iron clamps provide firm, stable pressure.
- Plastic parts should be avoided for heavy-duty use.
- Check for smooth screw operation and strong springs.
- A good finish prevents rust and wear.
Proper Clamp Placement
Using woodworking clamps correctly helps your project stay steady. Proper clamp placement ensures your wood pieces do not shift or get damaged.
Knowing where and how to place clamps improves the quality of your work. This guide covers key tips for placing clamps well.
Even Pressure Distribution
Clamps must apply pressure evenly to avoid weak bonds. Uneven pressure can cause gaps or misalignment in glued joints.
- Place clamps at equal distances along the workpiece
- Use multiple clamps for long boards
- Check that pressure feels balanced on all sides
- Use cauls to spread pressure across wider areas
Avoiding Wood Damage
Clamps can leave marks or dents on wood if placed wrongly. Protect your work by using padding and careful positioning.
| Clamp Tip | Protection Method |
| Metal jaws | Use scrap wood between clamp and project |
| Quick-release clamps | Apply gentle pressure, tighten slowly |
| Spring clamps | Check for sharp edges before use |
Maximizing Holding Strength
Strong hold keeps your work stable during drying or cutting. Correct clamp placement boosts this strength.
- Align clamp jaws parallel to the wood grain
- Place clamps close to the joint or edge
- Tighten clamps firmly but do not over-tighten
- Use enough clamps to cover the entire joint length
Techniques For Effective Clamping
Woodworking clamps hold pieces tightly while glue dries or during assembly. Using the right clamping techniques improves your work quality.
Good clamping avoids damage and keeps parts aligned. Learn simple ways to get the best hold with your clamps.
Tightening Methods
Tighten clamps carefully to avoid squeezing out glue or breaking wood. Apply pressure slowly and evenly for a strong hold.
Turn the clamp handle steadily until the pieces stop moving. Do not overtighten; it can leave marks or damage the wood.
- Start with gentle pressure and check alignment
- Tighten gradually on each clamp in turns
- Stop when parts are firm and do not shift
- Use a torque wrench for precise pressure if needed
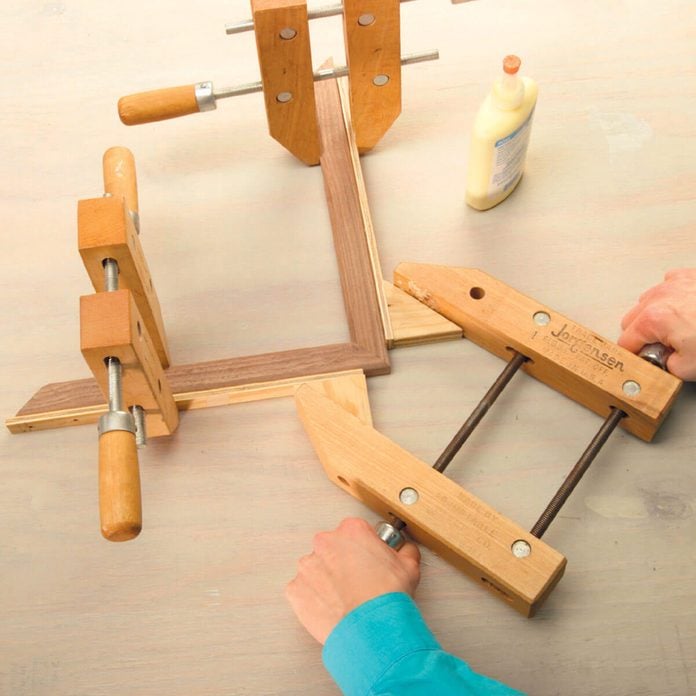
Using Cauls And Pads
Cauls are wooden blocks placed between clamps and your workpieces. Pads protect wood from clamp marks and spread pressure.
Use soft pads or scrap wood under clamps to avoid dents. Cauls help keep pressure even across wide surfaces.
- Place cauls parallel to the glued edge
- Use pads made from felt, cork, or scrap wood
- Check pads often to keep them in good shape
- Replace damaged pads to protect your work
Clamping Multiple Pieces
Clamping several pieces together needs careful pressure balance. Uneven clamping can cause gaps or misalignment.
Arrange clamps so each part gets enough pressure. Use more clamps for larger projects to hold parts firmly.
- Place clamps at regular intervals along the joint
- Alternate clamp positions to spread pressure evenly
- Check all pieces for alignment before tightening fully
- Use spacer blocks to keep clamps from sliding
Credit: www.familyhandyman.com
Maintenance And Care
Proper care helps woodworking clamps last longer. Regular upkeep keeps them working well.
Following simple maintenance steps saves money and prevents damage to your tools.
Cleaning And Lubrication
Clean clamps after each use to remove dust and glue. Use a brush or cloth for cleaning.
Apply light oil to moving parts. This stops rust and helps clamps open and close smoothly.
- Wipe clamps with a dry cloth
- Use mineral spirits for sticky residue
- Lubricate screw threads and pivot points
- Avoid over-lubricating to prevent dirt buildup
Storage Tips
Store clamps in a dry place to prevent rust. Hang them or use racks to keep them organized.
Avoid stacking clamps on top of each other. This can cause damage or bending.
| Storage Method | Benefit |
| Wall-mounted hooks | Easy access, saves space |
| Clamp racks | Organized and protected |
| Toolbox compartments | Good for small clamps |
Checking For Wear And Tear
Inspect clamps before use. Look for bent bars, cracked handles, or stripped threads.
- Check the frame for cracks or bends
- Test the screw mechanism for smooth movement
- Look for worn or damaged pads
- Replace parts that are broken or too worn
Safety Tips With Clamps
Woodworking clamps hold pieces firmly in place. Using them safely protects your hands and work.
Follow safety rules to avoid injuries and damage when using clamps in your projects.
Preventing Pinch Injuries
Pinch injuries happen when fingers get caught between clamp parts. Keep your hands clear when tightening.
- Always watch where your fingers are.
- Use clamp handles, not the frame, to tighten.
- Wear gloves to add protection.
- Keep clamps in good condition and clean.
- Release clamps slowly to avoid sudden movements.
Handling Heavy Clamps
Heavy clamps can strain your muscles or cause accidents if dropped. Use safe lifting methods.
| Tip | Advice |
| Lift Properly | Bend knees and keep back straight. |
| Use Both Hands | Hold clamp firmly on both sides. |
| Ask for Help | Get help if clamp is too heavy alone. |
| Store Safely | Keep clamps on stable shelves. |
Safe Release Techniques
Releasing clamps too fast can cause sudden snaps or flying parts. Use careful methods to avoid harm.
Follow these steps for safe clamp release:
- Loosen the clamp slowly and steadily.
- Keep your body clear of the clamp path.
- Hold the clamp handle firmly while releasing.
- Check that the workpiece is stable before removing the clamp.

Credit: www.familyhandyman.com
Advanced Clamping Strategies
Using clamps well can improve your woodworking projects. Advanced clamping helps hold pieces steady and safe.
Try special techniques for better grip and faster work. These tips make clamping easier and more reliable.
Custom Clamp Jigs
Custom clamp jigs hold parts in place with unique shapes. They fit your project perfectly and save time.
You can build jigs from scrap wood or buy parts to create your own designs. This helps clamp odd angles or small pieces.
- Use plywood to make flat, strong bases
- Add padding to protect wood surfaces
- Make adjustable jigs for different sizes
- Label jigs for quick setup
Clamping Unusual Shapes
Unusual shapes need careful clamping to avoid damage. Soft pads or blocks help protect the wood.
Try using spring clamps, strap clamps, or homemade supports. These can hold curves, circles, or uneven edges well.
- Use cork or rubber pads for soft contact
- Wrap straps around round pieces for even pressure
- Build wooden blocks to fit curves
- Try multiple small clamps for uneven surfaces
Time-saving Tips
Save time by organizing clamps and preparing before gluing. Ready clamps speed up your workflow.
Use quick-release clamps and keep them close to your workspace. Group clamps by size for easy access.
- Store clamps on wall racks or pegboards
- Use quick-release clamps for fast adjustments
- Prepare clamp pads or blocks ahead
- Plan clamp placement before gluing
Frequently Asked Questions
What Types Of Woodworking Clamps Are Best For Beginners?
Bar clamps and C-clamps are ideal for beginners. They are easy to use and versatile. These clamps provide strong, even pressure and suit most woodworking projects. Starting with these helps build confidence and skills before exploring specialized clamps.
How Do I Prevent Wood Damage Using Clamps?
Use protective pads or scrap wood between clamps and your project. Apply even pressure and avoid overtightening clamps. This prevents dents, marks, and uneven clamping, ensuring your wood surfaces remain smooth and undamaged during glue-ups or assembly.
When Should I Use Quick-release Clamps In Woodworking?
Quick-release clamps are best for projects needing frequent adjustments or repositioning. They allow fast opening and closing, saving time. Use them for temporary holds or when working on complex assemblies requiring multiple clamping changes.
How Tight Should Woodworking Clamps Be Applied?
Clamps should be tight enough to hold pieces firmly but not so tight they damage wood. Apply moderate pressure to avoid squeezing out glue or warping wood. Proper tension ensures strong joints and clean finishes.
Conclusion
Using woodworking clamps correctly makes your projects stronger and neater. Choose the right clamp for each task. Tighten clamps just enough to hold pieces firmly. Check alignment before letting glue dry. Avoid over-tightening to prevent damage. Practice helps you handle clamps with confidence.
Small tips lead to better results every time. Keep your clamps clean and in good shape. Enjoy building with more ease and accuracy. Your work will look professional and last longer. Keep these tips in mind for successful woodworking.