Are you ready to transform your woodworking projects with precision and ease? If you’ve ever struggled with making accurate angled cuts, you’re not alone.
Many DIY enthusiasts and seasoned woodworkers find this task challenging. But what if there was a tool that could make this process seamless and stress-free? Enter the miter gauge, your new best friend for achieving flawless angled cuts. Imagine the satisfaction of seeing your project come together perfectly, with each piece fitting together like a puzzle.
By mastering the use of a miter gauge, you can elevate your craftsmanship and save time. Curious to learn how this tool can revolutionize your woodworking? Let’s dive into the world of miter gauges and discover how they can make your projects shine.
Choosing The Right Miter Gauge
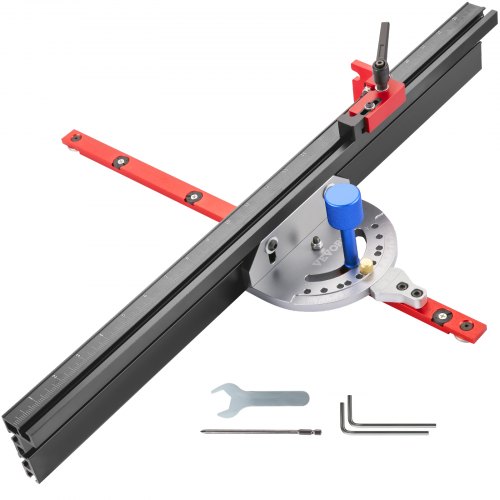
A miter gauge helps you make angled cuts on a table saw or band saw. Picking the right one makes your work easier and safer.
There are many types of miter gauges. Each type fits different cutting needs and tools.
Types Of Miter Gauges
Basic miter gauges are simple and easy to use. They usually have a fixed angle or a few preset angles.
Adjustable miter gauges let you set any angle you need. They often have a protractor-style dial for precise settings.
- Basic miter gauges: good for simple cuts
- Adjustable miter gauges: flexible for many angles
- Digital miter gauges: show angle on a screen
- Sliding miter gauges: allow for longer cuts
Materials And Build Quality
Miter gauges come in different materials like plastic, aluminum, and steel. The material affects durability and accuracy.
Steel miter gauges are very strong and last a long time. Aluminum ones are lighter but still sturdy. Plastic models are cheaper but less durable.
- Steel: heavy and very durable
- Aluminum: lightweight and strong
- Plastic: affordable but less accurate
Features To Look For
Look for a miter gauge with clear angle markings. This helps you set angles quickly and accurately.
A good miter gauge should have a smooth sliding bar and a locking mechanism. These features keep the gauge steady during cuts.
- Clear angle markings for easy reading
- Locking mechanism to hold angles firmly
- Smooth sliding bar for easy adjustment
- Large fence for better support of the workpiece
Setting Up For Accurate Cuts
Using a miter gauge helps you make angled cuts with a saw. Setting it up right is key for accuracy and safety.
This guide shows how to prepare your miter gauge for precise cuts every time.
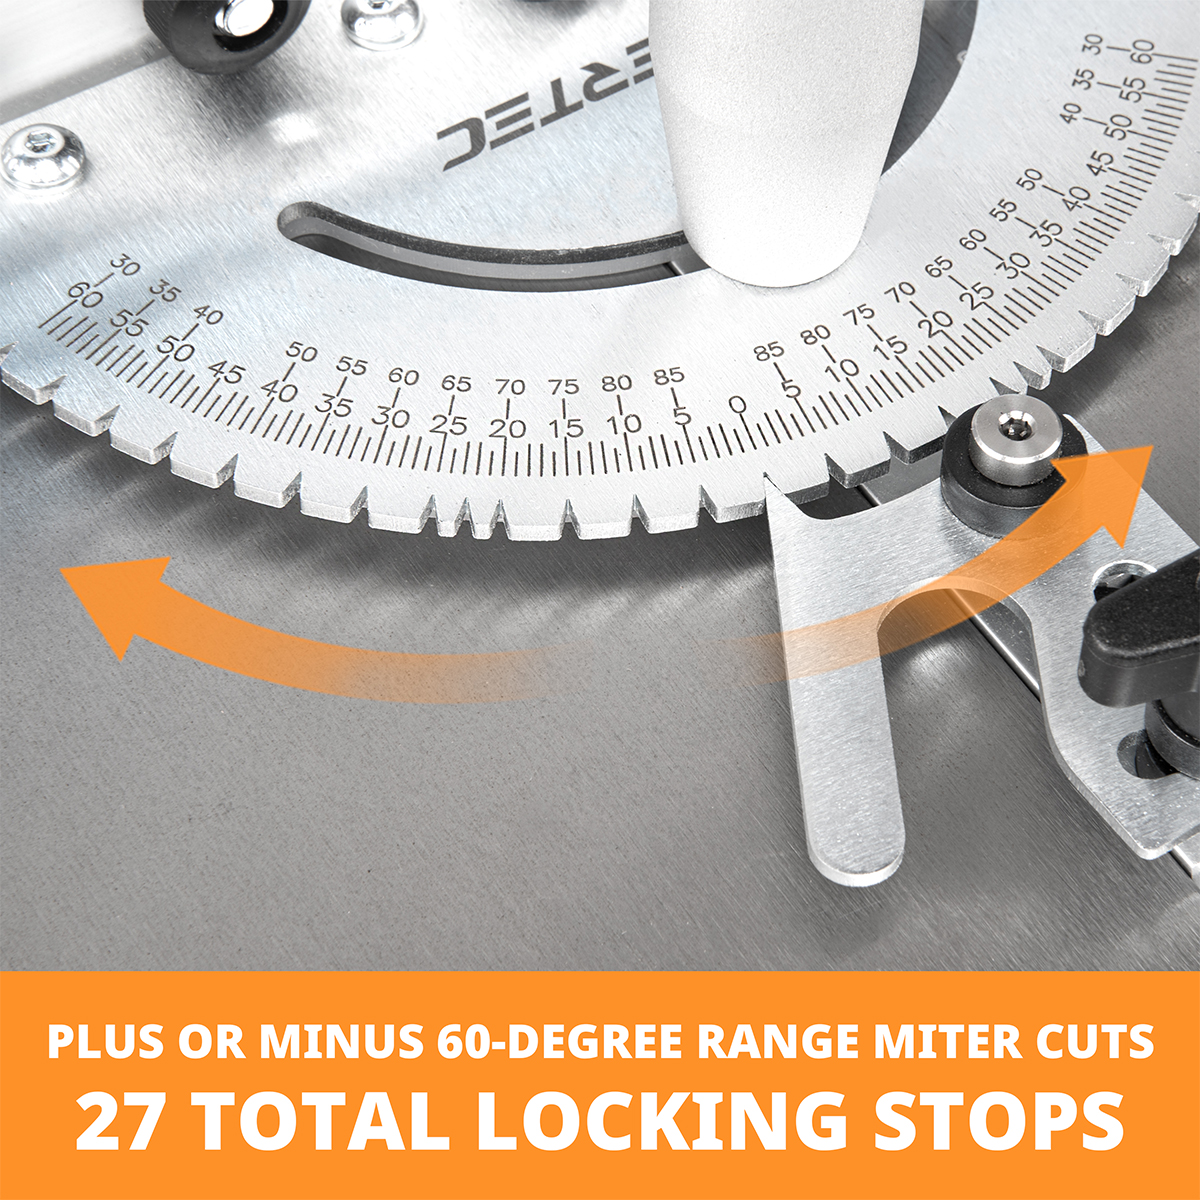
Calibrating The Miter Gauge
Calibration ensures the miter gauge angle matches the saw blade angle. Check this before cutting.
Use a square to compare the miter gauge to the saw blade. Adjust the gauge until they line up perfectly.
- Place the square on the saw table against the blade.
- Move the miter gauge to 0 degrees.
- Tighten the gauge so it matches the square.
- Repeat for other common angles if needed.
Aligning With The Saw Blade
Align the miter gauge so the workpiece cuts exactly on the blade line. This stops uneven edges.
Look down the blade and check the miter gauge pointer. Adjust it until the pointer points to the blade line.
- Loosen the gauge locking knob.
- Move the gauge to match the saw blade line.
- Tighten the knob firmly.
- Test with a scrap piece to confirm alignment.
Securing The Workpiece
Hold the workpiece firmly against the miter gauge fence. This prevents slipping and keeps the cut straight.
Use clamps if your gauge has holes for them. Clamping adds extra safety and precision.
- Place the wood flat on the miter gauge.
- Push it tight against the fence.
- Clamp the wood if possible.
- Check that the piece does not move before cutting.
Techniques For Precision Angled Cuts
Making angled cuts with a miter gauge requires careful setup and steady hands. Accurate cuts improve the fit and finish of your woodworking projects.
Learn how to adjust your miter gauge for common angles, keep your movement steady, and use stops and clamps for consistent results.
Adjusting For Common Angles
Most projects use standard angles like 45°, 30°, and 60°. Setting your miter gauge correctly for these angles saves time and reduces mistakes.
- Check the angle markings on your miter gauge scale carefully.
- Use a protractor or angle finder to verify the setting.
- Tighten the gauge lock firmly to prevent movement.
- Test the angle on scrap wood before cutting your workpiece.
- Mark the cut line clearly on the wood for guidance.
Maintaining Steady Movement
Steady movement during the cut ensures a clean edge and accurate angle. Sudden stops or jerks cause rough cuts and can damage the blade.
- Hold the workpiece firmly against the miter gauge fence.
- Start the blade before moving the wood forward slowly.
- Keep your hands steady and guide the wood straight along the fence.
- Do not force the wood; let the blade cut at its own pace.
- Complete the cut in one smooth pass without stopping.
Using Stops And Clamps
Stops and clamps help repeat the same cut multiple times and keep the wood from shifting during the cut.
| Tool | Purpose | Tip |
| Stop Block | Limits how far wood moves for repeat cuts | Attach securely to miter gauge fence with bolts |
| Clamp | Holds wood firmly in place | Use quick-release clamps for easy adjustments |
| Hold-Down | Prevents wood from lifting during cut | Adjust pressure to avoid marks on wood |
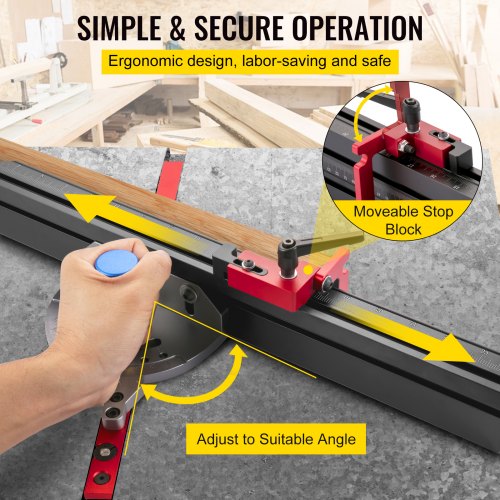
Credit: www.vevor.com
Troubleshooting Common Issues
Using a miter gauge can help you make angled cuts with your saw. Sometimes, problems happen that affect the cut quality. Knowing how to fix these issues saves time and material.
This guide covers common problems like inaccurate cuts, blade drift, and workpiece slippage. Follow these tips to improve your angled cuts with a miter gauge.
Fixing Inaccurate Cuts
Inaccurate cuts often come from the miter gauge not set correctly. If the angle is off, your cut will not fit as expected. Check your gauge’s calibration before starting.
Loose or worn parts in the miter gauge can cause errors. Tighten screws and replace worn pieces to keep it steady. Use a reliable square tool to verify angles.
- Check that the miter gauge locks firmly at the set angle.
- Use a combination square to confirm the angle is correct.
- Tighten all screws and knobs on the miter gauge.
- Replace worn or damaged parts.
Dealing With Blade Drift
Blade drift happens when the blade moves away from the cut line. This makes your angled cut wider or narrower than planned. Drift is common with thin or flexible blades.
To reduce drift, use a sharp and rigid blade. Support the workpiece well and feed it slowly through the blade. Avoid forcing the wood, which causes the blade to bend.
- Use a blade designed for clean, straight cuts.
- Keep the blade sharp and clean.
- Feed the workpiece steadily without pushing too hard.
- Support the workpiece firmly to prevent bending.
Avoiding Workpiece Slippage
Workpiece slippage happens when the wood moves during the cut. This can ruin the angle and cause safety risks. Hold the wood firmly against the miter gauge fence.
Use clamps or a stop block to keep the workpiece steady. Make sure your hands stay clear of the blade path. Always work slowly to maintain control.
- Press the workpiece firmly against the miter gauge fence.
- Use clamps or stop blocks to hold the wood in place.
- Keep hands away from the blade during the cut.
- Cut slowly to keep control and avoid slipping.
Advanced Tips And Tricks
Using a miter gauge for angled cuts can improve your woodworking projects. You can get more precise cuts with some extra adjustments.
These tips will help you customize your miter gauge, combine it with other jigs, and keep it in good shape.
Customizing Angle Stops
Angle stops help you set common angles quickly. You can add or adjust stops to fit your usual cutting needs.
Use a protractor or digital angle finder to mark exact angles on the gauge. Then, install small blocks or pins to stop at those angles.
- Mark angles with a clear, easy-to-read scale
- Attach adjustable stops with screws or clamps
- Test stops on scrap wood before cutting real pieces
- Use stops for repeatable, consistent cuts
Combining With Other Jigs
Use your miter gauge with other jigs to expand its function. This approach makes angled cuts safer and more accurate.
For example, a crosscut sled can hold large boards steady while the miter gauge guides the cut angle.
- Attach feather boards for better wood hold-down
- Use stop blocks on sleds for repeat cuts
- Combine with zero-clearance inserts to reduce tear-out
- Make custom jigs to support odd shapes or angles
Maintaining Your Miter Gauge
Regular care keeps your miter gauge working well. Clean and check it before use to avoid mistakes.
Keep the sliding bar smooth and free of dust. Tighten screws and replace worn parts to keep angles true.
- Wipe off dust and resin after each use
- Apply light oil to the sliding bar for smooth movement
- Check angle accuracy with a square or angle gauge
- Tighten or replace loose screws and knobs
Credit: www.vevor.com
Credit: powertecproducts.com
Frequently Asked Questions
What Is A Miter Gauge Used For In Woodworking?
A miter gauge guides angled cuts on a table saw or band saw. It ensures precise crosscuts and angled joints. It helps create clean, accurate cuts at specific angles, especially 45 and 90 degrees.
How Do I Set The Angle On A Miter Gauge?
Loosen the locking knob, adjust the gauge to the desired angle, then tighten the knob. Use the angle scale for accuracy. Double-check with a protractor if needed for perfect cuts.
Can A Miter Gauge Be Used For Bevel Cuts?
No, a miter gauge guides crosscuts at an angle, not bevel cuts. Bevel cuts require tilting the saw blade, while the miter gauge stays flat on the table.
How Do I Ensure Safety When Using A Miter Gauge?
Keep your hands clear of the blade and use a push stick if needed. Secure the workpiece firmly against the miter gauge fence. Always wear safety glasses and follow saw safety rules.
Conclusion
Using a miter gauge makes angled cuts easier and more accurate. It helps you cut wood at the exact angle you want. This tool is useful for many woodworking projects. Practice using the miter gauge to improve your skills. Always keep safety in mind while cutting.
With time, your cuts will look cleaner and fit better. A miter gauge is a simple tool that brings great results. Try it on your next project to see the difference.