Are you looking to measure the flow of electricity in your circuits but don’t know where to start? Using a multimeter to measure amperage is a simple skill that can save you time and prevent costly mistakes.
Whether you’re fixing a device or working on a new project, knowing how to check the current can help you understand what’s happening inside your electronics. You’ll discover easy steps and practical tips to measure amperage safely and accurately. Keep reading, and you’ll gain the confidence to handle your multimeter like a pro.
Credit: rjallain.medium.com
Choosing The Right Multimeter
A multimeter measures different electrical values like voltage and current. Choosing the right one is key for accurate amperage readings.
Not all multimeters measure amperage the same way. Some are better for high current, others for small signals.
Types Of Multimeters
There are two main types of multimeters: analog and digital. Each has its pros and cons for measuring amperage.
- Analog Multimeters: Use a needle to show readings. Good for seeing trends but less precise.
- Digital Multimeters (DMM): Show numbers on a screen. More accurate and easier to read.
- Clamp Meters: Measure current without direct contact. Ideal for high amperage and quick checks.
Key Features For Amperage Measurement
Look for features that help with safe and clear amperage readings. These make your work easier and safer.
- Current Range: Choose a meter that covers the amperage you expect to measure.
- True RMS: Gives accurate readings with AC signals that change shape.
- Auto-Ranging: Automatically finds the right measurement scale.
- Separate Amperage Ports: Dedicated input jacks for high and low current improve accuracy.
- Data Hold: Lets you freeze the reading on the display for easier viewing.
Safety Ratings To Consider
Safety is very important when measuring amperage. Check the multimeter’s safety ratings before buying.
Look for CAT ratings that match your work environment. Higher CAT numbers mean better protection.
- CAT I: For electronics and low energy circuits.
- CAT II: For household appliances and portable tools.
- CAT III: For distribution wiring and fixed installations.
- CAT IV: For utility-level measurements and outdoor lines.

Credit: www.ariat-tech.com
Preparing For Measurement
Measuring amperage with a multimeter requires careful preparation. You must gather the right tools and check your equipment before starting.
Following safety steps helps you get accurate readings and avoid damage or injury.
Gathering Necessary Tools
Collect all tools needed for amperage measurement before you begin. Having everything ready saves time and keeps you safe.
- Digital or analog multimeter with amperage settings
- Test leads with insulated probes
- Protective gloves and eyewear
- Manual or user guide for your multimeter
- Wire cutters or strippers if needed for connections
Inspecting The Multimeter And Leads
Check your multimeter and test leads for damage before use. Faulty equipment can give wrong readings or cause hazards.
| Check Item | What to Look For |
| Multimeter Body | No cracks, clean display, functioning dial |
| Test Leads | Insulation intact, no exposed wires, firm connectors |
| Probes | Sharp tips, not bent or dull |
| Battery | Good charge for accurate readings |
Setting The Multimeter To Amperage Mode
Set your multimeter to the correct amperage range before measuring current. This step is crucial for safety and accuracy.
- Turn the multimeter dial to the “A” or “Amps” setting.
- Select AC or DC amperage based on the circuit type.
- Choose a range higher than the expected current if your meter is not auto-ranging.
- Plug the red test lead into the correct terminal, usually marked for high current.
- Keep the black test lead in the common (COM) terminal.
Measuring Current Safely
Using a multimeter to measure current can be dangerous if done wrong. You must follow safety steps to avoid shocks and damage.
This guide explains how to measure current safely with a multimeter. Read each step carefully before starting.
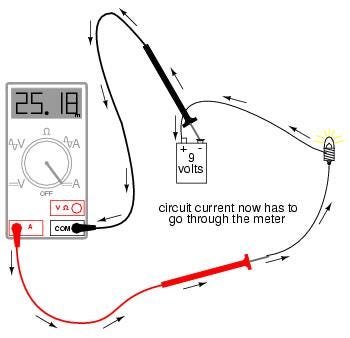
Breaking The Circuit
To measure current, you need to open the circuit. This means stopping the flow of electricity at one point.
Breaking the circuit lets you connect the multimeter so that current flows through it. Never try to measure current without breaking the circuit first.
Connecting The Multimeter In Series
Connect the multimeter leads in series with the circuit. This means the current will flow through the meter.
Put one lead on one side of the break and the other lead on the other side. Make sure the multimeter is set to the correct current range.
- Turn off power before connecting
- Set multimeter to the proper amperage range
- Connect leads in series, not parallel
- Turn power on and read the display
Avoiding Common Mistakes
Common errors can cause injury or damage your multimeter. Avoid these mistakes to measure current safely.
- Do not connect the multimeter in parallel when measuring current
- Never measure current above your meter’s limit
- Always start with the highest current setting
- Check that test leads are in the correct ports
- Do not touch metal parts during measurement
Reading And Interpreting Results
Using a multimeter to measure amperage helps you check electrical current safely. It shows how much current flows through a circuit.
Knowing how to read and interpret the display is important. It helps you understand if your circuit works well or has issues.
Understanding Display Readings
The multimeter screen shows numbers that tell you the current size. The unit is usually in amps (A), milliamps (mA), or microamps (µA).
Look at the decimal points and units carefully. They change what the number means. Make sure you choose the right range on your multimeter.
- Amps (A) measure large currents
- Milliamps (mA) measure small currents
- Microamps (µA) measure very tiny currents
- Decimal points show precise values
- Range setting affects reading accuracy
Dealing With Fluctuating Values
Sometimes the display numbers jump or change quickly. This means the current is not steady. Fluctuations can happen in many circuits.
Try to hold the probes steady and check connections. Wait a moment for the reading to settle. Use the average value if readings move fast.
- Keep probes steady to avoid false readings
- Check all circuit connections for good contact
- Wait for the number to stabilize
- Use the average if numbers keep changing
Recording And Using Data
Write down your readings clearly. Note the time, the circuit tested, and the multimeter settings. This helps you track changes over time.
Use the data to find problems or check if devices work well. Comparing readings helps you decide if repair or adjustment is needed.
- Record current value with unit
- Note test date and time
- Write down multimeter range used
- Compare with normal or expected values
- Use data to find faults or confirm function
Troubleshooting Measurement Issues
Using a multimeter to measure amperage can sometimes cause problems. You might not get a reading or see strange numbers. Knowing how to fix these issues helps you get correct results.
Here are common problems and easy fixes to help you troubleshoot your multimeter when measuring amperage.
Multimeter Not Showing Reading
If your multimeter does not show any reading, first check the connections. Make sure the test leads are plugged into the correct ports for current measurement.
Also, check if the multimeter is set to the right amperage range. A wrong setting can cause no reading to appear.
- Verify test leads are in the correct jacks
- Set the dial to the correct amp range (mA or A)
- Ensure the circuit is live and current is flowing
Inconsistent Or Erratic Values
Sometimes the multimeter shows changing or unstable amperage values. This can happen if the test leads are loose or damaged.
Also, a weak battery inside the multimeter can cause wrong readings. Make sure your battery is fresh and test leads are secure.
- Check test leads for breaks or loose connections
- Replace the multimeter battery if it is low
- Avoid touching the metal parts of the leads while measuring
Fuse Blown In Multimeter
A blown fuse inside the multimeter stops it from measuring current. This can happen if you try to measure a current higher than the fuse limit.
To fix this, open the multimeter case and replace the fuse with the same rating. Always check the fuse before measuring high currents.
- Turn off and unplug the multimeter before opening it
- Find the fuse inside the multimeter case
- Replace it with a fuse that has the same amperage rating
- Never use a fuse with a higher rating than recommended

Credit: medium.com
Advanced Tips For Accurate Measurement
Measuring amperage correctly is important for safe and precise work. Using a multimeter needs some careful steps to get the best results.
This guide explains advanced tips for using clamp meters, differences in AC and DC measurements, and how to keep your tools calibrated.
Using Clamp Meters For Current
Clamp meters measure current without touching wires directly. They are fast and safe but need correct use for accuracy.
- Ensure the clamp is fully closed around a single conductor.
- Keep the conductor centered in the clamp jaws.
- Avoid clamping multiple wires together; measure one at a time.
- Use the correct range setting on the meter to prevent overload.
- Keep the meter away from magnetic fields or metal objects.
Measuring Ac Vs Dc Amperage
AC and DC currents behave differently, so your meter must match the current type. Most clamp meters measure AC only.
| Current Type | Measurement Method | Common Meter Type |
| AC (Alternating Current) | Clamp meter reads magnetic field changes | Standard clamp meter |
| DC (Direct Current) | Clamp meter uses Hall effect sensor | Specialized clamp meter for DC |
Use the right meter for the current type. Check if your tool supports DC before measuring.
Calibration And Maintenance
Regular calibration keeps your multimeter accurate. Maintenance prevents errors and extends tool life.
- Calibrate your meter yearly or after heavy use.
- Clean the clamp jaws and contacts with a dry cloth.
- Store the meter in a dry, dust-free place.
- Check the battery and replace it when low.
- Inspect test leads for cracks or damage before use.
Frequently Asked Questions
How Do I Measure Amperage With A Multimeter Safely?
To measure amperage safely, always turn off power before connecting the multimeter. Use the correct port and set the dial to the amp range. Connect the meter in series with the circuit to avoid damage and ensure accurate readings.
What Is The Difference Between Ac And Dc Amperage Measurement?
AC amperage measures alternating current flow, while DC measures direct current flow. Multimeters have separate settings for AC and DC amps. Choose the right mode to get accurate results and avoid damaging the meter or circuit.
Can I Measure High Amperage With A Standard Multimeter?
Standard multimeters usually measure up to 10 amps safely. For currents above 10 amps, use a clamp meter or a multimeter with a high-amp adapter. Exceeding limits can blow the fuse or damage the device.
Why Does My Multimeter Show Zero When Measuring Amperage?
A zero reading often means the meter isn’t connected in series with the load. Check the probes and settings. Also, ensure the circuit is powered and current is flowing through the meter.
Conclusion
Measuring amperage with a multimeter is simple and essential. First, ensure the multimeter is set to measure amps. Connect the probes correctly. Always start with the highest setting to avoid errors. Safety is crucial. Always turn off power before connecting.
With practice, using a multimeter becomes straightforward. You can confidently measure amperage in no time. Understanding these basics helps with various electrical tasks. Keep these tips handy for future reference. Enhance your skills with regular practice. Soon, checking amperage will be second nature.
Stay safe, stay informed, and keep exploring new skills.
