Are you struggling to get a tight, leak-free connection on your pipes? Using a pipe flaring tool might be the simple solution you’ve been missing.
This handy tool helps you create smooth, flared ends on your pipes, making your plumbing work stronger and more reliable. Whether you’re a DIY enthusiast or just tackling a quick repair, learning how to use a pipe flaring tool can save you time, frustration, and costly mistakes.
Keep reading to discover how this tool works and how it can make your next project easier and more professional.

Credit: www.walmart.com
Choosing The Right Flaring Tool
Using a pipe flaring tool makes your piping work secure and leak-free. Picking the right tool helps you get clean and accurate flares every time.
Many types of flaring tools exist. Each one suits a specific kind of pipe and material. Understanding these will help you choose well.
Types Of Pipe Flaring Tools
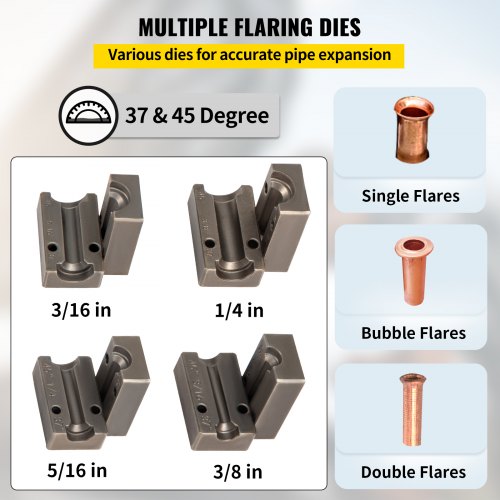
There are several common types of flaring tools. Each type shapes the pipe end differently to fit various needs.
- Single Flaring Tool: Creates a simple, single flare on soft tubing.
- Double Flaring Tool: Forms a stronger double flare, good for brake lines.
- Bubble Flaring Tool: Makes a rounded flare for some specific fuel lines.
- Hydraulic Flaring Tool: Uses hydraulic pressure to flare thick or hard tubes.
Materials Compatibility
Flaring tools work best with certain pipe materials. Choosing the tool for your pipe’s material prevents damage and ensures a tight seal.
| Pipe Material | Recommended Flaring Tool |
| Copper | Single or Double Flaring Tool |
| Aluminum | Double Flaring Tool |
| Steel | Hydraulic Flaring Tool |
| Brass | Single Flaring Tool |
Tool Quality And Durability
Good quality tools last longer and make better flares. Look for sturdy build and smooth operation.
- Choose tools made of strong metals like steel or cast iron.
- Check for rust resistance to keep tools working well over time.
- Look for tools with comfortable handles for easy use.
- Read reviews to find tools that stay accurate after many uses.
Preparing The Pipe
Preparing the pipe is important before using a pipe flaring tool. It helps make a strong and clean flare.
Good preparation saves time and prevents leaks in the pipe connection.
Cutting The Pipe Cleanly
Use a pipe cutter to make a clean and straight cut on the pipe end. Avoid twisting or bending the pipe while cutting.
A clean cut helps the pipe sit properly in the flaring tool and form a good flare.
Deburring The Edges
Remove any sharp edges or burrs from the cut pipe end. Burrs can damage the flare or cause leaks.
Use a deburring tool or a fine file to smooth the inside and outside edges of the pipe.
- Hold the pipe steady
- Run the deburring tool inside the pipe
- File the outside edge gently
- Check for smooth edges by touch
Measuring For Accurate Flares
Measure the pipe length to ensure the flare forms in the correct place. Too far or too close can cause leaks.
Use the flaring tool’s instructions to mark how much pipe should stick out for the flare.
- Mark the pipe with a pencil or marker
- Double check the measurement before flaring
- Clamp the pipe tightly in the flaring tool
Step-by-step Flaring Process
Using a pipe flaring tool allows you to create a secure flare on the pipe end. This flare helps form a tight connection in plumbing or automotive systems. The process requires careful handling for a safe and strong flare.
Follow each step carefully to ensure the pipe is properly flared and ready for use. This guide covers securing the pipe, forming the flare, and checking the flare quality.
Securing The Pipe In The Tool
Place the pipe into the flaring tool’s clamp. The pipe end should stick out slightly above the clamp surface. Tighten the clamp screws to hold the pipe firmly. Make sure the pipe is straight and does not move.
- Cut the pipe end squarely and clean any burrs.
- Insert the pipe into the clamp with the correct length exposed.
- Tighten the clamp so the pipe cannot move during flaring.
Forming The Flare
Attach the flaring cone to the tool’s yoke. Align it with the pipe end. Slowly turn the handle to press the cone into the pipe. This action spreads the pipe end outward, creating the flare shape. Turn until the flare is smooth and even.
- Place the yoke with the flaring cone over the pipe in the clamp.
- Turn the handle clockwise to push the cone into the pipe end.
- Keep turning until the flare forms evenly around the pipe edge.
- Turn the handle back to release the cone from the flare.
Inspecting The Flare Quality
Check the flare for uniform shape and no cracks. The flare should be smooth and round. It must fit well with the fitting to avoid leaks. Use a table to compare good and bad flare signs.
| Good Flare | Bad Flare |
| Even flare with smooth edges | Uneven shape or rough edges |
| No cracks or splits | Visible cracks or splits |
| Fits snugly into the fitting | Loose or too tight fit |
| Pipe wall not thinned too much | Pipe wall appears thin or weak |

Credit: www.amazon.com
Common Flaring Mistakes
Using a pipe flaring tool requires care and precision. Mistakes can cause leaks or weak connections. Knowing common errors helps you avoid damage and ensures a proper seal.
Below are some frequent flaring problems and tips to fix or prevent them. Focus on the flare shape, tool use, and pipe condition for best results.
Over-flared Or Under-flared Ends
Over-flared ends are too wide and may not fit the fitting properly. Under-flared ends are too narrow and can cause leaks. Both reduce the strength of the pipe joint.
- Over-flared ends show a thin, stretched flare edge.
- Under-flared ends have a small or incomplete flare.
- Check flare size before tightening the fitting.
- Adjust the flaring tool pressure for the right flare width.
Cracks And Deformations
Cracks or dents weaken the pipe and cause leaks. These often happen from too much force or old, brittle pipes. Always inspect the flare after forming it.
| Issue | Cause | Effect |
|---|---|---|
| Cracks | Excessive force or worn pipe | Leaks and joint failure |
| Dents | Improper handling or clamping | Weak flare connection |
| Uneven flares | Misaligned tool or pipe | Poor seal and leaks |
Improper Tool Alignment
Aligning the flaring tool wrong leads to poor flare shapes. The pipe end may flare unevenly or off-center. This causes weak connections and leaks.
Tips for proper tool alignment:
- Place the pipe squarely in the clamp.
- Center the flaring cone on the pipe end.
- Check the tool before each flare for wear or damage.
- Use steady, even pressure when flaring.
Maintaining Your Flaring Tool
Keeping your pipe flaring tool in good condition helps it work well. Regular care avoids damage and makes your work easier.
Follow simple steps to clean, store, and check parts of your flaring tool. This keeps it ready for use anytime.
Cleaning And Lubrication
Clean your flaring tool after each use. Remove dirt, metal shavings, and old lubricant. Use a soft brush or cloth for cleaning.
- Wipe all surfaces with a dry cloth.
- Use a small brush to clear tight spots.
- Apply light machine oil to moving parts.
- Avoid too much oil; it can attract dust.
- Do not use water to clean metal parts.
Storage Tips
Store your flaring tool in a dry place to stop rust. Keep it in a tool box or case to protect from dust and damage.
| Storage Tip | Reason |
|---|---|
| Keep tool dry | Prevents rust and corrosion |
| Use protective case | Avoids damage and dust buildup |
| Store away from sunlight | Prevents material weakening |
| Check tool monthly | Ensures it stays in good shape |
When To Replace Parts
Parts wear out after long use. Replace worn parts to keep your tool working well and safe.
- Check the flaring cone for dents or cracks.
- Inspect the clamp jaws for wear or damage.
- Replace any bent or broken handles.
- Change worn screws or bolts.
- Use manufacturer parts for replacements.
Credit: www.vevor.com
Applications Of Flared Pipes
Flared pipes create strong, leak-free connections in many systems. They are useful where pipes carry liquids or gases under pressure.
Using a pipe flaring tool helps shape the pipe end to fit tightly with fittings. This tool is important in several industries and systems.
Automotive Use
Flared pipes are common in cars. They are used in brake lines and fuel systems. The flare ensures a strong seal and prevents leaks.
Brake fluid and fuel must not leak. Flared connections keep the system safe and reliable. Mechanics use a pipe flaring tool to make these connections.
Hvac Systems
Heating, ventilation, and air conditioning systems use flared pipes for refrigerant lines. These connections handle high pressure and prevent gas leaks.
The flare helps join copper pipes to compressors and valves. It creates a tight, durable seal that lasts through temperature changes.
Plumbing And Gas Lines
Flared pipes are common in plumbing and gas lines. They connect pipes that carry water or natural gas. The flare stops leaks and holds pipes firmly.
Gas lines need safe connections to avoid leaks that cause danger. Plumbing systems use flared fittings for easy assembly and strong joints.
Frequently Asked Questions
What Is A Pipe Flaring Tool Used For?
A pipe flaring tool shapes pipe ends to create a secure, leak-proof connection. It is commonly used in plumbing and automotive brake lines.
How Do You Use A Pipe Flaring Tool Correctly?
First, cut the pipe squarely. Then, clamp it in the tool, and tighten the flaring cone to shape the pipe end.
What Types Of Pipes Can Be Flared With This Tool?
Pipe flaring tools work best on soft metals like copper, aluminum, and thin-walled steel tubing.
Why Is Proper Flaring Important For Pipe Connections?
Proper flaring ensures a tight seal, prevents leaks, and maintains system pressure, enhancing safety and durability.
Conclusion
A pipe flaring tool makes plumbing tasks easier and more efficient. It ensures tight connections, preventing leaks. With practice, using the tool becomes simple. It’s essential for anyone working with pipes. Investing in a quality tool saves time and effort.
Proper use can lead to successful projects and satisfied customers. Always follow safety guidelines to avoid accidents. Keep the tool clean and well-maintained for longer life. Enjoy the benefits of a job well done. Happy flaring!