When it comes to carving intricate details, the right tool can make all the difference. Using a mallet for carving details gives you better control and precision, helping you bring your creative vision to life.
If you want your carvings to stand out with sharp lines and fine touches, mastering the mallet technique is key. You’ll discover how to use a mallet effectively, avoid common mistakes, and take your craftsmanship to the next level. Ready to transform your carving skills?
Let’s dive in!

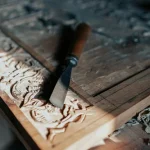
Credit: rockandtools.com
Choosing The Right Mallet
Using a mallet is important for carving fine details. The right mallet helps you control your cuts.
Choosing the right mallet depends on your carving style and the tools you use. This guide helps you pick the best one.
Types Of Mallets For Carving
There are several types of mallets for carving wood. Each type suits different carving tasks and tools.
- Wooden Mallets:Traditional and light, good for delicate work.
- Rubber Mallets:Soft head protects tools and wood from damage.
- Rawhide Mallets:Gentle strike, ideal for fine detail carving.
- Plastic Mallets:Durable and medium weight, good for general use.
Material And Weight Considerations
The material of the mallet affects its weight and feel. Weight changes how much force you apply.
Lighter mallets let you carve softly with control. Heavier mallets deliver stronger hits but need care.
- Wood:Light and traditional, easy to handle for long periods.
- Rubber:Absorbs shock, good for sensitive carving.
- Rawhide:Soft but firm, balances power and control.
- Plastic:Medium weight, lasts long with consistent strikes.
Matching Mallet To Chisel
Choose a mallet that fits your chisel size and type. The right pair helps you carve smoothly.
Small chisels need lighter mallets. Large chisels require heavier mallets for power.
- Use a wooden mallet with small, delicate chisels.
- Rubber mallets work well with chisels needing gentle taps.
- Rawhide mallets suit medium chisels for balanced force.
- Plastic mallets match larger chisels for stronger strikes.
Preparing Your Workspace
Using a mallet for carving needs a good workspace. Preparing your area helps you work safely and well. A neat place makes carving easier and more fun.
Focus on setting a stable bench, good lighting, and organized tools. These three things keep your work smooth and safe.
Setting Up A Stable Workbench
Choose a workbench that does not wobble or shake. A strong and flat surface holds your wood firmly. This helps you carve details without slips or mistakes.
- Check that the bench legs stand firmly on the floor.
- Use clamps or vises to hold your work piece tightly.
- Keep the bench height comfortable for standing or sitting.
- Clear the bench surface before starting work.
Ensuring Proper Lighting
Good lighting lets you see fine details while carving. Use bright, white light close to your work area. Avoid shadows that can hide parts of your wood.
| Light Source | Best Position | Notes |
| Desk Lamp | Side or above your bench | Use LED bulbs for bright light |
| Natural Light | Near a window | Work during daylight hours |
| Overhead Light | Centered above workspace | Add extra lamps if needed |
Organizing Tools For Efficiency
Keep your carving tools close and tidy. Organize them so you can find and reach each tool fast. A clean space helps you focus on your carving.
- Use a tool rack or magnetic strip on the wall.
- Keep mallets, chisels, and knives grouped together.
- Store small carving bits in labeled containers.
- Clean and sharpen tools after each use.
Basic Mallet Handling Techniques
Using a mallet correctly helps you carve details with better control. It also reduces hand fatigue and mistakes.
Learning the right grip, stance, and force will improve your carving skills. This guide covers key tips for handling your mallet.
Grip And Stance Tips
Hold the mallet firmly but not too tight. Your hand should feel relaxed to prevent shaking. Stand with your feet shoulder-width apart for balance.
- Grip the mallet near the end of the handle for better leverage.
- Keep your wrist straight to avoid strain.
- Position your body close to the workpiece for control.
- Use your whole arm, not just your wrist, to strike.
- Keep your eyes on the carving area at all times.
Controlling Force And Speed
Apply gentle, steady strikes to avoid splitting the wood. Increase force only when carving harder materials or deeper cuts.
| Force Level | Use Case | Tip |
| Light | Fine details, soft wood | Keep strokes slow and steady |
| Medium | General carving, medium wood | Use smooth, controlled swings |
| Strong | Deep cuts, hard wood | Strike firmly but avoid over-hitting |
Avoiding Common Mistakes
Many carvers make errors that slow progress or cause damage. Watch out for these common problems and fix them early.
- Gripping the mallet too tightly, which causes hand fatigue.
- Using only wrist motion and not the full arm.
- Striking too fast, leading to loss of control.
- Ignoring stance, resulting in poor balance.
- Applying uneven force, which can chip the wood.

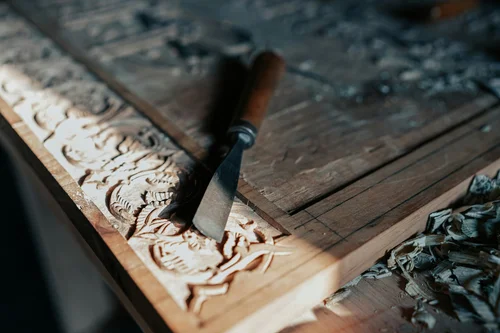
Credit: www.finewoodworking.com
Precision Carving Methods
Using a mallet helps control the chisel during carving. It gives power and accuracy for fine details.
Precision carving needs careful hand movements. A mallet lets you tap the chisel gently or strongly.
Guiding The Chisel Accurately
Hold the chisel firmly but not too tight. Keep your hands steady to guide the blade exactly where you want.
Use your free hand to support the chisel’s shaft. This gives better control and reduces slips.
- Grip the chisel handle near the blade
- Rest your fingers on the wood for balance
- Move slowly and watch the cut progress
Using Light Taps For Detail Work
Tap the mallet lightly for small cuts and fine details. Light taps prevent breaking thin parts of the wood.
Start with soft taps and increase force only if needed. This helps avoid deep or rough cuts.
- Keep mallet strikes gentle and controlled
- Focus on smooth, even tapping
- Stop often to check your work
Adjusting Pressure For Different Materials
Soft woods need lighter pressure to avoid dents. Hard woods require stronger taps for clean cuts.
Test the material first with small taps. Change your mallet force based on how the wood reacts.
- Soft wood: gentle taps, slow carving
- Medium wood: moderate force, steady pace
- Hard wood: firm taps, careful control
Advanced Techniques For Fine Details
Using a mallet for carving fine details takes practice and control. This guide shows ways to improve your skill with advanced carving methods.
Focus on layering strokes, creating textures, and mixing tools. These techniques help produce precise and delicate details in woodwork.
Layering Carving Strokes
Start by making light, shallow cuts with your mallet. Gradually deepen the strokes in layers to build detail. This prevents mistakes and keeps edges sharp.
- Begin with soft taps for thin outlines.
- Increase force slightly for mid-depth shaping.
- Use firm hits for final deep cuts.
- Check progress often to avoid overcutting.
Creating Textures With Mallet Control
Control your mallet strikes to create different textures. Varying the speed and angle changes the look of the wood surface.
| Strike Type | Effect on Wood |
| Light, fast taps | Fine, dotted texture |
| Slow, angled hits | Grooved, lined texture |
| Firm, centered blows | Deep, smooth cuts |
Combining Mallet And Hand Tools
Use your mallet for rough shaping and hand tools for detail work. This combination improves control and finish quality.
- Start carving broad shapes with mallet and chisels.
- Switch to hand tools like gouges for delicate patterns.
- Use mallet strikes to clear large areas quickly.
- Finish with hand tools to refine edges and textures.
Maintaining Mallet And Tools
Using a mallet for carving details helps control your work better. Keeping your mallet and tools in good shape makes carving easier and safer.
Regular maintenance stops damage and keeps tools working well. Small care steps save time and money later.
Cleaning And Storage Tips
Clean your mallet and chisels after every use. Remove wood dust and dirt to avoid rust and damage.
- Wipe tools with a dry cloth
- Use a soft brush for tight spots
- Apply a light coat of oil to metal parts
- Store tools in a dry, cool place
- Keep tools in a toolbox or wrap in cloth
Sharpening Chisels Regularly
Dull chisels make carving hard and unsafe. Sharpen your chisels often to keep clean cuts and control.
Use a sharpening stone or system to keep edges sharp. Check the angle and polish after sharpening.
- Check chisel edge before each use
- Sharpen on a flat stone with water or oil
- Maintain the original bevel angle
- Polish the edge for a smooth finish
- Store chisels with edge guards
Replacing Worn Mallet Heads
Mallet heads wear down from hitting hard surfaces. Replace worn heads to keep good striking power and protect tools.
Choose mallet heads made for carving. Replace heads if cracked, split, or deformed.
- Inspect mallet head before each use
- Remove old head carefully
- Fit new head securely to handle
- Test mallet on scrap wood first
- Store mallet in a safe place

Credit: www.schaaftools.com
Frequently Asked Questions
What Is The Best Mallet For Carving Details?
The best mallet for carving details is lightweight with a smooth, rounded head. Wooden or rawhide mallets offer control and precision, reducing wood damage during intricate work. Choose a mallet size that fits comfortably in your hand for better accuracy.
How Do I Hold A Mallet For Detailed Carving?
Hold the mallet near the end of the handle with a relaxed grip. This provides control and power without fatigue. Keep your wrist flexible to guide the chisel gently and avoid excessive force that can damage the carving.
Can I Use A Metal Mallet For Carving Wood Details?
Metal mallets are not ideal for wood carving details. They deliver harder impacts that can split or damage delicate wood. Wooden or rawhide mallets absorb shock better, allowing for finer control and cleaner cuts in detailed carving.
How Do I Avoid Damaging Wood When Using A Mallet?
Use light, controlled taps instead of heavy blows. Always position the chisel correctly and keep it sharp. A softer mallet head like wood or rawhide helps prevent dents and splits in the wood during detailed carving.
Conclusion
Carving details with a mallet adds precision and depth to your work. It transforms basic shapes into intricate designs. Practice makes perfect. Start with simple projects. Gradually tackle more complex patterns. This process helps build confidence. Choose the right mallet for your needs.
Consider weight and material. A comfortable grip is crucial. Proper technique prevents injury. It also ensures better results. Enjoy the journey of learning. Each piece tells a story. Your skills will improve over time. Relish the satisfaction of your crafted details.
Keep exploring new methods and tools. Happy carving!