Are you struggling to get smooth, clean corners and edges in your woodworking or DIY projects? Sanding these tricky spots can be frustrating, but mastering the right techniques will make your work look professional and polished.
In this guide, you’ll discover simple, effective methods to sand corners and edges like a pro. Whether you’re fixing rough spots or preparing surfaces for paint or stain, the tips here will save you time and effort. Keep reading, and you’ll soon enjoy flawless finishes that impress every time.
Choosing The Right Sandpaper
Choosing the right sandpaper is key for sanding corners and edges. The right grit and material make the job easier and better.
Different sanding tasks need different sandpaper types. Knowing grit levels and durability helps pick the best one for your project.
Grit Levels And Their Uses
Sandpaper grit means how rough or smooth it is. Lower grit numbers are rougher. Higher grit numbers are finer.
- Coarse grit (40-60) removes paint and shapes wood fast.
- Medium grit (80-120) smooths surfaces and removes small marks.
- Fine grit (150-220) prepares wood for finishing and makes it smooth.
- Very fine grit (320 and up) is for polishing and final touches.
Materials And Durability
Sandpaper comes in many materials. Each type lasts different times and works best on certain surfaces.
| Material | Best For | Durability |
| Aluminum Oxide | Wood and metal | Long lasting |
| Garnet | Soft wood | Shorter life |
| Silicon Carbide | Metal and plastic | Very durable |
| Ceramic | Heavy sanding | Very long lasting |
Credit: woodworking.stackexchange.com
Tools For Sanding Corners And Edges
Sanding corners and edges requires the right tools to get smooth results. Using proper sanding tools helps avoid damage to the material.
This guide covers hand sanding, sanding blocks and sponges, and power tools for precise sanding on corners and edges.
Hand Sanding Techniques
Hand sanding lets you control the pressure and reach tight spots. Use fine-grit sandpaper for finishing corners and edges.
- Fold sandpaper to fit small corners
- Use your fingers to reach tight edges
- Sand with light, even strokes
- Change sandpaper when it clogs
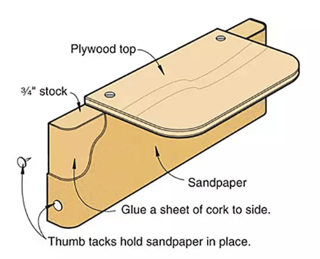
Using Sanding Blocks And Sponges
Sanding blocks and sponges help keep flat surfaces even. They also protect your hands from rough sandpaper.
| Tool | Best Use | Advantages |
| Sanding Block | Flat edges and broad corners | Even pressure, easy to hold |
| Flexible Sponge | Curved edges and irregular shapes | Conforms to shape, smooth finish |
| Detail Sponge | Small corners and tight spots | Precise sanding, less waste |
Power Tools For Precision
Power tools speed up sanding and reach difficult corners. Use them carefully to avoid sanding too much.
- Detail sander for small corners
- Oscillating tool with sanding attachments
- Rotary tool with sanding tips
- Use light pressure and slow speed
Preparing The Surface
Sanding corners and edges requires a clean and smooth surface. Proper preparation helps you get the best results. This guide explains how to prepare the surface before sanding.
Focus on cleaning the area and finding spots that need extra attention. Careful preparation makes sanding easier and improves the final look.
Cleaning And Inspecting
Start by cleaning the corners and edges. Remove dust, dirt, and grease. Check for old paint, glue, or rough patches that can affect sanding.
- Wipe the surface with a damp cloth
- Use mild soap if needed to remove grease
- Let the surface dry completely
- Look closely for damaged or uneven areas
- Remove loose material with a scraper or brush
Marking Problem Areas
Mark spots that need extra sanding or repair. This helps you focus your work and avoid missing rough edges or deep dents.
Use a pencil or masking tape to mark problem areas. Here is a simple table to help identify common issues and how to mark them:
| Issue | How to Mark |
|---|---|
| Rough spots | Draw a small circle |
| Deep dents | Place a piece of masking tape |
| Paint drips | Use a pencil arrow |
Sanding Techniques For Corners
Sanding corners and edges needs care to keep the shape sharp. Using the right method helps avoid damage.
This guide shows how to control angle and pressure and keep edges from rounding off. Follow these tips for good results.
Angle And Pressure Control
Hold the sandpaper at the correct angle to reach corners. Use gentle pressure to avoid removing too much material.
- Keep the sandpaper flat against the surface near the corner.
- Use a light touch to avoid deep scratches.
- Move the sandpaper back and forth in small, controlled strokes.
- Check your progress often to prevent over-sanding.
Avoiding Rounding Off Edges
Keep edges sharp by sanding carefully. Avoid pressing too hard or sanding too long on one spot.
| Common Mistake | Effect | How to Fix |
|---|---|---|
| Using too much pressure | Edges become rounded | Use lighter pressure and check often |
| Sanding with coarse grit | Rough edges and uneven surface | Start with medium grit, finish with fine grit |
| Holding sandpaper at wrong angle | Material removed unevenly | Keep sandpaper flat and aligned with edge |
Sanding Techniques For Edges
Sanding edges is a key part of making wood projects smooth and safe. It helps remove rough spots and shapes the wood cleanly.
Using the right sanding methods keeps edges neat and blends them with the rest of the surface. This guide explains how to do both well.
Maintaining Sharpness
Keeping edges sharp means sanding carefully without rounding them too much. Use fine grit sandpaper for the last steps.
- Start with medium grit sandpaper to shape the edge.
- Use light pressure to avoid dulling the corner.
- Finish with fine grit (220 or higher) to keep edge sharpness.
- Sand along the edge, not across it, for better control.
Blending With Adjacent Surfaces
Blending edges with nearby surfaces creates a smooth transition. It stops sharp edges from standing out or causing damage.
| Technique | Purpose |
| Feather Sanding | Softens edge into flat surfaces |
| Cross-Sanding | Removes sanding marks |
| Edge Rounding | Prevents splinters and chips |
| Final Buffing | Creates uniform look and feel |
Dealing With Different Materials
Sanding corners and edges requires different methods for each material. Using the right tools and techniques helps get smooth, clean results. This guide covers wood, metal, drywall, and plaster.
Each material reacts differently to sanding. Choose the right grit and sanding tool to avoid damage. Safety gear is important for all sanding work.
Wood And Plywood
Wood and plywood need careful sanding to avoid splinters and rough edges. Use sanding blocks or flexible sanding sponges for corners. Start with coarse grit and finish with fine grit for smoothness.
- Use 80-120 grit sandpaper for shaping
- Switch to 180-220 grit for finishing
- Sand along the grain to prevent scratches
- Use sanding sponges for curved edges
- Clean dust before applying finishes
Metal Edges
Metal edges need sanding to remove burrs and sharp points. Use abrasive pads or metal sanding discs. Avoid using soft sandpaper as it wears out fast.
| Material | Tool | Grit | Tip |
| Aluminum | Fine sanding cloth | 400-600 | Use light pressure to avoid scratches |
| Steel | Flap wheel or sanding disc | 120-240 | Wear gloves for protection |
| Copper | Sandpaper or sanding sponge | 320-400 | Clean surface after sanding |
Drywall And Plaster
Drywall and plaster require gentle sanding to smooth joints and edges. Use fine grit sanding blocks or sanding screens. Keep dust low by sanding lightly.
Tips for sanding drywall and plaster:
- Wear a dust mask to protect lungs
- Use a sanding pole for high corners
- Sand in circular motions for even finish
- Remove dust with a damp cloth before painting
Safety Tips During Sanding
Sanding corners and edges can create dust and small debris. These can harm your eyes, skin, and lungs. Safety is important to avoid injuries.
Use the right tools and follow safety rules to protect yourself. This guide covers key safety tips to keep you safe while sanding.
Protective Gear
Wearing the right protective gear helps prevent injuries from dust, splinters, and tool slips. Always prepare before starting to sand.
- Wear safety goggles to protect your eyes from dust and particles.
- Use a dust mask or respirator to avoid breathing in fine dust.
- Put on work gloves to protect your hands from splinters and abrasions.
- Wear long sleeves and pants to protect your skin from irritation.
- Use ear protection if you use power sanders that create loud noise.
Dust Management
Dust from sanding can cause health problems and mess up your work area. Managing dust keeps your workspace clean and your lungs safe.
| Dust Management Tip | How It Helps |
| Use a vacuum sander or attach a vacuum to your sander | Captures dust at the source, reducing airborne particles |
| Work in a well-ventilated area | Keeps dust from building up and improves air quality |
| Clean the workspace regularly with a damp cloth or vacuum | Prevents dust buildup and reduces slipping hazards |
| Wear a respirator rated for fine dust particles | Protects your lungs from harmful dust inhalation |

Credit: mrsander.co.uk
Finishing Touches
After sanding corners and edges, the final steps are key. These steps ensure a clean, smooth surface that looks great.
Taking time to inspect and clean your work will help paint or stain last longer and look better.
Inspecting For Smoothness
Carefully check corners and edges to find any rough spots or bumps. Run your hand gently over the surface. Feel for scratches, uneven patches, or leftover sanding dust.
- Look closely under good light for missed areas.
- Use fine-grit sandpaper on rough spots.
- Remove all sanding dust before moving on.
Cleaning Before Painting Or Staining
Cleaning the surface is important. Dirt and dust can cause paint or stain to stick poorly. Use a soft cloth or tack cloth to wipe down all areas.
| Cleaning Tool | Purpose | Tip |
| Soft Cloth | Remove dust and dirt | Use a clean, dry cloth |
| Tack Cloth | Pick up fine sanding dust | Lightly wipe surfaces |
| Vacuum Cleaner | Clear dust from corners | Use brush attachment |

Credit: enthrallinggumption.com
Frequently Asked Questions
How Do I Sand Corners Without Damaging Edges?
Use a sanding sponge or wrap sandpaper around a small block. Sand gently in circular motions to avoid rounding edges. Keep the pressure light to maintain the corner shape while smoothing rough surfaces.
What Grit Sandpaper Is Best For Edges And Corners?
Start with a medium grit (120-150) for shaping and remove roughness. Finish with a fine grit (220-320) for a smooth surface. Using the right grit prevents over-sanding and preserves edges.
Can I Sand Inside Corners Effectively?
Yes, use a small sanding sponge or fold sandpaper to fit inside corners. Sand carefully to remove imperfections without rounding the edges. Precision tools help reach tight spots easily.
How To Avoid Uneven Sanding On Edges?
Sand with consistent pressure and use sanding blocks or sponges for control. Work slowly and check progress often to maintain even surfaces. Uneven sanding can ruin the edge’s clean look.
Conclusion
Mastering sanding corners and edges takes time and practice. Start slowly. Use the right tools. Pay attention to detail. Smooth surfaces make a big difference. They improve the look and feel. Always sand in a well-lit area. This helps you see imperfections.
Keep your tools clean. They work better and last longer. Remember to wear safety gear. Protect your eyes and lungs. Sanding can create dust. Enjoy the process. Each project improves your skills. Soon, you’ll achieve professional results. Happy sanding!
