Are you ready to tackle your next framing project but unsure how to use a hammer like a pro? Getting the basics right can save you time, effort, and frustration.
Whether you’re building a wall or assembling a frame, mastering hammer techniques will make your work stronger and safer. This guide will walk you through everything you need to know to handle a hammer with confidence. Keep reading, and you’ll soon be hitting every nail perfectly—no more missed swings or bent nails!
Credit: www.protoolreviews.com
Choosing The Right Hammer
Using the right hammer makes framing easier and safer. Picking the correct hammer helps you work faster and with less effort.
This guide explains the key factors to consider when selecting a hammer for framing projects.
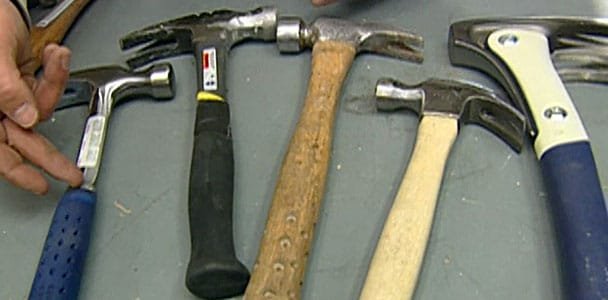
Types Of Hammers For Framing
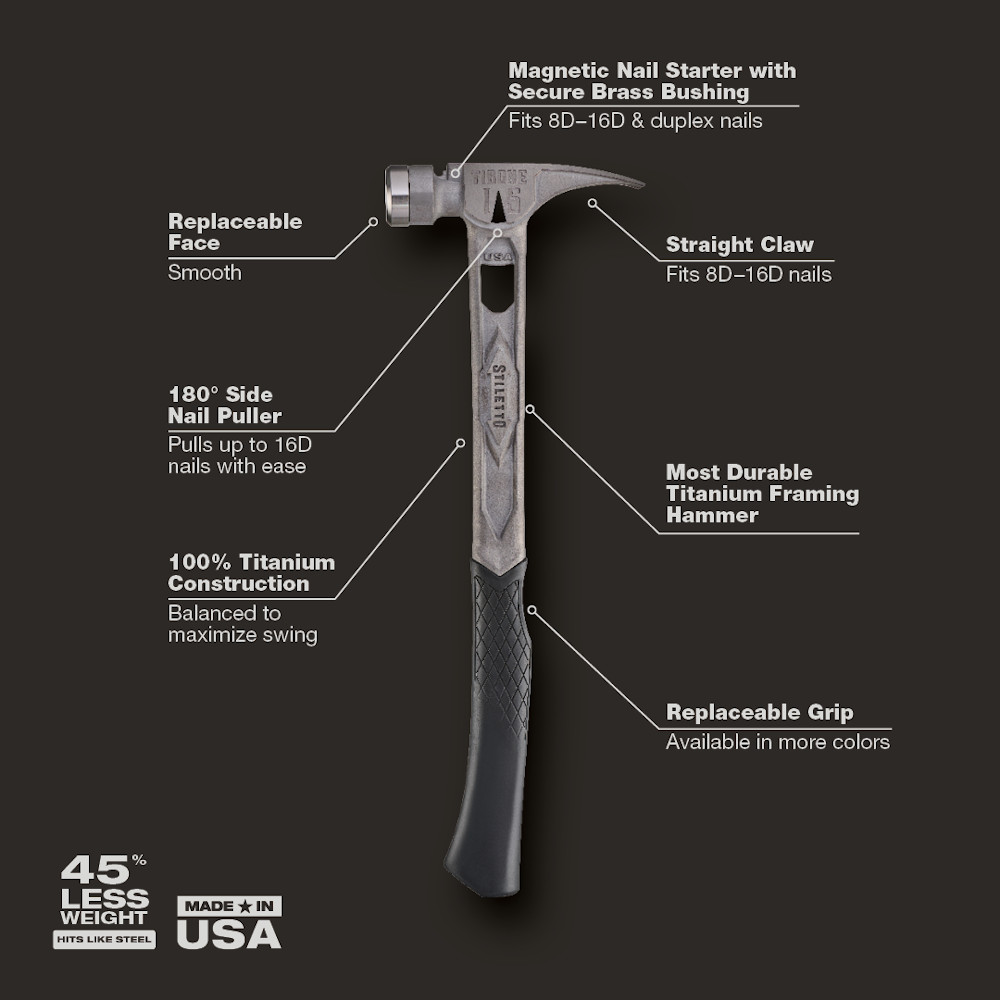
There are several hammer types designed for framing. The most common is the framing hammer. It has a straight claw and a heavy head to drive large nails.
- Framing Hammer: Heavy head, straight claw
- Rip Hammer: Similar to framing but with a curved claw
- Club Hammer: Small, heavy, used for light demolition
- Hammer with a Magnetic Nail Holder: Helps start nails quickly
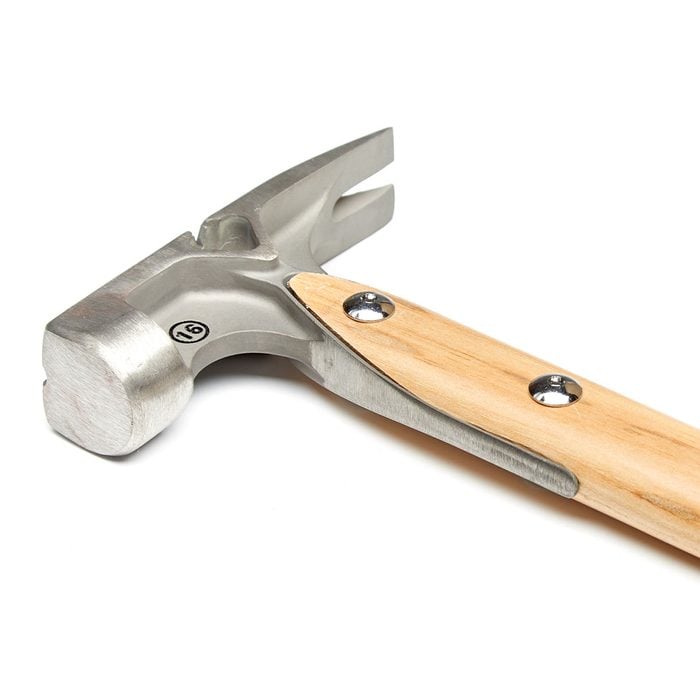
Weight And Handle Material
| Weight | Handle Material |
| 16 to 20 ounces for most framing tasks | Wood: Traditional, absorbs shock |
| Lighter hammers reduce arm fatigue | Fiberglass: Durable, reduces vibration |
| Heavier hammers drive nails faster | Steel: Very strong, can transmit more shock |
Choose the weight based on your strength and comfort. Handle material affects how the hammer feels and handles vibration.
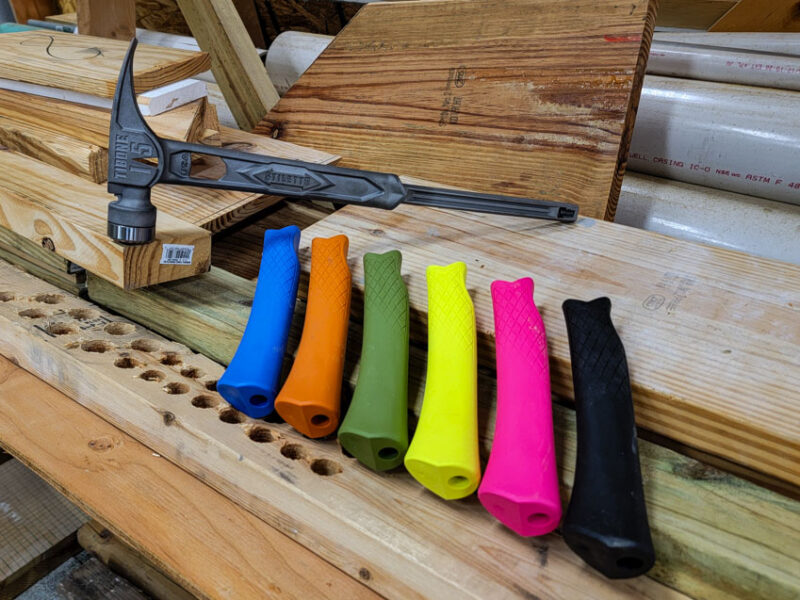
Grip And Comfort
A good grip helps you hold the hammer firmly and avoid slipping. Comfort reduces hand strain during long use.
- Rubber grips add cushioning and prevent slipping
- Textured handles improve control
- Ergonomic shapes reduce fatigue
Credit: www.familyhandyman.com
Preparing For Framing Work
Using a hammer for framing needs careful preparation. You must get ready to work safely and efficiently.
This guide covers the main points to prepare before starting your framing tasks.
Safety Gear Essentials
Protecting yourself during framing work is very important. Use the right safety gear to avoid injuries.
- Wear safety glasses to protect your eyes from flying nails and wood chips.
- Use heavy-duty gloves to protect your hands from splinters and blisters.
- Wear a hard hat to protect your head from falling objects.
- Use ear protection if you work with loud tools nearby.
- Wear sturdy boots with good grip to avoid slipping.
Workspace Setup
Organize your workspace for easy movement and safety. Clear the area of any hazards.
- Keep the floor clean and free of nails or debris.
- Set up good lighting to see your work clearly.
- Arrange tools within easy reach but out of walking paths.
- Use sturdy sawhorses or workbenches to hold lumber steady.
- Mark your work area boundaries to keep others safe.
Selecting Nails
Choose the right nails for framing. The size and type affect the strength of your work.
| Nail Type | Common Use | Length |
|---|---|---|
| Common Nails | Framing walls and general construction | 3 to 4 inches |
| Box Nails | Light framing and trim work | 2 to 3 inches |
| Galvanized Nails | Outdoor framing and moisture areas | 3 to 4 inches |
Basic Hammer Techniques
Using a hammer correctly is important for safe and effective framing. Good technique helps you drive nails faster and prevents mistakes.
This guide covers basic hammer skills every beginner should learn. Start with proper grip and stance, then learn how to swing with control and drive nails straight.
Proper Grip And Stance
Hold the hammer near the end of the handle for the best power. Your grip should be firm but relaxed to avoid fatigue.
Stand with your feet shoulder-width apart. Keep your body balanced and face the nail directly for accuracy.
- Grip hammer handle near the end
- Keep your wrist straight
- Stand with feet shoulder-width apart
- Face the nail squarely
Swinging With Control
Use your elbow and wrist to swing the hammer smoothly. Avoid using your shoulder to keep control and reduce strain.
Start with small swings to place the nail, then use longer swings to drive it in. Keep your eyes on the nail head as you swing.
- Swing with elbow and wrist
- Keep shoulder relaxed
- Begin with light taps
- Increase swing length gradually
- Watch the nail head while swinging
Driving Nails Straight
Hold the nail steady between your fingers at first. Tap lightly to set it into the wood before full swings.
Keep the hammer face flat against the nail head. Strike the nail straight on to prevent bending or splitting wood.
- Hold nail steady before hammering
- Tap lightly to start the nail
- Strike nail head flat and straight
- Avoid hitting the nail at an angle
- Check nail position as you hammer
Advanced Tips For Efficiency
Using a hammer for framing can be quicker and easier with the right techniques. These tips help you work faster and avoid common problems.
Improving your hammer skills saves time and makes your work stronger. Focus on accuracy and speed for best results.
Using Nail Sets
Nail sets help drive nails below the wood surface without damaging the wood. This gives a clean look and avoids splitting the wood.
Hold the nail set tip on the nail head and tap lightly with the hammer. Use short, controlled strikes to sink the nail.
- Choose a nail set size that matches your nail heads.
- Keep your hand steady to avoid slipping.
- Practice on scrap wood to get the right force.
Speed Nailing Tricks
Speed nailing means driving nails quickly without losing accuracy. Use these tricks to save time and keep nails straight.
Hold the hammer near the end of the handle for better control. Start the nail with light taps before full swings.
- Group nails close together to reduce hammer movement.
- Use your non-dominant hand to hold nails steady.
- Keep your eyes on the nail head, not the hammer.
Avoiding Common Mistakes
Framing with a hammer can cause errors like bent nails or split wood. Watch out for these mistakes to improve your work.
Do not hit nails at an angle or too hard. Avoid placing nails too close to edges to prevent wood from cracking.
- Check nail alignment before hammering fully.
- Use the right nail size for the wood thickness.
- Replace worn hammer heads for better strikes.
Maintaining Your Hammer
A hammer is a basic tool for framing work. Keeping it in good shape helps you work safely and well.
Regular care extends your hammer’s life and keeps it ready to use anytime.
Cleaning And Storage
Clean your hammer after each use. Dirt and debris can cause damage over time.
Use a cloth to wipe the handle and head. Remove any sticky substances or rust spots.
- Store the hammer in a dry place to avoid rust.
- Keep it in a toolbox or hang it on a pegboard.
- Do not leave it outside where weather can harm it.
Checking For Wear
Look at the hammer’s head and handle regularly. Check for cracks, chips, or loose parts.
Make sure the head is firmly attached to the handle. A loose head can cause accidents.
- Check the hammer face for dents or mushrooming.
- Inspect wooden handles for splinters or cracks.
- Look for rust or corrosion on metal parts.
When To Replace
Replace your hammer if it is unsafe or no longer works well. Using a bad hammer can cause injury.
Do not use a hammer with a cracked handle or loose head. Also, replace if the face is too worn.
- Handle cracks or breaks
- Head loosens and cannot be tightened
- Hammer face is badly mushroomed or chipped
- Severe rust or corrosion
Credit: www.fastek.ca
Frequently Asked Questions
What Type Of Hammer Is Best For Framing?
A framing hammer has a heavier head and longer handle. It delivers powerful strikes and drives nails efficiently. Its milled face prevents slipping. This makes it ideal for heavy-duty framing tasks and structural work.
How Do You Hold A Hammer Correctly For Framing?
Grip the hammer near the end of the handle for better control and power. Keep your wrist firm but flexible. Aim your strikes precisely to avoid bending nails or damaging wood.
What Safety Tips Should I Follow When Using A Framing Hammer?
Wear safety goggles to protect your eyes from flying debris. Check the hammer for damage before use. Keep your work area clear to avoid accidents. Always strike nails squarely to prevent glancing blows.
How Can I Avoid Damaging Wood While Hammering?
Use a milled face hammer to reduce slipping. Start nails with light taps, then increase force gradually. Avoid overdriving nails, which can split the wood. Use a nail set to countersink nails neatly.
Conclusion
Mastering the use of a hammer for framing simplifies your projects. With practice, your skills improve. Remember, safety comes first. Wear protective gear always. Choose the right hammer for the job. It makes a difference. Follow the steps detailed in this guide.
They ensure efficiency and precision. Keep your tools in good condition for best results. Regular maintenance extends their lifespan. Building with precision saves time and effort. Your confidence grows with each successful project. Enjoy the satisfaction of a job well done.
Happy building!