
Marking perfect circles on wood and metal can be tricky, but it doesn’t have to be. Whether you’re a beginner or have some experience, getting clear, accurate lines is key to making your project look professional.
You might have struggled with smudged marks, uneven curves, or tools that just don’t seem to work right. Imagine having simple, reliable tips that help you draw circles quickly and precisely every time. Keep reading, and you’ll discover easy methods and handy tricks that will change the way you mark circles on your materials forever.
Your next project will thank you!
Choosing The Right Tools
Marking circles on wood and metal needs the right tools. Using proper tools helps you get clean and accurate lines.
Selecting tools depends on the material and the size of the circle. This guide covers three main tool types for marking circles.
Compasses And Dividers
Compasses and dividers are common for drawing circles on wood and metal. They have sharp points or pencil tips to mark precise arcs.
- Compasses hold a pencil and a metal point for steady circles.
- Dividers have two sharp points to scribe circles directly.
- Adjustable arms let you set the circle’s radius accurately.
- Use dividers on metal for scratch marks that paint won’t hide.
Templates And Stencils
Templates and stencils help mark circles quickly and repeatedly. They are often made of plastic or thin metal.
| Type | Material | Best Use |
| Plastic Template | Plastic | Small circles on wood |
| Metal Stencil | Thin Metal | Multiple sizes on metal sheets |
| Adjustable Template | Mixed | Custom circle sizes |
Specialized Marking Tools
Specialized tools offer better control and cleaner marks on both wood and metal. Some tools combine features for more precision.
- Circle cutters with built-in marking tips ensure exact cuts.
- Marking gauges with a wheel or blade scribe even curves.
- Laser markers project circles for hands-free marking.
- Scratch awls give deep marks on metal for visible guides.
Credit: www.popularwoodworking.com
Preparing The Surface
Marking circles on wood and metal requires a clean, smooth surface. Dirt and roughness can cause errors.
Proper surface preparation helps you draw accurate and clear circles for cutting or shaping.
Cleaning And Smoothing Wood
Remove dust and debris from the wood surface before marking. Sand the area with fine-grit sandpaper. This smooths out rough spots and helps the pencil or marker glide evenly.
- Use a soft brush or cloth to clear dust.
- Sand in the direction of the grain.
- Wipe the surface with a damp cloth to remove sanding dust.
- Let the wood dry completely before marking.
Prepping Metal Surfaces
Metal surfaces need to be free of grease, rust, and paint for clear marks. Use a cleaner and a wire brush or sandpaper to prepare the area.
| Surface Problem | Cleaning Method | Tools Needed |
| Grease or Oil | Wipe with degreaser or rubbing alcohol | Cloth, degreaser |
| Rust | Scrape or sand rust off | Wire brush, sandpaper |
| Paint | Sand off paint where marking is needed | Sandpaper, scraper |
Applying Marking Aids
Use marking aids to improve line visibility and accuracy. Chalk, marking fluids, or tape can help you see marks better on tough surfaces.
- Apply chalk or marking fluid evenly on the surface.
- Use painter’s tape to create a clean edge and prevent smudging.
- Choose a fine-tip marker or pencil suited to the material.
- Test your marking tool on a scrap piece before starting.
Techniques For Wood Circles
Marking circles on wood needs care and the right tools. Good marks help you cut or carve with accuracy.
Many ways exist to draw circles on wood. Some ways are simple, while others use guides or tools.
Using A Compass On Wood
A compass is a great tool for drawing circles on wood. It helps you make smooth, round shapes.
Set the compass point firmly in place. Move the pencil end slowly around to draw the circle.
- Check the compass point is sharp for steady marking
- Hold the compass straight to avoid uneven lines
- Practice on scrap wood before marking your project
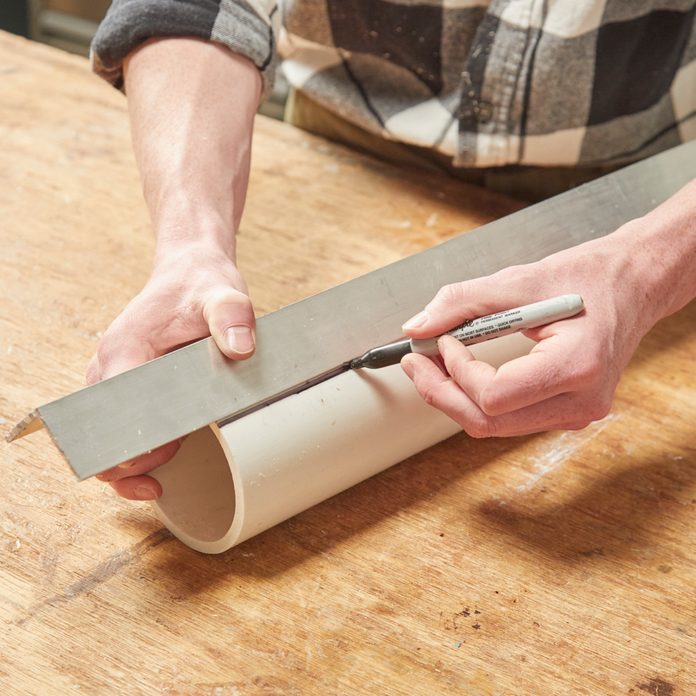
Creating Perfect Circles With Templates
Templates help you trace exact circles without measuring. Use them to save time and get neat results.
You can buy circle templates or make your own with thin wood or plastic. Trace around the edge carefully.
- Use a stable template that does not slip
- Trace with a sharp pencil or marking knife
- Check the template size fits your project needs
Avoiding Common Woodmarking Mistakes
Common mistakes can ruin your circle marks. Avoid them to keep your work clean and precise.
Do not press too hard with your pencil. Avoid moving the compass point while drawing.
- Use light marks first, then darken after checking
- Keep tools clean and sharp for clear lines
- Double-check measurements before drawing circles
- Work on a flat, stable surface to prevent slips

Credit: www.familyhandyman.com
Techniques For Metal Circles
Marking circles on metal requires precise tools and careful handling. The metal surface can be hard and shiny, making it tricky to draw clear lines.
Using the right techniques helps create accurate marks for cutting or drilling. This guide explains useful ways to mark metal circles.
Marking With Scribes
Scribes are sharp tools that scratch the metal surface to make fine lines. They work well on metals like steel or aluminum.
Use a compass scriber to draw circles. Set the radius, hold the point steady, and gently drag the scribe around the center.
- Clean the metal surface before marking
- Apply light pressure to avoid deep scratches
- Use a steady hand for smooth, even lines
- Check your marks under good light for clarity
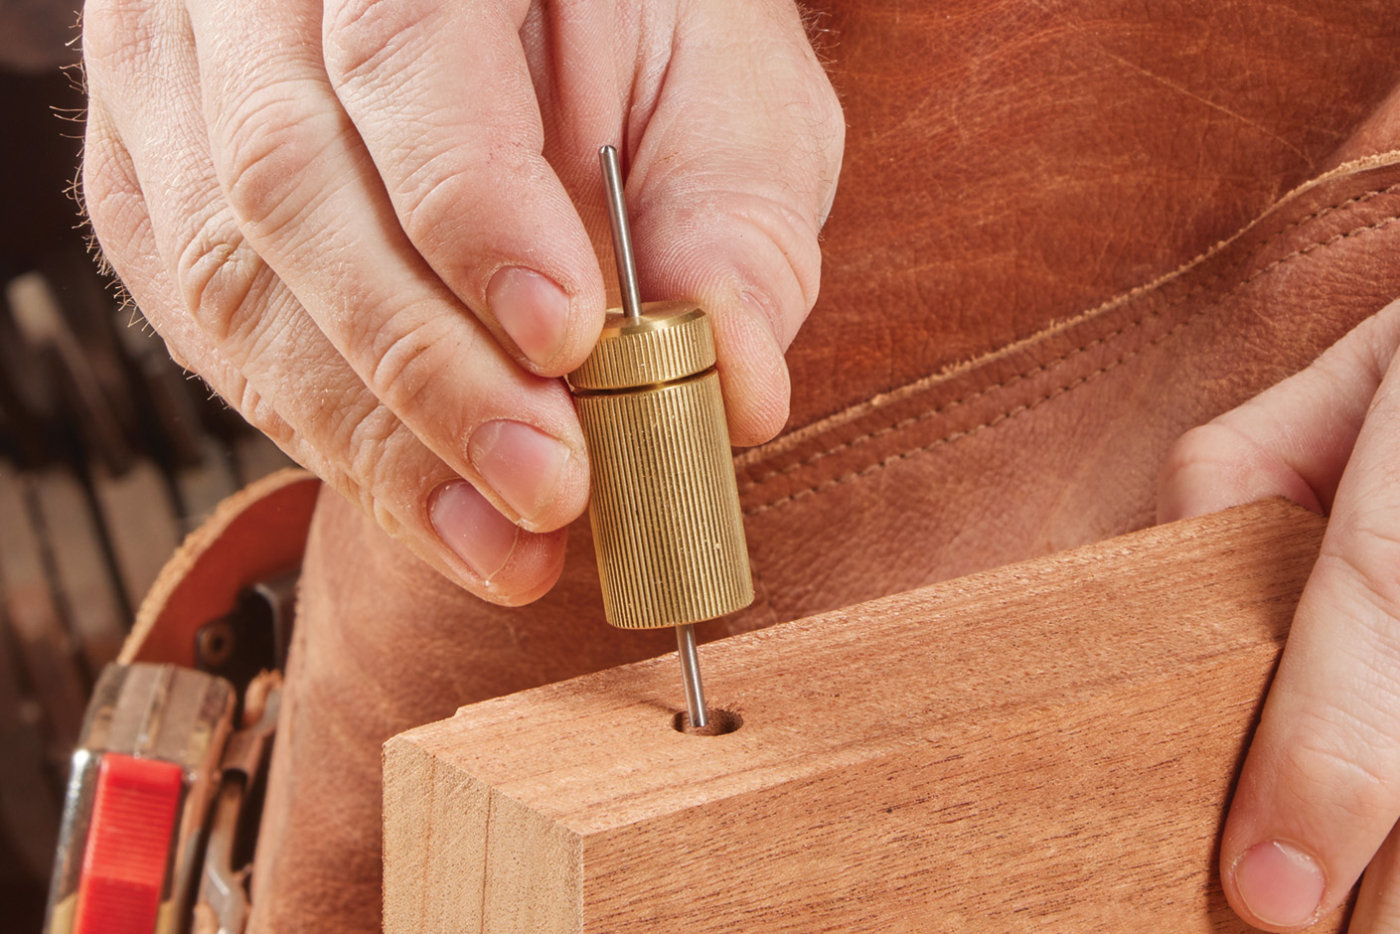
Using Punches For Accuracy
Punches create small indentations that help guide drilling or cutting tools. They improve accuracy by marking the exact center or points on the circle.
Place the punch at the desired spot and tap gently with a hammer. Avoid heavy hits that might distort the metal or move the punch.
- Use a center punch for the middle of the circle
- Mark key points on the circle’s edge for reference
- Keep the punch vertical to get clean indentations
- Wear safety glasses to protect from metal shards
Handling Reflective Surfaces
Shiny metals reflect light and make it hard to see markings. Dull the surface slightly to improve visibility before marking.
Use a fine abrasive pad or sandpaper to create a matte finish on the area where you will mark the circle. This reduces glare and helps lines stand out.
- Clean the metal before sanding to remove oils
- Sand just enough to dull the surface, not damage it
- Apply a thin layer of marker or chalk to enhance lines
- Work in a well-lit area for better visibility
Ensuring Precision And Accuracy
Marking circles on wood and metal requires careful steps. Precision and accuracy help create perfect shapes.
Using the right methods and tools makes your work clean and professional. Small mistakes can cause big problems later.
Measuring And Rechecking
Accurate measurement is the first key to marking circles. Always double-check your marks before cutting or drilling.
- Use a reliable ruler or caliper for exact measurements.
- Draw light guide lines to avoid permanent marks.
- Recheck the radius and center point before marking.
- Confirm all measurements with a second tool if possible.
Securing The Workpiece
Hold your wood or metal piece firmly to prevent slips. Movement can ruin your circle’s shape.
| Method | Benefit |
|---|---|
| Clamps | Keeps the workpiece steady and safe |
| Workbenches with Vises | Holds material tightly for precise marking |
| Non-slip mats | Prevents sliding on smooth surfaces |
Maintaining Tools For Best Results
Sharp and clean tools improve accuracy. Dull tools can cause errors or damage the material.
- Keep compasses and dividers clean and rust-free.
- Sharpen pencil points for fine, visible lines.
- Check calipers for smooth movement and correct calibration.
- Store tools properly to avoid damage.
Troubleshooting Common Issues
Marking circles on wood and metal can be tricky. You may face problems like slips, smudges, or uneven lines.
Knowing how to fix these issues helps you get neat and accurate marks every time.
Dealing With Slips And Smudges
Slips happen when your tool moves unexpectedly. Smudges occur when marks blur or spread. Both can ruin your work.
Use a sharp pencil or fine-tip marker for better control. Hold your tool steady and apply light pressure.
- Rest your hand on the surface to steady it
- Draw slowly to avoid slips
- Let ink or pencil marks dry before touching
- Use painter’s tape to protect areas from smudging
Correcting Inaccurate Marks
Sometimes your circle marks may be off-center or uneven. Fix these errors before cutting or drilling.
Lightly erase pencil marks with a soft eraser. For metal, use a fine abrasive pad or steel wool to remove ink marks.
- Measure twice to check mark placement
- Use a compass or template for perfect circles
- Redraw marks carefully after correction
- Work in good light to spot mistakes early
Working With Irregular Surfaces
Wood and metal surfaces can be rough or curved. This makes marking circles harder and less precise.
Use flexible measuring tools like a bendable ruler or wire compass. Hold your tool firmly to follow the surface shape.
- Sand rough areas smooth before marking
- Use a pencil for rough wood and a marker for metal
- Make several light marks instead of one heavy line
- Check your marks from different angles
Credit: www.familyhandyman.com
Frequently Asked Questions
How Do I Mark A Perfect Circle On Wood?
Use a compass or a makeshift trammel with a pencil. Secure the wood and keep the pivot point steady. This ensures a smooth, accurate circle without scratches or irregular edges.
What Tools Work Best For Marking Circles On Metal?
Use a scribe, metal compass, or a center punch for accuracy. Mark lightly first to avoid deep scratches. These tools help create clear, precise circles on metal surfaces.
Can I Use A Compass For Large Circles On Wood?
Yes, extend the compass arm or use a DIY trammel. This allows you to mark large circles accurately. Ensure the pivot point is stable for a clean circle.
How To Avoid Slipping While Marking Circles On Metal?
Secure the metal piece firmly with clamps. Use steady, controlled pressure with your marking tool. This prevents slips and ensures accurate, clean circle markings on metal.
Conclusion
Marking circles on wood and metal is simple with the right tools. Start by choosing a compass or a template. Next, measure your desired diameter carefully. Then, mark your circle with precision. Practice patience for clean results. Always ensure your tools are sharp and in good condition.
This prevents mistakes and ensures accuracy. Whether you’re crafting or building, these tips help. Try them in your next project for better outcomes. Happy crafting!
