Are you ready to tackle your next DIY project but unsure about using a claw hammer for nails? You’re not alone.
Whether you’re hanging a picture frame or fixing a loose board, using this basic tool correctly can make a world of difference. Imagine the satisfaction of driving in nails smoothly without bending them or, worse, damaging your walls. By mastering the use of a claw hammer, you can transform your home improvement tasks from daunting to doable.
This guide will show you the secrets to wielding a claw hammer like a pro, ensuring your projects are not only completed with ease but also with precision. Stick around, because by the end of this article, you’ll have the confidence and skills to tackle any nailing job with finesse.
Credit: www.homedepot.com
Choosing The Right Claw Hammer
Using a claw hammer correctly starts with picking the right one. The right hammer makes driving nails easier and safer.
Different hammers fit different tasks. Learn how to choose one by size, type, and handle material.
Types Of Claw Hammers
Claw hammers come in several types. Each type suits different jobs and nail sizes.
- Rip Claw Hammer: Has a straight claw for prying apart wood.
- Curved Claw Hammer: Features a curved claw for pulling nails easily.
- Ball Peen Hammer: Used mainly in metalwork, not for nails.
- Cross Peen Hammer: Helpful for starting nails in tight spaces.
Selecting Hammer Size And Weight
Hammer size and weight affect your control and power. Choose one that feels balanced in your hand.
| Hammer Weight | Best For |
|---|---|
| 8 to 12 ounces | Small nails and light tasks |
| 16 ounces | General household use |
| 20 ounces or more | Heavy-duty framing and construction |
Handle Materials And Grip
Handle materials impact comfort and durability. Choose a handle that reduces slipping and shock.
- Wood: Classic look, good shock absorption, may need maintenance.
- Fiberglass: Durable and reduces vibration, often with padded grips.
- Steel: Very strong but can transfer more shock to your hand.
- Rubber Grip: Helps prevent slipping and adds comfort.
Preparing For Nail Driving
Using a claw hammer to drive nails needs some preparation. Getting ready helps you work safely and accurately.
This guide covers how to select nails, mark nail spots, and use safety gear before you start hammering.
Selecting The Right Nails
Pick nails that fit your project. The size and type matter for strong holds and clean work.
| Nail Type | Best Use | Length |
| Common Nails | Framing and construction | 2 to 4 inches |
| Finish Nails | Trim and molding | 1 to 2.5 inches |
| Box Nails | Light woodwork | 1.5 to 3 inches |
Marking Nail Positions
Mark where each nail will go before you start. This helps keep nails straight and spaced well.
- Use a pencil to make small marks
- Space nails evenly for strong joints
- Check alignment with a ruler or square
- Avoid placing nails too close to edges
Safety Gear Essentials
Wear the right gear to protect yourself from injury. Safety is important when hammering nails.
- Safety glasses to protect your eyes
- Work gloves to protect your hands
- Closed-toe shoes to protect your feet
- Hearing protection if working in loud areas
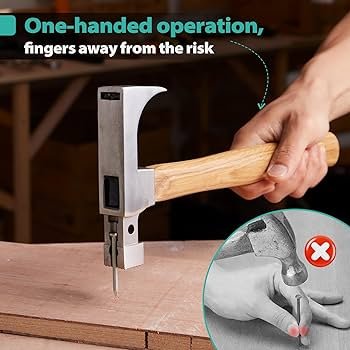
Proper Hammer Grip And Stance
Using a claw hammer the right way helps you drive nails safely and accurately. The right grip and stance make your work easier and reduce injury risk.
Focus on how you hold the hammer and position your body. This will improve your control and power when hitting nails.
Holding The Hammer Correctly
Hold the hammer near the end of the handle. This gives you more power and control. Your grip should be firm but relaxed.
Wrap your fingers around the handle with your thumb pointing along the handle. Avoid holding the hammer too tightly to reduce arm fatigue.
- Hold the hammer near the end of the handle
- Keep a firm but relaxed grip
- Wrap fingers around the handle with thumb aligned
- Do not grip too tightly
Positioning Your Body
Stand with your feet shoulder-width apart. This stance helps you stay steady and balanced. Face the nail directly for better accuracy.
Bend your knees slightly and keep your back straight. This position reduces strain and lets you swing the hammer smoothly.
- Feet shoulder-width apart
- Face the nail straight on
- Bend knees slightly
- Keep your back straight
Maintaining Balance
Keep your weight evenly spread on both feet. Avoid leaning too far forward or backward. Good balance helps you control the hammer better.
Use your non-dominant hand to hold the nail steady. Keep your arm relaxed and avoid locking your joints to prevent injury.
- Distribute weight evenly on both feet
- Do not lean forward or backward
- Hold the nail with your non-dominant hand
- Keep arms relaxed and joints unlocked

Credit: www.amazon.com
Nailing Techniques For Beginners
Using a claw hammer to drive nails is a basic skill in many projects. Learning good nailing techniques helps you work safely and efficiently.
This guide shows simple steps to start nails, drive them straight, and avoid common mistakes.
Starting The Nail With Taps
Hold the nail near its head with your fingers. Tap the nail gently with the hammer to set it in place.
Use light, controlled taps to avoid bending the nail or hitting your fingers.
- Hold the nail steady between thumb and forefinger
- Use soft taps to start the nail
- Stop tapping when the nail stands on its own
- Move your fingers away before driving the nail fully
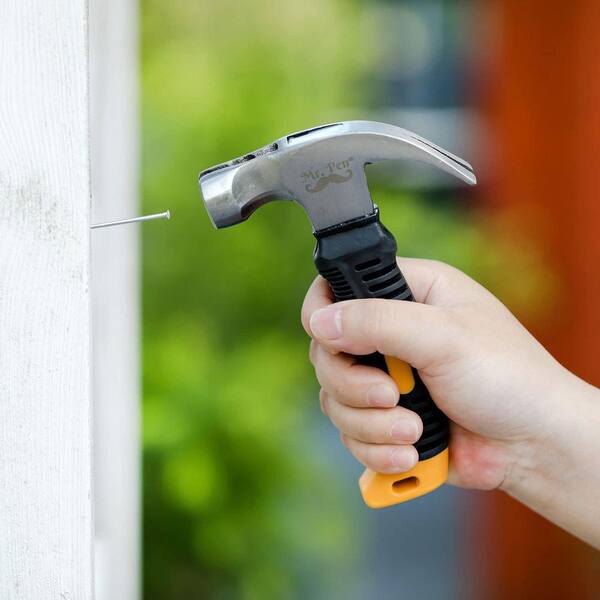
Driving Nails Straight
Keep the hammer aligned with the nail to drive it straight. This helps the nail hold better and prevents damage.
Use smooth, firm swings. Avoid hitting the nail at an angle or with too much force.
- Hold hammer near the end of the handle for control
- Focus on the nail head when swinging
- Keep the nail vertical and steady
- Drive the nail until the head is flush with the surface
Avoiding Common Mistakes
New users often bend nails or hit their fingers. Watch out for these mistakes to work safely.
Take your time and keep your hands clear of the hammer’s path.
- Do not use nails that are too long or too short
- Avoid hitting the nail at a sharp angle
- Keep fingers away after starting the nail
- Replace bent nails to avoid poor holding
- Wear safety glasses to protect your eyes
Removing Nails With A Claw Hammer
Removing nails can be easy if you use a claw hammer correctly. This tool helps pull nails out safely and quickly.
Knowing the right way to use the claw hammer prevents damage and saves effort during nail removal.
Using The Claw Effectively
Place the claw under the nail head carefully. Make sure the claw grips the nail firmly. Pull the handle back slowly to lift the nail.
Keep your hand steady to avoid slipping. If the nail is stuck, wiggle the hammer gently to loosen it before pulling.
Leveraging For Easy Removal
- Slide the claw under the nail head as far as possible.
- Use the hammer’s curved side as a lever on the surface.
- Pull the handle slowly to pry the nail out.
- If the nail is long, repeat the process from different angles.
- Apply steady pressure to avoid breaking the nail.
Protecting Surfaces During Removal
Place a small piece of wood or cardboard under the hammer’s claw. This stops the hammer from scratching or denting the surface.
| Protection Item | Use |
|---|---|
| Wood Block | Prevents dents on wood surfaces |
| Cardboard | Protects painted or delicate surfaces |
| Cloth Rag | Reduces slipping and scratches |

Credit: owlp.pl
Advanced Tips For Perfect Results
Using a claw hammer to drive nails needs skill and care. Small mistakes can bend nails or damage wood.
These advanced tips help you control the hammer better and work on tough materials. You will also learn how to keep your hammer in top shape.
Controlling Hammer Force
Use smooth, controlled swings instead of hard hits. This helps drive nails straight without bending them.
Hold the hammer near the end of the handle. This gives more control and power. Start with gentle taps to set the nail.
- Keep your wrist firm but relaxed
- Focus on accuracy over strength
- Adjust force based on nail size and wood type
Dealing With Hard Materials
Hard woods and tough surfaces need extra care. Use nails made for hard materials to avoid bending.
Pre-drill small holes before hammering. This reduces resistance and stops wood from splitting.
- Choose longer nails for thick wood
- Use a nail set to finish nails below the surface
- Wear safety glasses to protect your eyes
Maintaining Your Hammer
Clean your hammer after use. Remove dirt and rust to keep it working well.
Check the handle for cracks or splinters. Tighten or replace loose heads to avoid accidents.
- Store in a dry place to prevent rust
- Use oil on metal parts for smooth use
- Replace worn handles promptly
Frequently Asked Questions
How Do I Hold A Claw Hammer Correctly?
Hold the hammer near the end of the handle for control and power. Grip it firmly but not too tight. Position your wrist to allow smooth swinging. This technique improves accuracy and reduces fatigue during nail driving.
What Is The Best Way To Start Nails With A Claw Hammer?
Start by placing the nail tip on the wood surface. Hold it steady between your fingers. Tap gently with the hammer’s face until the nail stands on its own. This prevents bending and ensures a straight drive.
How Can I Remove Nails Using A Claw Hammer?
Slide the claw under the nail head carefully. Use the hammer handle as leverage to pull the nail out. Apply steady pressure to avoid damaging the wood. This method makes nail removal efficient and safe.
What Safety Tips Should I Follow Using A Claw Hammer?
Always wear safety goggles to protect your eyes. Check the hammer for damage before use. Keep fingers clear when striking nails. Work in a well-lit area to improve precision and prevent accidents.
Conclusion
Using a claw hammer for nails becomes easier with practice. Hold the hammer firmly and strike nails straight. Use the claw side to pull nails gently out. Always keep your fingers clear to avoid injury. Work slowly at first, then build speed safely.
With time, you will feel more confident and precise. Simple steps make your project smooth and successful. Keep safety in mind and enjoy your work.
