Are you ready to elevate your woodworking projects to the next level? Understanding how to measure angles accurately can make all the difference between a good project and a great one.
Imagine crafting pieces that fit together seamlessly, creating not just functional items, but works of art. With the right techniques, you can achieve precision and perfection every time. In this guide, you’ll discover straightforward methods to measure angles, ensuring your projects look professional and polished.
Whether you’re a seasoned woodworker or just starting out, mastering these skills will boost your confidence and craftsmanship. Dive in, and see how simple adjustments can transform your woodworking experience. Your next masterpiece is just a few degrees away!

Credit: www.wikihow.com
Choosing The Right Tools
Measuring angles correctly is important for good woodworking results. Using the right tools helps you get accurate cuts and fits.
Different tools work best for different tasks. Choose tools based on the angle size and project needs.
Common Angle Measuring Tools
Many simple tools can measure angles well. They are easy to use and widely available for basic woodworking tasks.
- Protractor:A half-circle tool that measures angles in degrees.
- Combination Square:Measures angles and checks edges for accuracy.
- Speed Square:A triangular tool that marks common angles quickly.
- Bevel Gauge:Adjusts to copy and transfer angles easily.
Specialized Tools For Woodworking
Specialized tools offer more precision for complex angles. They help woodworkers create custom fits and joints.
- Digital Angle Finder:Shows angle measurements on a digital screen for accuracy.
- Sliding T-Bevel:Adjusts and locks to any angle for transferring measurements.
- Mitre Gauge:Fits on saws to set exact cutting angles.
- Angle Blocks:Fixed angle blocks to check and set common angles precisely.

Credit: www.familyhandyman.com
Preparing Your Workspace
Measuring angles correctly is key for good woodworking. A clean and organized workspace helps you measure better.
Prepare your area so you can work safely and accurately. This saves time and avoids mistakes.
Ensuring A Flat Surface
Use a flat, stable surface to measure angles. Uneven surfaces cause wrong readings.
Check your workbench or table with a level tool. Fix any bumps or dips before starting.
- Clear clutter from the surface
- Use a carpenter’s level to check flatness
- Place a straight edge to spot warps
- Adjust or replace the surface if needed
Marking Reference Points
Mark clear reference points on your wood. These points guide your angle measurements.
Use a sharp pencil or marking knife for accuracy. Mark points at edges or corners where angles meet.
- Choose visible, easy-to-reach spots
- Mark points before cutting or measuring
- Label marks if you have many angles
- Double-check marks for correctness
Measuring Angles Manually
Measuring angles is important in woodworking projects. It helps you cut wood pieces that fit well. You can measure angles without fancy tools. Manual tools like protractors and combination squares work well.
This guide shows how to use these tools to get accurate angle measurements. Follow simple steps to improve your woodworking skills.
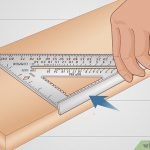
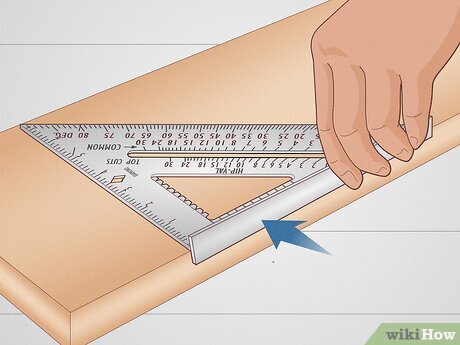
Using A Protractor
A protractor is a tool shaped like a half-circle. It has degree marks from 0 to 180. You use it to measure or draw angles on wood. Place the protractor carefully for the best results.
- Place the flat edge of the protractor along one side of the angle.
- Align the center hole over the angle’s vertex point.
- Read the degree where the other side of the angle crosses the protractor scale.
- Mark the angle on your wood if you need to cut or check it.
Applying A Combination Square
A combination square has a ruler and a movable head. It can measure 90 and 45-degree angles. It helps check if edges are square or mark angles for cuts.
| Task | How to Use |
| Measure 90-degree angle | Set the head at 90 degrees and place it on the wood edge. |
| Measure 45-degree angle | Move the head to 45 degrees and align with the wood edge. |
| Mark an angle | Use the ruler edge with the head set to the needed angle and draw a line. |

Credit: www.wikihow.com
Using Digital Tools
Measuring angles accurately is important in woodworking. Digital tools help make this task easier and faster.
Digital angle finders give precise readings that improve your project’s quality. They are simple to use and save time.
Benefits Of Digital Angle Finders
Digital angle finders offer many benefits over traditional tools. They provide quick and accurate angle measurements.
- Easy to read digital display
- High precision reduces mistakes
- Can measure angles in different units
- Portable and lightweight for convenience
- Often include hold functions to save readings
Step-by-step Digital Measurement
Follow these steps to measure angles using a digital angle finder. This method works for most woodworking projects.
- Turn on the digital angle finder and calibrate it if needed.
- Place the tool flat on one surface of the wood piece.
- Adjust the tool until it aligns with the second surface.
- Read the angle measurement from the digital display.
- Record the measurement or use the hold function to keep it visible.
- Double-check the reading for accuracy before cutting or joining.
| Step | Action | Tip |
| 1 | Turn on and calibrate | Calibrate on a flat surface |
| 2 | Place on first surface | Ensure full contact |
| 3 | Align with second surface | Move slowly for accuracy |
| 4 | Read the angle | Use the digital display |
| 5 | Hold or record reading | Use hold function if available |
| 6 | Double-check measurement | Repeat if unsure |
Transferring Angles To Wood
Measuring and transferring angles accurately is key for woodworking projects. It helps you cut wood pieces that fit together well.
There are tools that make this task easier. Two common tools are the bevel gauge and the carpenter’s square.
Marking With A Bevel Gauge
A bevel gauge lets you copy angles from one surface to another. It has an adjustable blade you can set to the angle needed.
To use it, loosen the knob, place the blade against the angle, then tighten the knob. Transfer the angle by tracing along the blade on your wood.
- Loosen the blade to adjust the angle
- Place the blade against the angle you want
- Tighten the blade to hold the angle
- Trace the blade line on your wood piece
Using A Carpenter’s Square
A carpenter’s square helps mark right angles and some common angled cuts. It has a ruler and a fixed 90-degree corner.
Place the square on the edge of the wood. Use the rulers to mark lines for right angles or measure other angles by combining the square with a protractor.
- Set the square on the wood edge
- Use the 90-degree corner for right angles
- Mark lines along the ruler
- For other angles, measure with a protractor first
Checking Accuracy
Measuring angles correctly is vital for woodworking projects. Small errors can cause big problems in fitting parts together.
Checking accuracy helps ensure your cuts and joints fit well. It saves time and material waste.
Common Mistakes To Avoid
Many woodworkers make simple mistakes that affect angle accuracy. Avoid these to get better results.
- Not calibrating your angle measuring tool before use
- Rushing the measuring process without steady support
- Ignoring the thickness of the saw blade when marking angles
- Using worn or damaged tools that give false readings
- Measuring angles on uneven or unstable surfaces
Double-checking Techniques
It is smart to check your angle measurements twice or more. This reduces mistakes and builds confidence.
| Technique | How to Do It |
| Use a digital angle finder | Measure the angle with the tool and compare it to your mark |
| Cross-check with a protractor | Align the protractor and confirm the angle matches your tool |
| Cut a test piece | Make a small cut and check if it fits the joint correctly |
| Compare opposite angles | Measure angles on both sides of the joint for consistency |
| Ask for a second opinion | Have another woodworker verify your measurements |
Tips For Complex Angles
Measuring angles is important for woodworking projects. Complex angles need special care to get right. Incorrect angles can cause gaps or weak joints.
Using the right tools and techniques helps you measure angles accurately. This guide covers tips for tricky angles in your projects.
Measuring Compound Angles
Compound angles have two different angles at the same time. These angles make cutting and joining wood harder. You need to measure both angles carefully.
Use a bevel gauge to copy one angle. Then, use a protractor to measure the second angle. Mark both angles on your wood before cutting.
- Set the bevel gauge to one angle
- Lock it in place and transfer to wood
- Use a protractor for the second angle
- Draw clear cutting lines for both angles
Dealing With Irregular Shapes
Irregular shapes do not have straight or even edges. Measuring angles on these shapes needs creativity and patience. Take your time to get accurate results.
Try tracing the shape onto paper first. Use a ruler and protractor on the paper to find angles. Then transfer these measurements to your wood piece.
- Trace the irregular shape on paper
- Measure angles on the paper with a protractor
- Mark these angles on your wood
- Cut slowly and check fit often
Maintaining Your Tools
Keeping your angle measuring tools clean and well stored helps them last longer.
Proper care ensures accurate measurements for your woodworking projects.
Cleaning And Storage
Remove dirt and dust after each use to avoid build-up on your tools.
- Use a soft cloth to wipe surfaces clean.
- Avoid harsh chemicals that can damage metal parts.
- Keep tools dry to prevent rust.
- Store tools in a protective case or toolbox.
- Place them in a dry, cool area away from direct sunlight.
Calibration Tips
Check your angle tools regularly to maintain accuracy.
| Calibration Task | Frequency | Notes |
|---|---|---|
| Check zero point | Before each project | Ensure tool reads zero when closed |
| Test with known angle | Monthly | Use a protractor or angle block |
| Adjust screws or dials | As needed | Follow tool manual for adjustments |
Frequently Asked Questions
How Do I Measure Angles Accurately For Woodworking?
Use a protractor or angle finder for precise angle measurement. Mark the angle on your wood before cutting. Double-check measurements to avoid errors. Proper tools ensure cleaner joints and better project results.
What Tools Are Best For Measuring Woodworking Angles?
Protractors, bevel gauges, and digital angle finders are ideal. Each tool offers accuracy for different angle types. Choose based on the complexity of your project and personal preference. Quality tools improve cutting precision.
How Can I Measure Inside And Outside Angles?
Use a bevel gauge for inside angles by adjusting its blade. For outside angles, place the tool on the wood’s edge. Transfer the angle to a protractor for exact measurement. This method works well for various joints.
Why Is Angle Measurement Important In Woodworking?
Accurate angle measurement ensures tight joints and stable structures. It prevents gaps and misalignments in your project. Proper angles improve the overall finish and durability. Measuring angles carefully saves time and materials.
Conclusion
Measuring angles accurately improves your woodworking results. Use the right tools for precise cuts every time. Practice measuring to gain confidence and skill. Double-check angles before cutting to avoid mistakes. Clear marks guide your saw and save wood. Good angle measuring helps create strong, neat joints.
Keep your workspace organized for easier measurements. Patience and care make your projects look professional. Enjoy building with angles done right.