Imagine stepping into your garage, and instead of chaos, you find a perfectly organized tool wall. Every wrench, screwdriver, and hammer has its place, saving you time and frustration.
Doesn’t that sound ideal? If you’ve ever spent precious minutes searching for the right tool or been overwhelmed by garage clutter, you’re not alone. Creating a garage tool wall can transform your workspace, making every project more efficient and enjoyable.
You’ll discover simple and effective tips to design a tool wall that’s not just functional, but also a source of pride. Get ready to unlock the secret to a more organized and productive garage!
Choosing The Right Wall
Picking the best wall for your garage tool wall is important. It affects how much you can store and how easy it is to use your tools.
Look at your garage space and think about what wall will work best for your needs and tools.
Assessing Available Space
Measure the walls in your garage. Check for any windows, doors, or obstacles that limit space. This helps you know how much room you have for your tool wall.
- Measure wall length and height
- Note locations of windows and doors
- Check for electrical outlets or switches
- Look for any pipes or vents on the wall
- Consider how much space you need for walking
Considering Wall Material
Know what your wall is made of before adding hooks or shelves. Some materials hold heavy tools better than others.
| Wall Material | Best Use | Notes |
| Drywall | Light tools | Use anchors for heavy items |
| Concrete | Heavy tools | Requires special drill bits |
| Wood Panel | Medium to heavy tools | Easy to attach hooks and shelves |
| Metal | Magnetic tool holders | Use magnets for small tools |
Lighting And Accessibility
Good lighting helps you find tools fast. Make sure the wall is easy to reach and well lit.
Consider these tips for lighting and access:
- Place tool wall near garage lights or add a lamp
- Keep frequently used tools at eye level
- Leave enough space to open doors or cabinets
- Use bright LED bulbs for clear visibility

Credit: www.ramblingrenovators.ca
Selecting Tool Storage Systems
Organizing your garage tools helps you work faster and keeps the space tidy. Choosing the right storage system is key to easy access and safety.
Think about how often you use each tool and the space you have before selecting storage options. Good storage protects tools and saves room.
Pegboards And Hooks
Pegboards offer a flexible way to store tools on the wall. Hooks fit into the holes and hold hammers, wrenches, and other hand tools.
You can arrange hooks to match tool sizes and shapes. Pegboards keep tools visible and easy to grab.
- Choose a pegboard made of metal or hardboard
- Use various hook sizes for different tools
- Label spaces to find tools quickly
- Keep heavy tools near the bottom for safety
Magnetic Strips
Magnetic strips hold metal tools like screwdrivers and pliers. They stick to the wall and keep tools within reach.
These strips save space and make tools easy to see. They work well for light to medium weight metal tools.
- Install strips at eye level for quick access
- Use strong magnets to hold heavier tools
- Keep the strip clean to keep tools from slipping
- Avoid placing near electronics that may be affected
Shelving And Cabinets
Shelves and cabinets store larger tools and supplies. They protect tools from dust and damage while keeping your garage neat.
Choose sturdy shelves for heavy tools. Cabinets with doors help hide clutter and keep tools secure.
- Use adjustable shelves for flexibility
- Label cabinet doors to find tools faster
- Keep frequently used tools at eye level
- Use clear bins inside cabinets for small parts
Organizing Tools By Type
Organizing your garage tools by type helps you find them fast. It also keeps your workspace neat and safe.
Sorting tools into groups makes it easy to store and reach for the right one quickly. Use walls or racks to save space.
Hand Tools Layout
Place hand tools like hammers, screwdrivers, and pliers in easy-to-reach spots. Keep similar tools together to avoid clutter.
- Group screwdrivers by type and size
- Hang hammers on hooks for quick access
- Use magnetic strips for metal hand tools
- Store wrenches by size on a pegboard
Power Tools Placement
Power tools need a sturdy spot. Keep them near power outlets to charge batteries or plug in cords.
| Tool | Storage Tip | Placement |
| Drill | Use a shelf with dividers | Near workbench |
| Jigsaw | Store in a case or box | Wall shelf |
| Sander | Keep dust covers on | High shelf |
| Circular Saw | Place in locked cabinet | Near power source |
Small Parts And Accessories
Small parts like screws and nails need clear containers. Label each container to find parts fast.
Containers to Use
- Clear plastic jars
- Small drawer units
- Stackable boxes
Label Tips
- Use large, readable fonts
- Include size and type
- Color code by category
Maximizing Vertical Space
Creating a garage tool wall helps keep your tools organized and easy to find. Using vertical space frees up floor area for other needs. It also makes your garage look neat and tidy.
Maximizing vertical space lets you store more tools in less room. You can use walls, corners, and ceilings to hold your equipment safely.
Stackable Storage Options
Stackable storage bins and shelves help organize small parts and tools. They use vertical space by allowing you to pile containers safely.
- Use clear plastic bins to see contents easily
- Label each bin to find tools fast
- Choose sturdy shelves that hold heavy items
- Stack bins by size for stability
- Keep frequently used tools in lower stacks
Overhead Racks
Overhead racks offer excellent storage without using wall space. These racks hold large or rarely used items above your head.
| Type | Best For | Tips |
| Ceiling-mounted racks | Large boxes, seasonal gear | Install close to ceiling for more headroom |
| Hanging hooks | Bikes, ladders, cords | Use sturdy hooks anchored to beams |
| Wire grids | Light tools, paint cans | Space items evenly to avoid clutter |
Using Corner Areas
Corners often go unused but hold great potential. Custom shelves and pegboards fit well in tight spaces.
- Install angled shelves for small tools
- Use corner pegboards to hang hand tools
- Add corner cabinets for hidden storage
Customizing For Efficiency
Creating a garage tool wall that fits your needs saves time and effort. Customizing the wall makes your tools easy to find and use.
Focus on clear organization and practical design. This helps you work faster and keeps the garage tidy.
Labeling And Color Coding
Label each tool’s spot on the wall. Use colors to group similar tools together. This method helps you spot tools quickly.
- Use bright labels with clear text
- Assign colors by tool type or task
- Keep labels at eye level for easy reading
- Update labels if you change the layout
Adjustable Hooks And Shelves
Install hooks and shelves that you can move. This lets you change the layout as your tool collection grows or shrinks.
| Type | Use | Benefit |
| Adjustable Hooks | Hanging hand tools | Easy to reposition |
| Sliding Shelves | Storing power tools | Flexible spacing |
| Magnetic Strips | Holding metal items | Quick access |
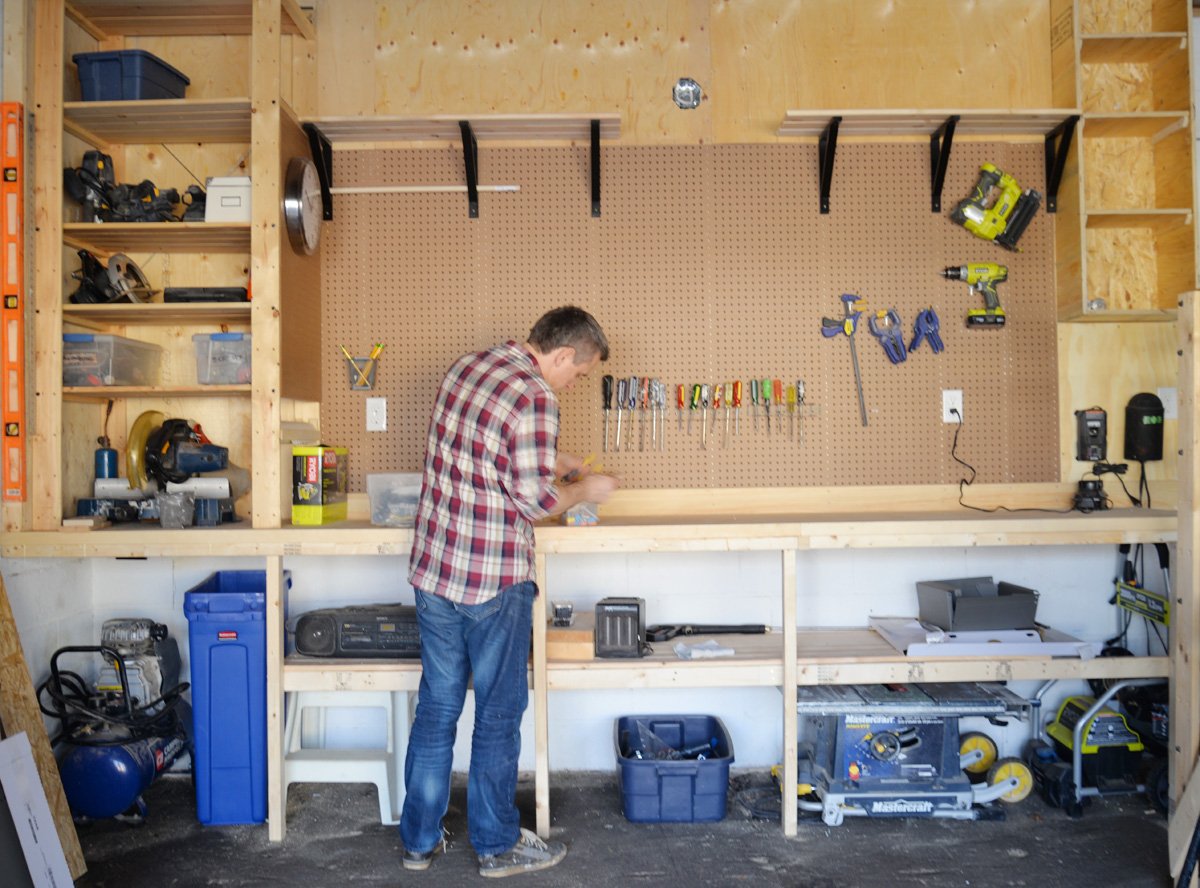
Incorporating Workbench Space
Include a workbench near the tool wall. This keeps your workspace close to your tools. It saves steps and keeps you focused.
Tips for a smart workbench setup:
- Use drawers for small parts
- Mount power outlets nearby
- Keep the surface clear for projects
- Attach a pegboard for extra tool storage

Credit: www.reddit.com
Maintaining Your Tool Wall
Keeping your garage tool wall in good shape helps you find tools fast. A well-maintained wall saves time and keeps tools safe.
Regular care and checks make sure your tool wall stays organized and useful for a long time.
Regular Cleaning Routines
Dust and dirt can build up on your tool wall. Clean it often to keep tools visible and easy to grab.
Use a soft cloth or brush to remove dust. Wipe handles and hooks to stop rust and grime.
- Wipe surfaces weekly
- Clean tool handles and hooks
- Remove cobwebs and dirt
- Check for rust or damage
Periodic Tool Inventory
Check your tools often to know what you have and what is missing. This helps avoid buying duplicates.
Look for broken or worn-out tools. Fix or replace them to keep your tool wall ready for any job.
- Count all tools monthly or quarterly
- Mark missing or damaged tools
- Plan replacements or repairs
- Keep a simple list or chart
Updating Layout As Needed
Your tool needs may change over time. Change the layout to keep tools easy to reach and organized.
Move hooks and holders to fit new tools. Group tools by type or use to improve workflow.
- Rearrange tools every few months
- Add new hooks or shelves
- Group similar tools together
- Keep frequently used tools at eye level

Credit: www.reddit.com
Frequently Asked Questions
How Do I Start Building A Garage Tool Wall?
Begin by assessing your tool collection and available wall space. Plan an organized layout with pegboards or slat walls. Ensure easy access and visibility for frequently used tools. Measure the wall accurately before purchasing materials to maximize efficiency and storage capacity.
What Materials Work Best For Garage Tool Walls?
Pegboards, slat walls, and metal panels are popular choices. Pegboards offer flexibility with hooks and holders. Slat walls provide sturdy support and easy customization. Choose durable, moisture-resistant materials to withstand garage conditions and keep tools organized and accessible.
How Can I Maximize Space On A Tool Wall?
Use vertical space by installing tall panels. Group similar tools together for easy access. Use hooks, shelves, and magnetic strips to hold different tools. Label sections clearly to maintain order. Consider adjustable mounts to accommodate changing tool collections.
What Tools Should I Prioritize On A Garage Wall?
Place frequently used tools like hammers, screwdrivers, and wrenches within easy reach. Store larger, less-used items higher or in cabinets. Prioritize organization by size and type to improve workflow and prevent clutter. Keep safety gear visible and accessible.
Conclusion
Creating a garage tool wall saves space and keeps tools ready. Choose strong materials and plan tool placement carefully. Use hooks and shelves for easy access and neatness. Regularly update your wall as you get new tools. A well-organized wall helps finish tasks faster and easier.
Start small, then add more sections over time. Keep your workspace tidy and tools within reach. A good tool wall makes any project more enjoyable. Simple steps lead to big improvements in your garage.