
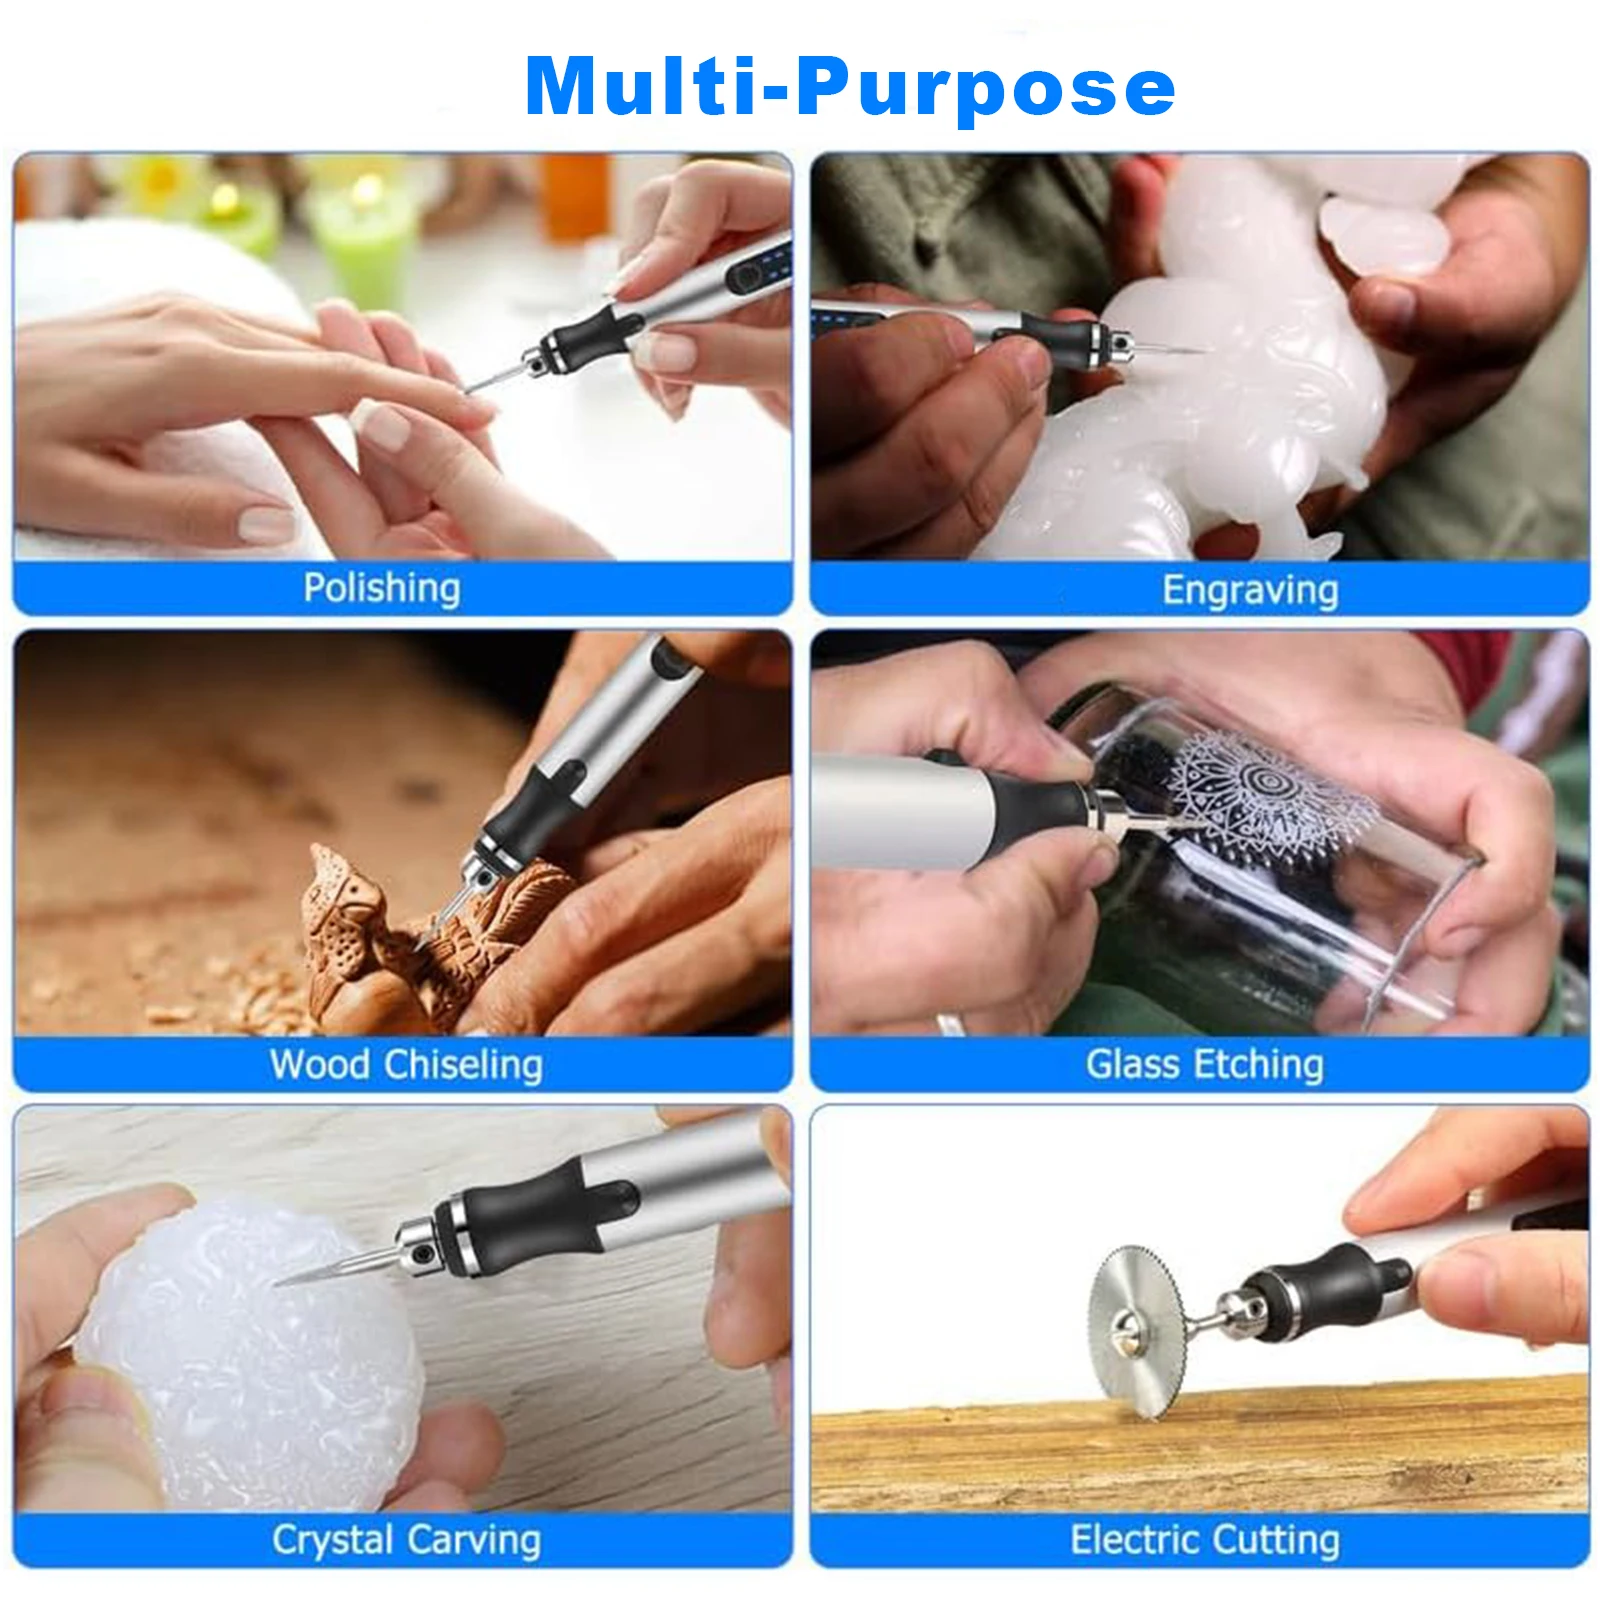
Are you ready to add a personal touch to your projects? Learning how to use a rotary tool for engraving can open up a world of creative possibilities.
Whether you want to customize gifts, decorate wood, or etch glass, mastering this skill will give you the power to bring your ideas to life. You’ll discover simple steps and insider tips that make engraving easy, even if you’ve never tried it before.
Keep reading, and soon you’ll be confidently turning ordinary items into stunning works of art.
Credit: www.aliexpress.com
Choosing The Right Rotary Tool
Using a rotary tool for engraving requires picking the right one. The right tool makes the work easier and the results better.
There are many types of rotary tools. Each type fits different engraving needs and materials.
Types Of Rotary Tools
Rotary tools come in several styles. Choose based on power, speed, and size.
- Corded Rotary Tools:Offer constant power and high speed for detailed work.
- Cordless Rotary Tools:Provide freedom to move but may have less power.
- Variable Speed Tools:Let you adjust speed to match the material and detail.
- Heavy-Duty Rotary Tools:Best for tough materials like metal or stone.
- Mini Rotary Tools:Ideal for small, precise engraving tasks.
Essential Accessories For Engraving
Accessories improve your engraving experience. They help with different materials and styles.
| Accessory | Purpose |
|---|---|
| Engraving Bits | Used to carve details in wood, metal, or glass. |
| Sanding Drums | Smooth rough edges after engraving. |
| Polishing Pads | Give a shiny finish to your work. |
| Cutting Wheels | Cut through thin materials like metal or plastic. |
| Collet Sets | Hold different sizes of bits securely. |
Safety Gear To Consider
Safety gear protects you from dust, debris, and noise during engraving.
- Wear safety glasses to protect your eyes from flying particles.
- Use a dust mask to avoid breathing in fine dust.
- Wear ear protection if your rotary tool is loud.
- Gloves can protect your hands but must fit well to avoid accidents.
- Work in a well-lit area to see details clearly.
Preparing Your Workspace
Setting up your workspace is key before you start engraving with a rotary tool. It helps keep your work steady and safe. Good preparation makes the job easier and more fun.
Focus on having a clean, bright, and organized area. This way, you can work without distractions and find your tools quickly.
Setting Up A Stable Surface
Choose a flat and solid table or workbench. It must hold your material without wobbling. Use clamps or a vise to keep your workpiece steady while engraving.
- Clear the surface of clutter and dust.
- Place a non-slip mat to prevent slipping.
- Secure your workpiece with clamps or a vise.
- Make sure the table does not shake when you work.
Lighting And Ventilation Tips
Good lighting helps you see details clearly and avoid mistakes. Natural light or bright LED lamps work well. Position lights to reduce shadows on your work.
Ventilation is important to keep fresh air flowing. It helps remove dust and fumes from engraving materials. Open a window or use a fan if needed.
| Lighting | Ventilation |
| Use bright LED or natural light | Open windows or use fans |
| Position lights to reduce shadows | Work in a well-ventilated area |
| Avoid glare on your work surface | Wear a dust mask if needed |
Organizing Tools And Materials
Keep all your tools and materials within easy reach. Group similar items together to save time. This reduces distractions and keeps you focused.
- Use small containers for bits and accessories
- Label storage boxes clearly
- Keep rotary tool cords untangled
- Have cleaning cloths and safety glasses nearby
Selecting Materials For Engraving
Choosing the right material is important for engraving with a rotary tool. Different materials react differently to engraving.
Knowing what materials work best can save time and improve your results.
Best Surfaces For Beginners
Soft materials are easier to engrave for beginners. They require less pressure and cause less wear on the tool.
Wood, plastic, and soft metals are great starting points. These surfaces show clear engraving without much effort.
- Soft wood like pine or basswood
- Plastics such as acrylic and PVC
- Aluminum and copper for soft metals
Material-specific Techniques
Each material needs a special approach to get good engraving results. Adjust speed and pressure for each type.
Use slower speeds for metals and harder materials. Apply light pressure on plastics to avoid melting or cracking.
- Wood: Use medium speed and steady pressure
- Plastic: Use low speed and gentle pressure
- Metal: Use slow speed and firm pressure
Avoiding Common Material Issues
Some materials can cause problems during engraving. Knowing these helps prevent damage and poor results.
Avoid materials that are too soft or brittle. Watch for melting plastics or splintering wood. Use the right bits for each material.
- Do not engrave very soft plastics that melt easily
- Avoid wood with knots or cracks
- Use diamond bits for hard metals to avoid wear

Credit: www.youtube.com
Basic Engraving Techniques
Engraving with a rotary tool is a fun way to decorate wood, metal, glass, and plastic. It needs some care and practice to get good results.
Start by learning the basic techniques. These include holding the tool right, controlling speed and pressure, and making simple patterns.
Holding The Rotary Tool Correctly
Hold the rotary tool like a pencil for better control. Use your thumb and fingers close to the tip. This helps guide the tool smoothly.
Keep your hand steady and rest your wrist on the work surface. This reduces shaking and improves accuracy.
Controlling Speed And Pressure
Use a low to medium speed for most engraving tasks. High speed can cause mistakes or damage the material.
Apply light pressure. Let the tool do the work. Pressing too hard can break bits or make uneven lines.
- Start with slow speed and increase if needed
- Keep pressure steady and gentle
- Stop and check your work often
Creating Simple Patterns
Begin with easy shapes like lines, dots, and circles. These help you practice control and build confidence.
Draw your pattern lightly on the surface before engraving. Follow the lines slowly with the tool for better results.
- Try straight and curved lines
- Make small dots for textures
- Practice simple shapes like stars or hearts
Advanced Engraving Tips
Using a rotary tool for engraving requires skill and practice. These tips will help improve your technique. You can create more detailed and precise designs.
Focus on layering, choosing the right bits, and fixing mistakes smoothly. These methods make your engraving look professional and clean.
Layering And Shading Effects
Layering helps build depth in your engraving. Start with light passes, then add more layers for darker areas. Shading adds realism to your design.
- Begin with a low-speed setting to avoid over-cutting
- Use multiple shallow layers instead of one deep cut
- Blend shaded areas by varying pressure and speed
- Practice on scrap material to see how layers build up
Using Different Bits For Detail
Different bits create different effects. Choose the right bit to achieve fine lines or wider cuts. Using the right bit improves precision and detail.
| Bit Type | Use | Material |
| Diamond tip | Fine detail and hard surfaces | Glass, metal |
| Ball nose | Rounded edges and shading | Wood, plastic |
| Flat cutter | Wide cuts and removing large areas | Wood, soft metals |
| Needle point | Very fine lines and engraving text | Metal, plastic |
Correcting Mistakes Smoothly
Mistakes happen. Fix them without damaging your work. Use gentle sanding and clean tools to smooth errors.
Tips for fixing mistakes:
- Stop engraving as soon as you notice the error
- Use fine-grit sandpaper to smooth rough edges
- Try a small bit to reshape or reduce unwanted cuts
- Clean the area with a soft brush to remove dust
- Practice steady hand movements to avoid repeats
Maintaining Your Rotary Tool
Keeping your rotary tool in good shape helps it work longer and better. Regular care prevents problems and saves money.
Simple maintenance steps like cleaning, storing right, and replacing parts make a big difference.
Cleaning And Storage
Clean your rotary tool after each use to remove dust and debris. Dirt can cause it to overheat or stop working.
Store the tool in a dry, cool place. Avoid areas with high humidity or extreme temperatures.
- Use a soft brush or cloth to clean the tool
- Keep the vents clear to allow airflow
- Store in a case or box to protect from dust
- Unplug the tool before cleaning
Replacing Bits And Parts
Bits and parts wear out with use. Replace them to keep your tool working well and safely.
Check bits for cracks or dull edges. Change them when they no longer cut or engrave properly.
- Use the right bit for your project
- Follow the tool manual to replace parts
- Use only manufacturer-approved parts
- Tighten bits securely before use
Troubleshooting Common Issues
If your rotary tool stops working or makes strange noises, check for common problems first.
Look for loose parts, dirty vents, or worn brushes. Fix these issues to avoid bigger damage.
- Clean vents if the tool overheats
- Replace carbon brushes if the tool loses power
- Check power cord for damage
- Ensure bits are properly installed
Creative Project Ideas
Using a rotary tool for engraving lets you add unique designs to many items. You can create special gifts or decorate your home. This tool is great for personalizing and crafting detailed artwork.
Explore creative ideas that make your projects stand out. Try engraving on different materials like wood, metal, or glass for varied effects.
Personalized Gifts
Engraving with a rotary tool helps you make gifts that feel personal. You can add names, dates, or special messages on items. This makes gifts more meaningful and memorable.
Common items for engraving include wooden boxes, photo frames, and leather wallets. These simple objects become keepsakes with your custom designs.
- Engrave names on wooden keychains
- Add dates to glass mugs or bottles
- Carve special messages on leather bookmarks
- Decorate metal pens with initials
Home Décor Enhancements
Use a rotary tool to add artful details to your home décor. You can create patterns or designs on wood, glass, or stone pieces. These touches make your space feel unique and warm.
Engraving can refresh old furniture or create new decorative items. Try simple shapes or complex motifs to fit your style.
- Engrave floral patterns on wooden trays
- Etch designs on glass candle holders
- Add textures to stone coasters
- Personalize picture frames with carved borders
Custom Jewelry Designs
Rotary tools work well for making custom jewelry. You can engrave metal, wood, or resin pieces with fine details. This lets you create one-of-a-kind rings, pendants, or bracelets.
Adding initials, symbols, or patterns makes jewelry special. Choose simple shapes to start and build your skills over time.
- Engrave initials on metal rings
- Add patterns to wooden pendants
- Create textured designs on resin bracelets
- Carve small symbols on earrings

Credit: www.iars.co.in
Frequently Asked Questions
What Is A Rotary Tool Used For Engraving?
A rotary tool is versatile for engraving various materials like wood, metal, and glass. It uses high-speed rotation to carve intricate designs. Ideal for crafting and DIY projects, it offers precision and control. With different attachments, you can achieve detailed and artistic engravings effortlessly.
How Do You Start Engraving With A Rotary Tool?
To start engraving, choose the right attachment for your material. Secure the material firmly and sketch your design lightly. Hold the tool like a pen and start with low speed. Gradually increase the speed for more precision. Practice on scrap material to refine your technique.
What Materials Can You Engrave With A Rotary Tool?
A rotary tool can engrave wood, metal, glass, plastic, and ceramics. Each material requires specific attachments for optimal results. Wood and soft metals are beginner-friendly, while glass and ceramics need more skill. Always use the appropriate bit and speed setting for the best outcome.
How To Maintain A Rotary Tool For Engraving?
Regularly clean your rotary tool to ensure longevity. Remove dust and debris after each use. Check the attachments for wear and replace them as needed. Lubricate moving parts occasionally. Store the tool in a dry place to prevent rusting. Proper maintenance ensures smooth engraving operations.
Conclusion
Using a rotary tool for engraving takes practice and patience. Start with simple designs and slow speeds. Keep your hand steady and control the tool carefully. Always wear safety gear to protect your eyes and hands. Try different tips to see what works best.
With time, you will create detailed and beautiful engravings. Enjoy the process and keep experimenting. This tool opens many creative possibilities for your projects. Keep learning and have fun with every engraving you make.
