Is your table saw acting up just when you need it most? You rely on this powerful tool to get your projects done right, but a small issue can quickly turn your work into a frustrating experience.
Imagine fixing your table saw yourself, saving time and money, and getting back to creating with confidence. This guide to repairing table saws is made just for you. It breaks down the common problems and shows you simple steps to fix them safely and effectively.
Keep reading, and you’ll discover how easy it can be to bring your table saw back to peak performance.
Common Table Saw Issues
Table saws are useful tools for woodworking. They can have problems that stop work or cause mistakes.
Knowing common issues helps you fix your saw fast and keep it safe to use.
Blade Alignment Problems
Blade alignment means the blade is straight and parallel to the table and fence. Bad alignment makes cuts crooked or unsafe.
Check the blade’s angle and position often. Use a square or alignment tool to make sure the blade lines up correctly.
- Blade not parallel to the fence causes angled cuts
- Blade not square to the table causes uneven cuts
- Loose parts can shift blade position during use
Motor And Electrical Faults
The motor powers the blade. Electrical problems can stop the motor or cause it to run poorly.
Check the power cord and switch for damage. Listen for strange noises or smells from the motor.
- Burnt wires or loose connections stop power flow
- Motor brushes wear out and need replacement
- Overheating can cause the motor to shut down
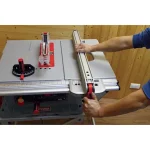
Fence And Miter Gauge Malfunctions
The fence guides your wood for straight cuts. The miter gauge helps with angled cuts. Problems here cause poor results.
Make sure the fence locks tightly and moves smoothly. Check that the miter gauge is accurate and fits well.
- Loose fence causes wood to shift during cutting
- Damaged or bent fence rails stop proper locking
- Worn or broken miter gauge leads to wrong angles
Dust Collection Challenges
Dust can build up and block your view or machine parts. Good dust collection keeps your workspace clean and safe.
Check the dust port for clogs. Empty dust bags or containers often. Use a vacuum or blower to clear dust.
- Clogged dust ports reduce suction power
- Loose dust hoses cause leaks and mess
- Full dust bags can cause airflow problems

Credit: www.searspartsdirect.com
Essential Tools For Repairs
Repairing a table saw needs the right tools. Using proper tools saves time and keeps you safe.
This guide covers the main tools you need to fix your table saw. Get ready to work with confidence.
Measuring Instruments
Measuring tools help check parts and ensure accurate repairs. You need to measure blade height, alignment, and angles.
- Tape measure for general length checks
- Combination square to set angles and check flatness
- Caliper for precise thickness and diameter measurements
- Protractor to measure blade tilt angles
- Feeler gauges for gap measurements
Wrenches And Screwdrivers
Wrenches and screwdrivers help loosen and tighten bolts and screws. They come in various sizes and types.
| Tool | Use | Common Sizes |
| Adjustable Wrench | Grip bolts of different sizes | 6 to 12 inches |
| Combination Wrench | Tighten or loosen hex bolts | 8 mm to 19 mm |
| Phillips Screwdriver | Drive cross-head screws | 1, 2 sizes |
| Flathead Screwdriver | Drive slotted screws | Small to large tips |
| Allen Wrench (Hex Key) | Adjust hex socket screws | Metric and imperial sets |
Lubricants And Cleaning Supplies
Lubricants keep moving parts smooth. Cleaning supplies remove sawdust and grime to prevent damage.
- Light machine oil for blade arbor and gears
- Dry lubricant spray to avoid dust buildup
- Soft brushes to clean dust from motor and blade areas
- Lint-free cloths for wiping parts clean
- Non-abrasive cleaner to remove sticky residue
Blade Alignment Techniques
Proper blade alignment is key to safe and accurate cuts on table saws. Misaligned blades can cause poor cuts and dangerous kickbacks.
This guide covers simple ways to check and adjust blade alignment. Focus on blade parallelism, rip fence, and miter gauge settings.
Checking Blade Parallelism
Blade parallelism means the blade runs parallel to the table saw’s miter slot. This reduces blade wear and improves cut quality.
- Unplug the saw before starting any checks.
- Raise the blade to full height.
- Place a combination square or dial indicator near the blade and miter slot.
- Spin the blade slowly and check for any gap changes between blade and miter slot.
- If the gap changes, the blade is not parallel and needs adjustment.
Adjusting The Rip Fence
The rip fence guides your wood during cuts. It must be perfectly parallel to the blade to avoid binding or uneven cuts.
| Step | Action |
| 1 | Unlock the rip fence from the table. |
| 2 | Use a measuring tape or ruler to check distance from fence to blade at front and back. |
| 3 | Loosen the fence lock and adjust fence until distances are equal. |
| 4 | Tighten the fence lock securely. |
| 5 | Test by sliding wood along fence and checking cut straightness. |
Calibrating The Miter Gauge
The miter gauge controls angled cuts. It must be set exactly to the blade angle for accurate results.
- Set the miter gauge to 0 degrees.
- Place a square against the blade and the miter gauge fence.
- Adjust the miter gauge until it is perfectly square with the blade.
- Tighten all screws to lock the angle.
- Test cuts on scrap wood to verify the angle.
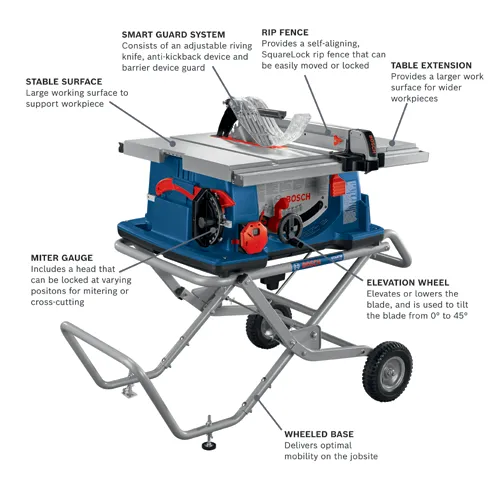
Credit: www.boschtools.com
Motor And Electrical Fixes
Fixing the motor and electrical parts of a table saw is key for safety and performance. Regular checks help spot problems early.
This guide covers how to inspect wiring, replace fuses and switches, and maintain the motor. Follow these tips to keep your saw running well.
Inspecting Wiring And Connections
Look for loose, frayed, or damaged wires in your table saw. Bad wiring can cause the motor to stop or start unexpectedly.
- Turn off and unplug the saw before checking wires.
- Use a screwdriver to open the motor cover.
- Check all wire connections for tightness.
- Look for burnt or melted insulation on wires.
- Replace damaged wires with the correct gauge and type.
Replacing Fuses And Switches
Fuses protect the saw from electrical overload. Switches control power flow. Both parts wear out and need replacement.
| Component | Signs of Failure | Replacement Tips |
| Fuse | Saw won’t start or cuts out | Use fuse with the same rating and type |
| Switch | Power does not turn on/off properly | Match the switch type and voltage rating |
Motor Maintenance Tips
The motor needs cleaning and lubrication to last longer. Dirt and dust can cause overheating or failure.
- Unplug the saw before working on the motor.
- Use compressed air to blow out dust and debris.
- Check motor brushes for wear and replace if needed.
- Apply motor oil to bearings as the manual advises.
- Keep the motor dry and avoid water contact.
Fence And Miter Gauge Repairs
Table saws need precise fence and miter gauge parts for safe and accurate cuts. Keeping these components aligned and in good condition helps your saw work better. This guide covers fixing fences and miter gauges.
Learn how to realign the fence, fix miter gauge play, and replace broken parts. These repairs keep your table saw safe and efficient.
Realigning The Fence
Check the fence alignment before each use. An off-center fence causes uneven cuts and can be unsafe. Use a square or straight edge to test alignment with the blade.
- Loosen the fence lock or clamps.
- Slide the fence close to the blade without touching it.
- Use a square to check if the fence is parallel to the blade.
- Adjust the fence until it is perfectly aligned.
- Tighten the fence lock securely.
- Make a test cut to confirm alignment.
Fixing Miter Gauge Play
Loose miter gauges cause cuts to shift and lose accuracy. Play is usually caused by worn or damaged parts. Tightening and adjusting the gauge helps reduce this play.
| Cause | Fix |
| Loose screws | Tighten all screws on the miter gauge. |
| Worn guide bar | Replace or shim the guide bar to fit snugly. |
| Dirty slots | Clean slots and rails to remove debris. |
| Damaged locking mechanism | Replace the lock or add a new clamp. |
Replacing Damaged Components
Damaged fences, miter gauges, or parts reduce safety and cut quality. Replace parts that are bent, cracked, or broken. Use parts made for your saw model.
Here are common parts to check and replace:
- Fence rails and locks
- Miter gauge bars and stops
- Clamps and knobs
- Guide rails and tracks
Dust Collection Solutions
Keeping your table saw clean is important for safety and performance. Dust collection helps reduce debris and keeps your workspace tidy. Proper dust solutions also protect your health by lowering airborne dust.
This guide covers how to clean dust ports, install efficient systems, and maintain your dust collection setup regularly.
Cleaning Dust Ports
Dust ports can get clogged with sawdust and debris. Cleaning them often keeps airflow strong and the saw running smoothly. Use compressed air or a brush to clear out the dust.
- Turn off and unplug the saw before cleaning
- Use a soft brush to remove dust from ports
- Blow out dust with compressed air carefully
- Check ports for cracks or damage
- Replace damaged dust ports promptly
Installing Efficient Systems
Choose dust collection systems that fit your workspace and saw model. Proper installation helps capture most dust and keeps your shop cleaner.
| System Type | Best For | Benefits |
| Shop Vacuum | Small workshops | Affordable and portable |
| Dust Extractor | Medium workshops | Stronger suction, quieter |
| Central Dust System | Large shops | High capacity, multiple tools |
Regular Maintenance Practices
Keep your dust collection system working well by checking it often. Clean filters and hoses to avoid blockages. Regular upkeep extends the life of your equipment.
- Inspect hoses and connections monthly
- Empty dust bags or bins when half full
- Clean or replace filters as needed
- Check suction power regularly
- Fix leaks or damage quickly
Safety Tips During Repairs
Repairing a table saw can be risky without the right safety steps. Always follow safety tips to avoid injury.
Focus on power off procedures, using protective gear, and handling sharp parts carefully during repairs.
Power Off Procedures
Always turn off the table saw before starting any repair. Unplug it from the power source to stop all movement.
Check that the blade has fully stopped before touching any parts. This prevents accidental cuts or injuries.
- Switch off the saw using the power button.
- Unplug the saw from the wall outlet.
- Wait for the blade to stop completely.
- Use a lockout device if available.
Using Protective Gear
Wear the right protective gear to stay safe during repairs. This includes gloves, goggles, and dust masks.
Protective gear shields your eyes, hands, and lungs from harm. It also reduces risks from sharp edges and dust.
- Use safety goggles to protect your eyes.
- Wear cut-resistant gloves for your hands.
- Put on a dust mask to avoid inhaling particles.
- Use ear protection if the saw is noisy.
Handling Sharp Components
Table saw blades and parts are very sharp. Handle them carefully to prevent cuts and injuries.
Use tools to hold sharp parts instead of your hands. Keep blades covered when not in use during repairs.
- Always hold blades by the edges, not the teeth.
- Use pliers or clamps to move small sharp parts.
- Store blades in a safe place after removal.
- Keep the work area clean and organized.

Credit: www.searspartsdirect.com
Preventive Maintenance Advice
Keeping your table saw in good shape helps it last longer. Regular care stops small problems from growing.
Simple checks and cleaning make your saw safer and more accurate to use. Follow these tips to maintain your tool.
Routine Inspections
Check your table saw often for signs of damage or wear. Look at the blade, motor, and safety parts carefully.
- Inspect the blade for chips or dullness
- Test the safety guard and switch for proper function
- Look for loose bolts or screws
- Check the power cord for cracks or frays
- Ensure the table surface is clean and flat
Lubrication Schedules
Lubricate moving parts to reduce friction and wear. Use the right oil or grease as the saw’s manual suggests.
| Part | Type of Lubricant | Frequency |
| Arbor bearings | Light machine oil | Monthly |
| Blade elevation and tilt gears | Grease | Every 3 months |
| Trunnions | Grease | Every 6 months |
| Motor shaft | Light machine oil | Monthly |
Proper Storage Practices
Store your table saw in a dry, clean place. Protect it from dust and moisture to avoid rust and damage.
Follow these storage tips:
- Cover the saw with a dust cover or cloth
- Keep it off the ground to prevent moisture contact
- Store blades separately in a dry area
- Unplug and clean the saw before storing
Frequently Asked Questions
How Do I Troubleshoot A Table Saw?
Start by unplugging the saw and inspecting for visible damage. Check the power source and reset buttons. Examine the blade for dullness or damage. Ensure the motor and drive belt function correctly. Clean and lubricate moving parts. Consult the manual for specific troubleshooting steps.
What Are Common Table Saw Problems?
Common issues include dull blades, poor alignment, and motor malfunctions. A misaligned fence can cause inaccurate cuts. Loose or worn drive belts may affect performance. Dust buildup can lead to overheating. Regular maintenance can prevent these problems and ensure efficient operation.
How Often Should I Maintain My Table Saw?
Regular maintenance is crucial for optimal performance. Clean the saw after each use to remove dust. Inspect the blade and motor monthly. Lubricate moving parts every six months. Replace worn or damaged components immediately. Consistent upkeep extends the lifespan of your table saw.
Can I Repair A Table Saw Motor Myself?
Yes, with proper tools and instructions, you can repair a motor. Start by identifying the issue, such as a burnt-out motor or faulty wiring. Follow the manufacturer’s guidelines for repairs. If unsure, consult a professional to avoid further damage or safety hazards.
Conclusion
Repairing table saws keeps them safe and working well. Regular checks help catch problems early. Use the right tools and follow steps carefully. Small fixes save money and extend saw life. Stay patient and take your time during repairs. Practice makes you more confident and skilled.
Keep your saw clean and parts tight. Now, you can handle common issues with ease. Your table saw will serve you better and longer.