Are you tired of searching through a cluttered toolbox every time you need a pair of pliers? Imagine the satisfaction of effortlessly reaching for the right tool exactly when you need it.
An organized workspace not only boosts your productivity but also eases your mind. With our guide to organizing pliers on shelves, you’ll transform your tool chaos into a neatly arranged sanctuary. Discover simple yet effective strategies to keep your pliers in order, making your DIY projects smoother and more enjoyable.
Dive into the article and unlock the secrets to a tidy and efficient workspace that saves you time and energy.
Choosing The Right Shelves
Organizing pliers on shelves keeps your workspace neat and tools easy to find. Choosing the right shelves is key to good organization.
Consider the material, size, and adjustability before picking shelves. Each factor affects durability and convenience.
Material Options
Shelves come in wood, metal, and plastic. Wood offers a classic look but may wear down with heavy tools. Metal shelves are strong and last longer. Plastic shelves are lightweight but may not hold heavy pliers well.
- Wood:Durable for light to medium weight tools
- Metal:Best for heavy or many pliers
- Plastic:Good for light tools and easy cleaning
Size And Weight Capacity
Pick shelves that fit your space and hold your pliers safely. Check both the shelf length and how much weight it can support. Overloading weak shelves can cause damage or accidents.
| Shelf Size | Weight Capacity | Best Use |
| Small (up to 2 feet) | 20-50 lbs | Few pliers, light use |
| Medium (2-4 feet) | 50-100 lbs | Average number of pliers |
| Large (4+ feet) | 100+ lbs | Many pliers, heavy tools |
Adjustable Vs Fixed Shelves
Adjustable shelves let you change shelf height. Fixed shelves stay at one height. Adjustable shelves work well if you have pliers of different sizes. Fixed shelves are often stronger and cost less.
- Adjustable:Flexible spacing, good for varied tool sizes
- Fixed:More stable, usually supports more weight

Credit: www.ebay.com
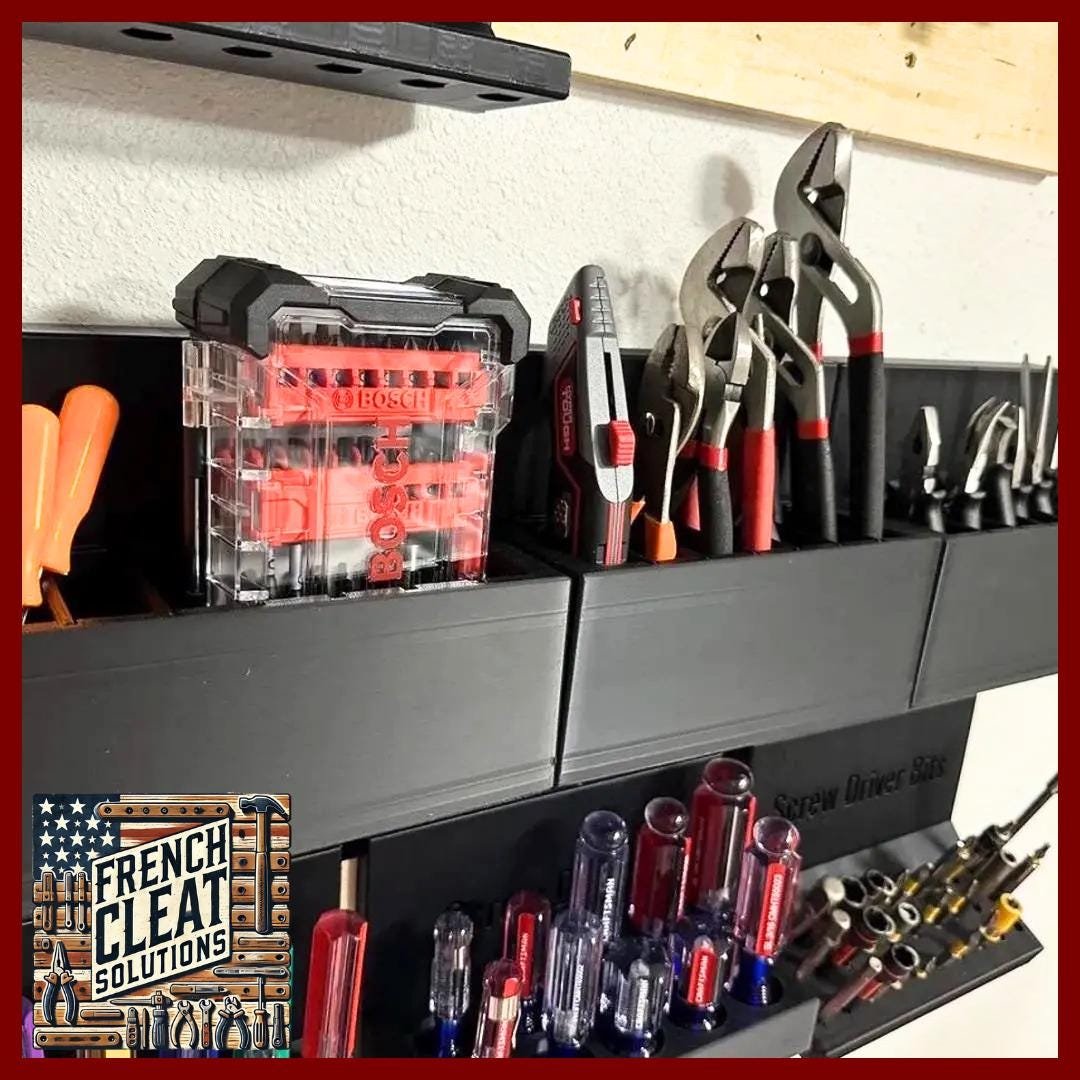
Types Of Pliers To Organize
Pliers come in many shapes and sizes. Each type has a special use in tasks like gripping, cutting, or bending.
Organizing your pliers by type helps you find the right tool fast. It also keeps your workspace neat and safe.
Needle Nose Pliers
Needle nose pliers have long, thin jaws that taper to a point. They work well in tight spaces where fingers cannot reach.
These pliers are useful for bending wire, holding small objects, and reaching into narrow areas.
- Long, pointed tips
- Good for precision work
- Used in electronics and jewelry
Slip Joint Pliers
Slip joint pliers have adjustable jaws that can open wider or narrower. This makes them versatile for gripping different sizes.
They are handy for general use, such as holding pipes or turning nuts and bolts.
- Adjustable jaw width
- Two or more positions
- Good for many household tasks
Cutting Pliers
Cutting pliers have sharp edges to cut wires, nails, or small metal pieces. They often have strong, short jaws for power.
Use these pliers when you need clean cuts in electrical work or crafting.
- Sharp cutting edges
- Strong grip for cutting
- Includes diagonal and end-cutting types
Specialty Pliers
Specialty pliers are made for specific jobs. Examples include locking pliers, crimping pliers, and fishing pliers.
Organize these separately to avoid confusion and protect their unique features.
- Locking pliers hold tightly without effort
- Crimping pliers join wires or cables
- Fishing pliers help remove hooks and cut lines
Space-saving Storage Ideas
Organizing pliers on shelves can be tricky when space is limited. Using smart storage ideas saves room and keeps tools easy to find.
Try different ways to store pliers vertically or inside drawers. This helps keep your workspace neat and tools ready to use.
Vertical Hanging Solutions
Hanging pliers vertically uses wall or shelf space well. It keeps tools visible and prevents clutter on shelves.
Use hooks, nails, or clips to hold the pliers by their handles. This arrangement saves shelf depth and makes grabbing tools easier.
Magnetic Strips
Magnetic strips stick to walls or shelf edges. They hold metal pliers securely without taking shelf space.
Place the strips at a height where you can reach tools quickly. Magnetic storage keeps pliers organized in a straight line.
Pegboards And Hooks
Pegboards let you arrange pliers with hooks. You can change the layout anytime to fit your tool collection.
This system uses vertical space well and keeps tools off shelves. It also shows all pliers at a glance.
- Select hooks that fit plier handles
- Place pegboard near your workspace
- Group pliers by size or type
Drawer Inserts
Drawer inserts create separate spots for each plier. This stops tools from moving and keeps them easy to find.
Use foam or plastic inserts with cutouts shaped for pliers. Drawers stay tidy and save shelf space for other items.
- Measure pliers to fit insert slots
- Label sections for quick access
- Use shallow drawers for better view

Credit: www.amazon.com
Labeling And Accessibility
Organizing pliers on shelves saves time and keeps your workspace neat. Clear labels and easy access help you find the right tool fast.
This guide covers labeling methods, grouping by function, and tips for easy reach. Use these ideas to improve your tool storage.
Clear Labeling Methods
Labels help you identify pliers quickly. Use large, easy-to-read fonts and durable materials for lasting marks.
- Write tool names with a permanent marker on tape or stickers
- Use color-coded labels for different plier types
- Attach labels near the tool handle or on the shelf edge
- Use a label maker for clean and uniform text
Grouping By Function
Group pliers by their use to find them faster. Separate them into categories like cutting, gripping, or bending.
| Function | Examples |
| Cutting | Diagonal, Wire Cutters |
| Gripping | Slip-Joint, Tongue-and-Groove |
| Bending | Needle-Nose, Round-Nose |
Easy Reach Tips
Keep often-used pliers within arm’s reach. Store rarely used ones higher or lower on shelves.
- Place daily tools at eye level
- Use clear bins or holders to see tools at a glance
- Arrange shelves so tools do not block each other
- Install small hooks for hanging pliers by handles
Maintenance And Safety
Organizing pliers on shelves helps keep your workspace tidy. Proper care improves tool life and safety.
Follow simple steps to maintain and handle pliers safely. This guide covers cleaning, rust prevention, and safe use.
Regular Cleaning
Clean pliers after each use to remove dirt and grease. Use a dry cloth or brush to wipe off debris.
- Use mild soap and water for tough grime
- Dry tools thoroughly to avoid moisture
- Apply light oil to moving parts
- Store pliers in a clean, dry place
Rust Prevention
Rust weakens pliers and makes them unsafe. Prevent rust by controlling moisture and using protective coatings.
| Method | Description |
| Oil Coating | Apply a thin layer of machine oil after cleaning |
| Silica Gel | Place packets on shelves to absorb moisture |
| Rust Inhibitor | Use sprays designed to prevent rust on metal tools |
| Proper Storage | Keep pliers in a dry, ventilated area |
Safe Handling Practices
Handle pliers carefully to avoid injury. Follow these safety tips each time you use them.
- Wear safety glasses to protect your eyes
- Check for damage before use
- Do not use pliers as a hammer or pry bar
- Keep fingers clear of the jaws
- Store pliers securely on shelves

Credit: www.amazon.com
Diy Storage Projects
Organizing pliers on shelves keeps your workspace tidy. It also helps you find tools quickly.
DIY storage projects let you create custom solutions. You can use simple materials and ideas.
Custom Shelf Builds
Build shelves that fit your pliers perfectly. Use wood or metal to make strong shelves.
Add slots or small hooks to hold pliers in place. This stops them from falling or moving.
- Measure your pliers before building shelves
- Create compartments for different plier sizes
- Use pegboards for adjustable storage options
Repurposed Materials
Use old items to store your pliers without spending money. Repurpose things like jars or boxes.
Old wooden crates or shoe organizers work well. They can hold pliers and keep them visible.
- Use mason jars for small pliers or parts
- Turn shoe boxes into shelf dividers
- Paint or label repurposed items for easy ID
Creative Display Ideas
Show off your pliers with smart display choices. This makes your tools easy to pick up.
Hang pliers on wall-mounted racks or magnetic strips. Use color coding or tags for quick sorting.
- Use magnetic strips to hold metal pliers
- Hang pliers by handles on hooks or pegs
- Group pliers by type or size for fast access
Frequently Asked Questions
How Do I Organize Pliers Efficiently On Shelves?
Use labeled bins or hooks to group pliers by type. Arrange them by size for easy access. Clear containers help you see tools quickly and keep shelves tidy.
What Is The Best Shelf Type For Storing Pliers?
Sturdy metal or wooden shelves work best. Adjustable shelves allow customization for different plier sizes. Ensure shelves are deep enough to hold tools securely without overcrowding.
How Can I Prevent Pliers From Rusting On Shelves?
Keep pliers dry and clean before storing. Use silica gel packs or rust inhibitors in storage areas. Regularly oil metal parts to protect against moisture and corrosion.
Should Pliers Be Stored Vertically Or Horizontally?
Storing pliers vertically on hooks saves space and improves visibility. Horizontal storage in bins works if shelves are shallow. Choose the method that fits your shelf design and tool access needs.
Conclusion
Organizing pliers on shelves saves time and keeps your workspace neat. Using clear labels helps find tools quickly. Group similar pliers together for easy access. Regularly check and tidy your shelves to maintain order. A simple system makes your work smoother and less stressful.
Keep your tools ready for any project. Small steps create a big difference in tool management.
