If you’ve ever spent precious time searching for the right chisel in a cluttered toolbox, you know the frustration all too well. Imagine having every chisel neatly organized, right at your fingertips, whenever you need it.
This isn’t just a dream—it’s entirely possible with the right storage solution. In this guide, you’ll discover how a chisel rack can transform your workspace, making your projects smoother and more enjoyable. By the end of this article, you’ll be equipped with the knowledge to keep your chisels safe, sharp, and ready for action.
Ready to revolutionize your toolkit? Let’s dive in!

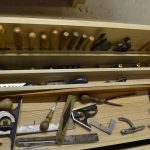
Credit: daitool.com
Choosing The Right Rack
Storing chisels properly keeps them safe and easy to find. The right rack helps protect the sharp edges and organizes your tools.
Choosing a rack depends on your workspace and chisel collection size. Think about the material, size, and type of rack.
Material Options
Racks come in many materials. Wood, metal, and plastic are popular choices for storing chisels. Each material has benefits and drawbacks.
Wood racks look classic and hold chisels gently. Metal racks are strong but can scratch tools if not padded. Plastic racks are light and easy to clean.
- Wood:Durable, gentle on tools, needs care
- Metal:Strong, long-lasting, may damage chisels
- Plastic:Lightweight, easy to clean, less sturdy
Size And Capacity
Choose a rack that fits your chisels and space. A small rack may not hold all your tools. A big rack might take too much room.
Measure the length and width of your chisels. Count how many chisels you want to store. Pick a rack that matches these numbers.
- Check chisel length for slot depth
- Count chisels for slot number
- Allow extra space for future tools
- Match rack size to workspace area
Custom Vs. Ready-made
Custom racks fit your chisels perfectly. You can choose size, shape, and material. They may cost more and take time to make.
Ready-made racks are easy to buy and use right away. They come in standard sizes. They may not fit your chisels exactly.
- Custom:Perfect fit, higher cost, longer wait
- Ready-Made:Quick buy, standard sizes, less precise

Credit: daitool.com
Preparing Chisels For Storage
Storing chisels properly keeps them sharp and safe. Preparing them well helps prevent damage and rust.
This guide covers cleaning, sharpening, and protecting chisels before placing them in a rack.
Cleaning And Drying
Remove dirt and residue from chisels after use. Clean blades and handles thoroughly to stop rust and decay.
- Wipe blades with a dry cloth to remove dust.
- Use warm water and mild soap for stubborn grime.
- Dry chisels completely with a soft towel.
- Leave them in open air for a few minutes to ensure no moisture remains.
Sharpening Tips
Sharp chisels work better and are safer. Sharpen blades before storing to keep their edge.
| Sharpening Method | Purpose |
| Whetstone | Refines the blade edge evenly |
| Leather Strop | Polishes and removes burrs |
| Grinding Wheel | Repairs damaged or dull blades |
Protecting The Blades
Protect blades from rust and damage during storage. Use covers or apply oils to keep them safe.
- Apply a light coat of oil to each blade to prevent rust.
- Use blade guards or sheaths to protect sharp edges.
- Store chisels in a dry, cool place away from moisture.
- Place chisels in a rack that holds them securely without touching each other.
Rack Placement Ideas
Organizing chisels properly keeps them safe and easy to find. Choosing the right rack placement helps protect the tools and saves workspace.
This guide covers three ways to place chisel racks: on walls, workbenches, and as portable units.
Wall-mounted Solutions
Mounting chisel racks on walls saves bench space. It also keeps chisels visible and accessible.
- Choose a wall near your work area for convenience.
- Use strong hooks or slots to hold chisels securely.
- Place the rack at eye level to see all tools easily.
- Keep the rack away from moisture or heat sources.
Workbench Integration
Integrate chisel racks into your workbench for quick access. This method keeps tools close during projects.
| Rack Type | Placement | Benefit |
| Inset Rack | Built into bench side | Saves surface space |
| Magnetic Strip | Attached near bench edge | Easy tool grab and replace |
| Drawer Insert | Inside workbench drawer | Protects tools from dust |
Portable Racks
Portable chisel racks let you carry tools to different places. They keep chisels organized on the move.
- Choose lightweight racks with secure slots.
- Look for handles or cases for easy carrying.
- Use padding to protect chisel edges during transport.
- Keep the rack closed to avoid tool loss.

Credit: www.rockler.com
Organizing By Type And Size
Storing chisels properly keeps your workspace tidy. It helps find the right chisel fast. Grouping chisels by type and size is a smart way to organize them.
This guide covers how to group similar chisels, label them clearly, and keep them easy to reach.
Grouping Similar Chisels
Sort chisels by their function and size. For example, place bench chisels together and carving chisels in another section. Size order helps quickly pick the needed tool.
- Separate bench, carving, and mortise chisels
- Arrange from smallest to largest within each group
- Keep frequently used chisels in easy-to-reach spots
Labeling Techniques
Labels make identifying chisels simple. Use clear tags or markers on the rack. Include type and size for each slot. This avoids confusion and saves time.
| Label Type | Details to Include |
| Tag on Rack Slot | Chisel type and width in millimeters or inches |
| Color Coding | Different colors for each chisel type |
| Magnetic Labels | Easy to move and update as needed |
Accessibility Considerations
Keep chisels within reach to avoid accidents. Store sharp edges away from hands. Make sure the rack is stable and visible. Good lighting helps find chisels quickly.
Tips for safer access:
- Place chisels at waist height or lower
- Use angled racks to show chisel sizes clearly
- Keep handles facing outward for easy grip
Maintenance Tips For Longevity
Proper care helps your chisels last longer and work better. Storing chisels in a rack keeps them organized and safe.
Follow simple maintenance tips to protect your chisels from damage and wear over time.
Regular Inspections
Check your chisels often for any signs of damage. Look for cracks, chips, or dull edges.
Fix small problems early to avoid costly repairs later. Sharp chisels work safer and easier.
- Inspect blade edges for chips or dullness
- Check handles for cracks or looseness
- Look for rust or discoloration on metal parts
Rust Prevention
Rust damages chisels and makes them unsafe to use. Keep chisels dry and clean to stop rust from forming.
Apply a thin oil layer on metal surfaces after use. This protects the metal and keeps it smooth.
- Wipe chisels dry after each use
- Use light machine oil or rust inhibitor
- Store chisels in a dry place
Storage Environment
Choose a storage spot with low humidity and stable temperature. Avoid damp or hot places.
A good rack keeps chisels separated and prevents damage. It also makes them easy to find.
- Use a wooden or plastic rack with slots
- Keep chisels away from moisture sources
- Avoid stacking chisels on top of each other
Creative Rack Designs
Storing chisels properly keeps them safe and easy to find. Creative rack designs help organize your tools neatly.
Good racks save space and protect the sharp edges of chisels. There are many ways to build or find a useful rack.
Diy Projects
Making your own chisel rack is fun and cost-effective. You can use wood, metal, or plastic to create a custom rack.
Simple designs include wooden boards with slots or holes to hold chisels upright. You can also add labels for each tool.
- Use scrap wood to save money
- Cut slots that fit chisel handles
- Sand edges to avoid damage
- Attach the rack to a wall or bench
Upcycling Ideas
Old items can become useful chisel racks with a little creativity. Upcycling helps reduce waste and saves money.
For example, an old wooden wine crate can hold chisels neatly. You can also use vintage toolboxes or drawer organizers.
- Turn a wooden pallet into a chisel holder
- Use metal tins or cans for small chisels
- Repurpose a spice rack for vertical storage
- Paint or decorate to match your workshop
Space-saving Innovations
Small workshops need racks that save space. Vertical and magnetic racks keep chisels off surfaces and easy to reach.
Magnetic strips hold metal chisels securely on walls. Slim racks fit in tight corners or inside drawers to keep tools organized.
- Install magnetic strips above your workbench
- Use narrow racks that hold chisels upright
- Build racks that fit inside drawers
- Stack racks to use vertical space
Frequently Asked Questions
What Is The Best Material For A Chisel Rack?
Wood and metal are ideal for chisel racks. Wood offers durability and aesthetics. Metal racks provide strong, long-lasting support. Both protect chisels from damage and maintain organization.
How Should Chisels Be Positioned In A Rack?
Place chisels with blades facing down or sideways. This prevents dulling and accidental cuts. Proper positioning ensures safety and extends tool life.
Can A Diy Chisel Rack Improve Tool Storage?
Yes, a DIY rack customizes size and slots. It maximizes space and keeps chisels easily accessible. Building your own rack saves money and fits your workspace perfectly.
How Often Should Chisel Racks Be Cleaned?
Clean your chisel rack monthly to remove dust and debris. A clean rack prevents rust and keeps tools in good condition. Regular cleaning enhances tool longevity.
Conclusion
Storing chisels in a rack keeps them safe and easy to find. It helps protect the sharp edges from damage. A good rack also saves space in your workshop. Organizing tools this way speeds up work and reduces accidents. Remember to clean chisels before storing to avoid rust.
Choose a rack that fits your chisels well. Simple steps like these keep your tools ready for use. Keep your workspace neat and your chisels sharp. That makes every project smoother and more enjoyable.