Are you ready to take your woodworking skills to the next level? Mastering the best practices for woodworking joints can transform your projects from ordinary to extraordinary.
Whether you’re building furniture, crafting decor, or fixing something around the house, strong and precise joints are the key to durability and beauty. You’ll discover simple tips and expert tricks that will help you create joints that not only hold together perfectly but also impress anyone who sees your work.
Keep reading, and you’ll unlock the secrets to making your woodworking projects truly stand out.
Credit: hoolnn.com
Types Of Woodworking Joints
Woodworking joints connect pieces of wood to build strong structures. Choosing the right joint makes your project last longer. This guide explains common types of woodworking joints.
Each joint type has its own use and strength. Learning about them helps you pick the best one for your work.
Butt Joints
Butt joints are the simplest way to join two pieces of wood. You just put the ends together and glue or nail them.
They are easy but not very strong. Reinforcement with screws or dowels can improve them.
Dovetail Joints
Dovetail joints have interlocking pins and tails shaped like a dove’s tail. This makes them very strong.
They are often used in drawers and boxes. Cutting dovetails requires precise tools and skill.
Mortise And Tenon
Mortise and tenon joints connect a tenon (a tongue) into a mortise (a hole). This joint is very sturdy.
It is common in furniture and frame building. The joint can be glued or pinned for extra strength.
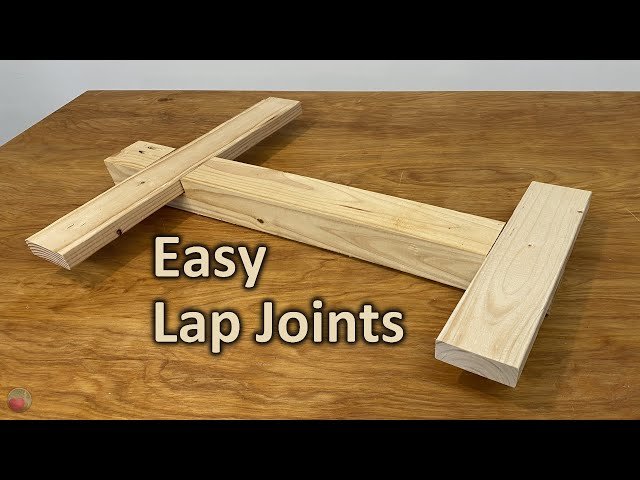
Lap Joints
Lap joints overlap two wood pieces by cutting away part of each piece. This increases the surface area for glue.
They are easy to make and used in frames and simple constructions. Lap joints can be half-lap or cross-lap types.
- Half-lap: one piece is cut halfway through
- Cross-lap: both pieces are cut halfway and fit together
Box Joints
Box joints are made of square pins and slots that fit together. They look like a box’s corner fingers.
These joints are strong and easy to cut with a jig. They are good for boxes and drawers.
Biscuit Joints
Biscuit joints use small, oval wooden biscuits inserted into slots cut in both wood pieces. Glue holds the biscuits in place.
This joint helps align pieces and adds strength. It works well for edge joining boards and panels.
Choosing The Right Joint For Your Project
Woodworking joints connect pieces of wood securely. Picking the right joint helps your project last longer.
Different joints suit different needs. Think about strength, look, wood type, and tools you have.
Strength Requirements
Strong joints hold weight and resist stress. Use joints like mortise and tenon for heavy loads.
- Dovetail joints offer high strength for drawers and boxes.
- Butt joints are weaker and good for light projects.
- Lap joints add surface area for better glue hold.
Aesthetic Considerations
Some joints show wood edges and add style. Others hide the join for a clean look.
Wood Type Compatibility
Softwood and hardwood react differently to joints. Choose joints that fit the wood’s strength and grain.
| Wood Type | Best Joint Types |
| Softwood | Butt, pocket hole, lap joints |
| Hardwood | Dovetail, mortise and tenon, finger joints |
| Plywood | Biscuit, dowel, pocket hole joints |
Tool Availability
Your tools limit what joints you can make. Some joints need special machines or clamps.
- Simple joints like butt or lap need only a saw and glue.
- Dovetail joints require a saw and chisel or a router.
- Mortise and tenon joints often need a drill or mortiser.
- Biscuit joints need a biscuit joiner tool.
Preparation Techniques For Accurate Joints
Making strong woodworking joints needs careful preparation. Accurate joints make your project last longer.
Good preparation helps the pieces fit well. It also makes the joint look neat and clean.
Measuring And Marking
Start by measuring your wood pieces carefully. Use a ruler or tape measure for exact sizes.
Mark the cut lines clearly with a sharp pencil or marking knife. This helps you cut straight.
- Double-check measurements before marking
- Mark both sides of the wood
- Use a square tool for straight lines
Cutting Precision
Cut along your marks carefully. Use a sharp saw or blade to avoid splinters.
Keep your cutting tool steady and follow the lines closely. Clean cuts help joints fit tightly.
- Use clamps to hold wood steady
- Cut slowly to maintain control
- Check blade sharpness before cutting
Surface Preparation
Smooth the wood surfaces before joining. Sand the edges to remove rough spots.
Clean dust and debris from the surfaces. This ensures glue bonds well and the joint holds tight.
- Use fine-grit sandpaper for finishing
- Wipe surfaces with a dry cloth
- Avoid over-sanding that changes dimensions
Assembly Tips For Tight Fits
Tight-fitting joints make woodworking projects strong and neat. Proper assembly helps parts fit well without gaps.
Use careful steps to join pieces tightly. This guide covers dry fitting, clamping, and glue application tips.
Dry Fitting
Dry fitting means assembling parts without glue first. This checks if the pieces fit tightly and align well.
Test the joint by gently pushing parts together. Fix any gaps or tight spots before gluing.
- Check for smooth edges and clean cuts
- Remove small amounts of wood if the fit is too tight
- Make sure all pieces match the joint design
- Practice assembling several times to feel the fit
Clamping Strategies
Clamps hold pieces tightly while glue dries. Use the right clamp type and pressure for your joint.
Apply even pressure to avoid bending or gaps. Tight clamps help create a stronger bond and better fit.
- Use bar clamps or C-clamps for larger joints
- Try spring clamps for small or delicate parts
- Place clamps evenly around the joint
- Check alignment before fully tightening clamps
Glue Application
Apply glue evenly for a secure joint. Too much glue causes mess and weakens the fit.
Spread glue thinly on all joint surfaces. Use a brush or roller to cover edges well.
- Use wood glue designed for your project
- Apply glue to both parts of the joint
- Wipe off extra glue before clamping
- Allow enough drying time for a strong bond
Common Mistakes To Avoid
Woodworking joints need care and skill. Avoiding common errors helps your projects last longer.
Many mistakes happen because of rushing or ignoring small details. Learning these can save time and wood.
Misalignment Issues
One big mistake is not lining up the pieces correctly. Misaligned joints look bad and weaken the structure.
- Check angles carefully before gluing
- Use clamps to hold pieces steady
- Test fit parts before final assembly
- Mark edges and ends clearly
Overuse Of Adhesives
Using too much glue can cause problems. Excess glue makes joints messy and weak.
| Problem | Cause | Solution |
| Glue squeeze-out | Too much glue applied | Use small amounts and spread evenly |
| Joint weakness | Glue layers too thick | Apply a thin, even coat |
| Long drying time | Excess glue slows curing | Wipe off extra glue quickly |
Ignoring Wood Movement
Wood expands and shrinks with weather changes. Ignoring this can crack joints or warp wood.
Tips to allow wood movement:
- Leave small gaps in tight joints
- Use flexible adhesives where possible
- Choose joint types that allow movement
- Seal wood surfaces to reduce moisture changes

Credit: www.familyhandyman.com
Finishing Touches For Durable Joints
Woodworking joints need strong finishing to last long. Proper finishing stops damage from water, dirt, and wear.
This guide covers sanding, sealing, and ways to make joints stronger. These tips help keep your work neat and steady.
Sanding Techniques
Sanding smooths the wood and removes rough edges. It helps glue and finishes stick better to the joint.
- Start with coarse sandpaper to even the surface.
- Use finer grit to smooth the area near the joint.
- Sand along the grain to avoid scratches.
- Clean dust before applying any finish.
Sealing And Protecting
Sealing stops moisture from entering the wood and causing damage. It also protects against dirt and stains.
| Sealing Method | Best Use | Dry Time |
| Wood varnish | Outdoor projects | 4–6 hours |
| Polyurethane | High wear surfaces | 6–8 hours |
| Wood oil | Indoor furniture | 2–4 hours |
Reinforcement Options
Adding reinforcements helps joints hold under pressure. These options add strength and keep joints tight.
Common reinforcement methods include:
- Wooden dowels for hidden support
- Metal brackets for corner joints
- Screws or nails for quick fixes
- Glue with clamps to ensure tight bonding
Tools That Enhance Joint Accuracy
Woodworking joints need precise tools for the best fit. Using the right tools helps make strong and clean joints. Accuracy reduces mistakes and saves time.
This guide covers hand tools, power tools, and jigs that improve joint accuracy. Each tool type helps in different ways during the joinery process.
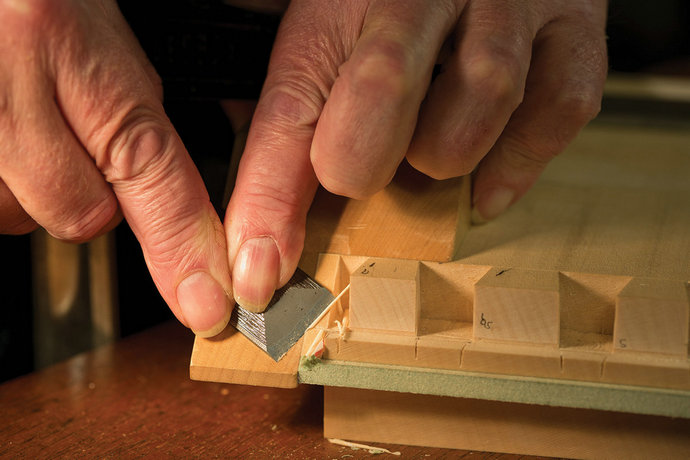
Hand Tools
Hand tools give you control for fine adjustments. They are great for detailed work and small corrections. Using sharp and well-maintained tools is important.
- Marking gauge: marks precise lines for cuts and joints
- Try square: checks the accuracy of right angles
- Chisels: clean out waste and refine joints
- Hand saws: make careful cuts following marked lines
- Mallet: taps chisels gently without damaging wood
Power Tools
Power tools speed up work and improve consistency. They help make clean cuts and smooth surfaces that fit well together. Safety and steady hands are essential.
| Tool | Use | Benefit |
|---|---|---|
| Router | Create grooves and shapes | Precise and repeatable cuts |
| Table saw | Make straight cuts | Uniform width and angles |
| Band saw | Cut curves and irregular shapes | Smooth and accurate curves |
| Drill press | Drill holes at exact depths | Consistent hole placement |
| Random orbital sander | Finish surfaces | Even and smooth texture |
Jigs And Fixtures
Jigs and fixtures hold wood pieces steady and guide tools. They help repeat the same cuts or holes exactly every time. This saves time and keeps joints accurate.
Common jigs and fixtures include:
- Dovetail jig for making dovetail joints
- Box joint jig for even finger joints
- Biscuit joiner jig for aligning biscuit slots
- Clamp fixtures to hold pieces firmly
- Miter sled for angled cuts on table saw
Advanced Joint Techniques
Woodworking joints create strong connections between wood pieces. Advanced techniques improve strength and appearance.
These joints fit complex shapes and hide fasteners for a clean look. Learn about compound angled joints, hidden fasteners, and hybrid joints.
Compound Angled Joints
Compound angled joints join two wood pieces cut at multiple angles. They fit together tightly in three dimensions.
These joints are common in curved furniture and roof framing. Careful measuring and cutting are important for a good fit.
- Use a miter saw or table saw with angle adjustments
- Mark angles clearly on wood before cutting
- Dry fit pieces before gluing or fastening
Hidden Fasteners
Hidden fasteners hold wood pieces without visible screws or nails. This creates a smooth, clean surface.
Types include biscuits, dowels, and pocket holes. These fasteners add strength and keep the joint neat.
- Biscuits align and strengthen joints inside the wood
- Dowels fit into holes to join pieces firmly
- Pocket holes use angled screws hidden on the inside
Hybrid Joints
Hybrid joints combine two or more joint types for extra strength. They often use both mechanical fasteners and glue.
These joints suit heavy or load-bearing projects. They balance ease of assembly with solid connection.
- Example: a mortise and tenon with hidden dowels
- Example: a dovetail joint reinforced with screws
- Carefully plan to avoid weakening the wood

Credit: paulsellers.com
Frequently Asked Questions
What Are The Strongest Woodworking Joints For Durability?
The strongest woodworking joints include mortise and tenon, dovetail, and box joints. These joints provide excellent strength by maximizing glue surface and mechanical interlock. They are ideal for furniture and structural projects requiring long-lasting stability and resistance to stress.
How To Choose The Right Joint For Woodworking Projects?
Choose a woodworking joint based on project type, strength needs, and aesthetics. Consider joint complexity, tools available, and wood species. For heavy loads, opt for mortise and tenon; for decorative work, dovetails work well. Match joint type to project function for best results.
Why Is Joint Preparation Important In Woodworking?
Proper joint preparation ensures tight fits, strong bonds, and precise alignment. Sanding, cutting accuracy, and cleaning joint surfaces improve glue adhesion. Well-prepared joints minimize gaps, increase durability, and create professional-quality finishes, enhancing overall woodworking project success.
What Glue Is Best For Woodworking Joints?
PVA wood glue is the most common choice for woodworking joints. It offers strong bonding, dries clear, and is easy to clean. For outdoor or moisture-prone projects, use waterproof or polyurethane glue for added durability and water resistance.
Conclusion
Woodworking joints are crucial for strong, durable projects. Choosing the right joint ensures stability. Practice makes these skills grow stronger. Remember to measure twice and cut once. Patience leads to precision. Each joint type has its own benefits. Experiment with various techniques to find your favorite.
Always prioritize safety in your workshop. Enjoy the process and learn from each project. Building with care creates lasting results. Share your creations and inspire others. Happy woodworking!