Are you struggling with installing compression fittings and want a simple, clear guide to get it right the first time? You’re in the right place.
Compression fittings can seem tricky, but once you understand the steps, you’ll save time, avoid leaks, and feel confident tackling your plumbing projects. This guide breaks down everything you need to know in easy-to-follow steps, so you can master the installation without stress.
Keep reading to discover the secrets to a perfect, secure fit every time.
What Are Compression Fittings
Compression fittings connect two pipes or tubes without soldering. They use a ring called a ferrule to create a tight seal.
These fittings are common in plumbing and gas systems. They help join pipes quickly and securely.
Basic Components Of Compression Fittings
Compression fittings have three main parts. Each part works together to hold pipes firmly.
- Compression Nut:Tightens the fitting around the pipe.
- Compression Ring (Ferrule):Squeezes to make a leak-proof seal.
- Body:Connects the pipes and holds the nut and ring.
How Compression Fittings Work
When you tighten the nut, it pushes the ring onto the pipe. The ring compresses and seals the joint.
This pressure stops water or gas from leaking. It also keeps the pipes firmly connected.
Materials Used For Compression Fittings
Compression fittings come in many materials. Choose one that fits your pipe type and use.
- Brass:Common for water pipes and durable use.
- Plastic:Lightweight and used for some water lines.
- Stainless Steel:Strong and good for high pressure.
Common Uses Of Compression Fittings
Compression fittings connect pipes where welding is hard or unwanted. They work well in tight spaces.
- Water supply lines
- Gas lines
- Hydraulic systems
- Air and vacuum systems
Credit: dfhydraulics.com
Tools Needed
Compression fittings connect pipes without soldering. Using the right tools makes installation easy and secure.
This guide lists the basic tools needed for compression fittings installation. Each tool has a specific role.
Pipe Cutter
A pipe cutter cuts pipes cleanly and evenly. It helps avoid damage to the pipe ends.
Use a pipe cutter designed for your pipe type and size. It ensures a straight cut for proper fitting.
Adjustable Wrench
An adjustable wrench tightens and loosens compression nuts. It fits different sizes of fittings.
Hold the fitting steady with one wrench. Use the other wrench to turn the nut without slipping.
Deburring Tool
A deburring tool removes rough edges inside the pipe after cutting. Smooth edges prevent leaks.
Run the deburring tool inside and outside the pipe end to clean any burrs or sharp bits.
Measuring Tape
Measuring tape helps measure pipe lengths accurately. Proper length avoids gaps and tight fits.
Measure twice before cutting to ensure the pipe fits well with the compression fitting.
Marker
A marker marks pipe cut points and fitting positions. It helps keep work precise and organized.
Use a permanent marker or pencil that is easy to see on the pipe surface.
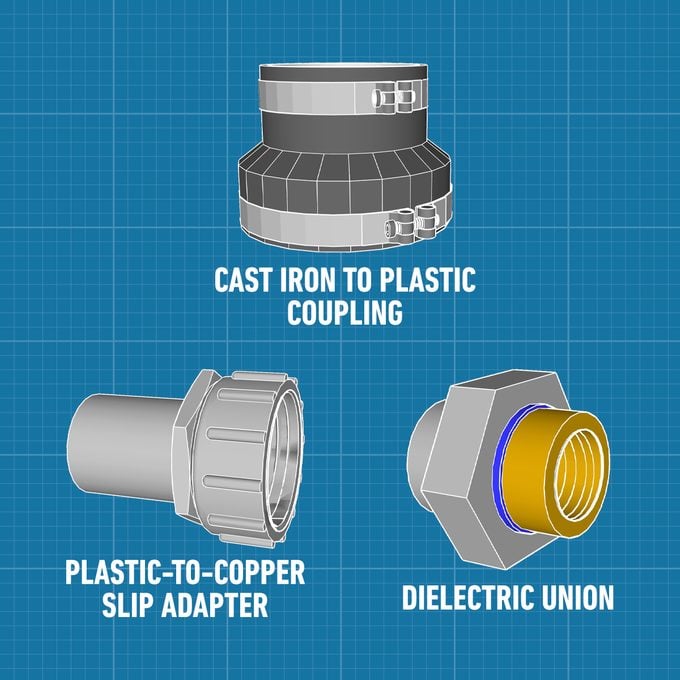
Choosing The Right Fitting
Compression fittings connect pipes without welding or soldering. Choosing the right fitting is important for a safe, leak-free joint.
Use fittings that fit your pipe material and size. Different fittings work better for metal or plastic pipes.
Match The Fitting Material
Choose fittings made from the same or compatible material as your pipes. This prevents corrosion and leaks.
- Copper fittings work with copper pipes
- Brass fittings suit copper and plastic pipes
- Stainless steel fittings fit stainless steel pipes
- Plastic fittings are for plastic pipes only
Check The Pipe Size
Select fittings that match your pipe diameter exactly. A wrong size causes poor sealing and leaks.
Measure the outside diameter of the pipe before buying fittings. Sizes are often marked on the pipe.
Consider The Pressure Rating
Fittings have pressure limits. Pick fittings rated for your system’s maximum pressure to avoid failure.
- Low-pressure fittings suit household plumbing
- High-pressure fittings are for industrial use
- Check manufacturer specs for pressure ratings
Decide On The Fitting Type
Compression fittings come in different types, such as straight, elbow, and tee fittings. Choose based on pipe layout.
Straight fittings join pipes in a line. Elbows change direction. Tees split flow into two paths.
Check Compatibility With Pipe Material
Some fittings do not work well with certain pipe materials. Use fittings designed for your pipe type to avoid damage.
- Use plastic-compatible fittings for plastic pipes
- Metal fittings can damage soft plastic pipes
- Ask for fittings designed for your pipe material
Credit: www.familyhandyman.com
Preparing The Pipe
Preparing the pipe is an important step for a good compression fitting. Clean and smooth pipe ends help create a tight seal. This prevents leaks and ensures a long-lasting connection.
Before installing compression fittings, you need to cut and prepare the pipe carefully. This guide explains how to cut the pipe cleanly and remove rough edges.
Cutting The Pipe Cleanly
Use a proper pipe cutter or a fine-toothed saw for cutting. Make sure the cut is straight and even. A crooked cut can cause leaks or damage the fitting.
Hold the pipe steady while cutting. Avoid twisting or bending it. Take your time to get a clean, smooth cut.
Deburring The Edges
After cutting, the pipe edges may have burrs or sharp bits. These can damage the fitting or stop the pipe from fitting properly.
Use a deburring tool or a file to remove all rough edges. Run the tool inside and outside the pipe end. The pipe should feel smooth and safe to handle.
- Check for burrs by running your finger around the pipe edge
- Remove all sharp bits to prevent leaks
- Keep the pipe end round and smooth
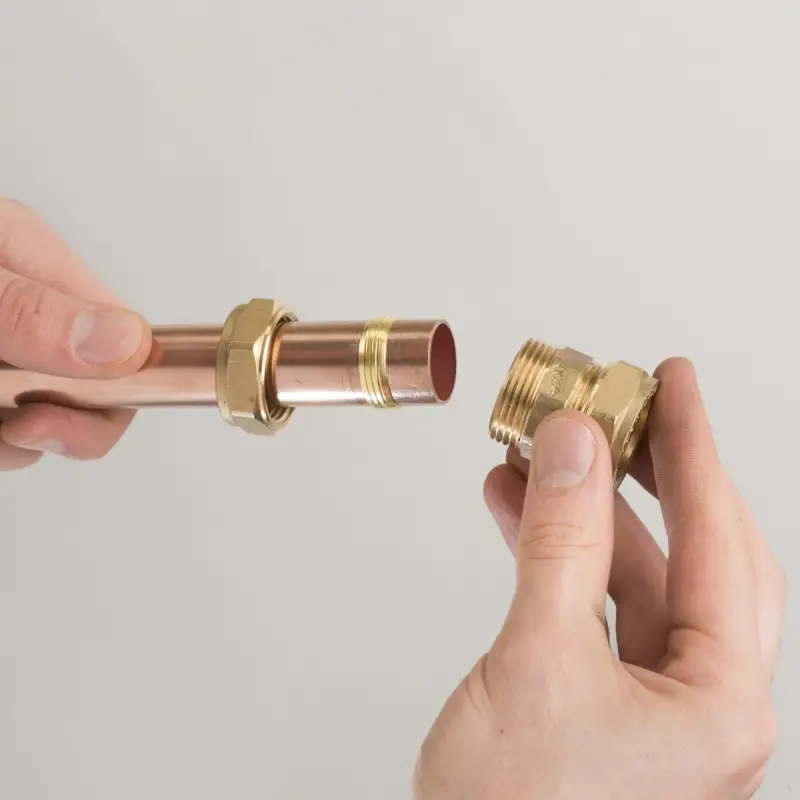
Assembling The Fitting
Compression fittings join pipes without soldering or welding. Proper assembly ensures a tight seal and stops leaks.
Follow the right steps to fit the nut and ring and position the pipe correctly. This keeps the fitting secure and durable.
Sliding The Nut And Ring
Start by sliding the nut onto the pipe. The nut threads onto the fitting later to hold parts tight.
Next, slide the compression ring, also called an olive, onto the pipe. It helps make a strong seal.
- First, push the nut onto the pipe, thread side facing the fitting.
- Then, slide the ring over the pipe until it touches the nut.
- Make sure the ring is straight and not damaged before fitting.
Positioning The Pipe
Insert the pipe fully into the fitting body. It must reach the internal stop for a good seal.
Hold the pipe steady while tightening the nut. This keeps the ring compressed evenly around the pipe.
- Push the pipe inside the fitting until it stops.
- Check the pipe is straight and not tilted.
- Hold the pipe firm while you tighten the nut by hand.
Tightening Techniques
Tightening compression fittings correctly is key to a secure seal. Poor tightening can cause leaks or damage.
This guide covers two main methods: hand tightening and using wrenches properly. Each has its own tips.
Hand Tightening
Hand tightening is the first step in fitting installation. It allows you to position the fitting without over-tightening.
- Turn the fitting by hand until it feels snug.
- Do not force the fitting beyond hand tight at this stage.
- Check alignment to avoid cross-threading.
- Hand tightening helps prevent damage to threads and seals.
Using Wrenches Properly
After hand tightening, use wrenches to finish securing the fitting. Use the right size wrench to avoid slipping.
| Wrench Type | Purpose | Tightening Tip |
| Adjustable Wrench | General use | Fit snugly, avoid over-tightening |
| Pipe Wrench | Heavy fittings | Use with care to prevent damage |
| Flare Nut Wrench | Compression fittings | Grips nut firmly without rounding edges |
Turn the wrench slowly and steadily. Stop tightening as soon as resistance increases significantly.
Always check the fitting for leaks after tightening. Tighten a bit more if needed but avoid forcing.
Testing For Leaks
Checking compression fittings for leaks is key to safe plumbing. Leaks can cause damage and waste water.
This guide covers two main ways to test fittings: pressure testing and visual inspection.
Pressure Testing
Pressure testing helps find leaks by using water or air pressure inside pipes. It shows if the fittings hold tight under stress.
- Close all valves to isolate the test area.
- Fill the pipes with water or air at the recommended pressure.
- Watch the pressure gauge for 10 to 15 minutes.
- Look for any drop in pressure, which means a leak.
- If pressure stays steady, the fittings are sealed well.
Visual Inspection
Visual inspection finds leaks by checking fittings closely. This method helps spot small cracks or loose connections.
| Inspection Area | What to Look For |
| Fitting joints | Water drops, moisture, or corrosion |
| Pipe ends | Proper alignment and tightness |
| Surrounding area | Signs of water damage or stains |
Credit: dfhydraulics.com
Common Installation Mistakes
Compression fittings provide a secure way to join pipes without soldering. Still, mistakes during installation can cause leaks or damage.
Knowing common errors helps you avoid problems and ensures a tight, lasting seal.
Incorrect Pipe Cutting
Cutting the pipe unevenly or leaving burrs can prevent the fitting from sealing well. Always use a proper pipe cutter and make a straight cut.
Not Deburring The Pipe
Failing to remove sharp edges inside and outside the pipe can damage the fitting’s ring. Use a deburring tool to smooth all edges before installation.
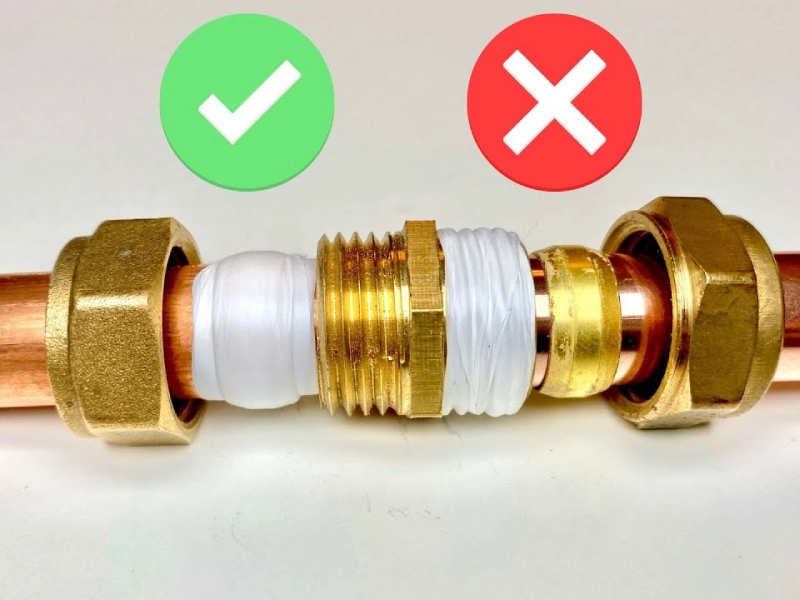
Over-tightening The Nut
Turning the nut too much can crush the pipe or damage the fitting. Tighten only until firm and then give a small additional turn as per manufacturer advice.
Under-tightening The Nut
Not tightening enough causes leaks. The fitting will not compress the pipe ring fully, allowing water to escape.
Using Wrong Size Fittings
| Common Mistake | Effect | Fix |
| Using too large fitting | Loose connection, leaks | Match fitting size to pipe diameter |
| Using too small fitting | Cannot fit pipe, damages parts | Check pipe and fitting sizes before buying |
| Mixing different materials | Poor seal, corrosion risk | Use compatible fittings and pipes |
Skipping Cleaning The Pipe Surface
Dirt, oil, or paint on the pipe can stop the fitting from sealing. Always clean the pipe surface with a cloth before assembly.
Misaligning The Pipes
If the pipes are not straight or aligned, the fitting will not seal properly. Ensure pipes are in line before tightening the fitting.
Reusing Old Fittings Or Rings
Old compression rings lose shape and grip. Always use new rings and fittings for each installation to avoid leaks.
Maintenance Tips
Compression fittings need regular care to work well. Good maintenance stops leaks and damage.
Follow these tips to keep your fittings safe and strong for a long time.
Check For Leaks Often
Look at your compression fittings regularly. Check for drops or wet spots near the joints.
Fix leaks quickly to avoid bigger problems like water damage or pressure loss.
Tighten Fittings Carefully
Use the right tools to tighten fittings. Do not over-tighten because it can break parts.
If a fitting feels loose, turn it gently until it is snug but not forced.
Clean Fittings Regularly
Dirt and grime can damage compression fittings. Wipe them clean with a dry cloth or mild cleaner.
Keep the area around fittings free from dust and moisture to prevent corrosion.
Replace Worn Parts
Check the rings and seals inside the fittings. Replace any that look cracked or worn out.
Using damaged parts can cause leaks or failure in the system.
Avoid Excess Pressure
Do not let pressure go higher than the fitting’s limit. High pressure can cause cracks or leaks.
Use pressure regulators or relief valves to keep the system safe.
Store Spare Fittings Properly
Keep extra fittings in a dry, clean place. Protect them from dust and moisture.
- Store in labeled containers
- Avoid direct sunlight
- Keep away from chemicals
Frequently Asked Questions
What Tools Are Needed For Compression Fittings Installation?
You need a pipe cutter, adjustable wrench, and compression fitting tools. These ensure clean cuts and secure tightening. Proper tools prevent leaks and damage during installation.
How To Prepare Pipes For Compression Fittings?
Clean and deburr pipe ends before installation. Ensure pipes are cut straight and free from dirt. Proper preparation ensures a tight, leak-free connection.
Can Compression Fittings Be Reused After Removal?
Compression fittings are generally designed for single use. Reusing may cause leaks due to worn seals. It’s best to replace fittings for reliable performance.
What Common Mistakes To Avoid During Installation?
Avoid overtightening, misaligning pipes, or skipping pipe preparation. These errors cause leaks and damage. Follow instructions carefully for a secure, lasting fit.
Conclusion
Installing compression fittings doesn’t have to be complicated. With this guide, you can handle the task effectively. Always ensure the pipe and fitting are clean. This helps prevent leaks. Make sure to tighten the fittings correctly. Not too loose, not too tight.
Use the right tools for the job. Double-check every step before finishing. Safety should always be your priority. Take your time to avoid mistakes. Practice will improve your skills over time. Remember, a good installation saves money and time. Enjoy your leak-free plumbing system!