Are you ready to master the art of soldering electrical wires? Whether you’re a DIY enthusiast, a budding electronics hobbyist, or someone looking to fix a loose connection, understanding how to solder wires can unlock a world of possibilities.
This guide will walk you through each step, ensuring you gain confidence and skill in no time. Imagine the satisfaction of completing your projects with precision and reliability. By following these simple techniques, you’ll not only enhance your technical skills but also save time and money on future repairs.
Let’s dive into the essentials and discover how you can transform your electrical projects with the power of soldering. Your newfound expertise is just a few steps away!
Credit: medium.com
Tools And Materials Needed
Soldering electrical wires requires the right tools and materials. Using proper equipment helps make strong and safe connections.
Below are the key items you need before starting your soldering project. Each plays an important role in the process.
Types Of Soldering Irons
Soldering irons come in different types for various tasks. Choose one that fits your project size and skill level.
- Basic soldering iron: Heats up quickly and suits simple wire jobs.
- Temperature-controlled soldering iron: Lets you set the heat level for sensitive components.
- Butane soldering iron: Portable and cordless, good for outdoor use.
- Station soldering iron: Comes with a stand and adjustable settings for frequent use.
Choosing The Right Solder
Select solder based on the materials and the type of electrical work. The composition and thickness affect the joint quality.
| Solder Type | Use Case | Notes |
| Lead-based solder | General electronics | Flows well, but contains lead |
| Lead-free solder | Environmentally safe projects | Higher melting point |
| Rosin-core solder | Electrical wiring | Contains flux for cleaning joints |
| Silver solder | High strength joints | Used in jewelry and heavy-duty wires |
Additional Supplies
Other materials help make soldering easier and safer. Prepare these before you start.
- Soldering stand to hold the iron safely.
- Wire strippers to remove insulation cleanly.
- Helping hands or clamps to hold wires steady.
- Heat shrink tubing for protecting soldered joints.
- Sponge or brass wire cleaner to clean the soldering tip.
- Safety goggles to protect your eyes.
- Ventilation or fume extractor to avoid breathing solder fumes.
Preparing Wires For Soldering
Preparing wires properly is very important for a strong solder joint. Clean, stripped, and twisted wires make soldering easier and last longer.
This guide explains how to prepare wires before soldering. Follow each step carefully to get good results.
Stripping Wire Insulation
Remove the plastic coating from the wire ends. Use a wire stripper tool for a clean cut. Avoid cutting the wire strands inside.
Strip about 1/2 inch of insulation to expose the wire. If you strip too much, the joint may be weak or short-circuited.
- Choose the right size hole on the wire stripper
- Place the wire in the stripper and squeeze gently
- Pull the insulation off without damaging wire strands
- Check that wires are fully exposed and clean
Cleaning Wire Surfaces
Wires often have dirt, oil, or oxidation that blocks solder. Clean the wire surface before soldering for better flow.
Use fine sandpaper or a wire brush to clean the wire strands gently. Wipe with a cloth if needed to remove dust.
- Use 400-600 grit sandpaper or a small wire brush
- Rub the wire strands lightly to remove oxidation
- Wipe the wire with a clean cloth or alcohol
- Do not over-clean or damage the wire strands
Twisting Wire Strands
Twist the wire strands tightly to keep them together. Twisted strands make a solid base for solder and prevent fraying.
Hold the wire ends and twist them clockwise until they are neat and firm. Avoid twisting too tight to break the wires.
- Hold the stripped wire ends firmly
- Twist strands evenly in one direction
- Keep the twist tight but do not snap wires
- Prepare wires for easy solder application
Setting Up Your Workspace
Creating a safe and organized workspace is key to soldering electrical wires well. A good setup helps you work better and avoid accidents.
This guide covers how to prepare your workspace with safety, lighting, ventilation, and tool organization.
Safe Work Environment
Keep your workspace free of clutter to prevent accidents. Use a sturdy table that does not wobble. Avoid flammable materials near your soldering area.
- Wear safety glasses to protect your eyes
- Use heat-resistant mats or surfaces
- Keep a fire extinguisher nearby
- Ensure your hands are dry before working
- Do not eat or drink near the workspace
Proper Lighting And Ventilation
Good lighting helps you see tiny wires clearly. Use a bright, adjustable lamp focused on your work area.
Ventilation removes smoke and fumes from soldering. Place your workspace near a window or use a fan to move air out.
| Lighting Tips | Ventilation Tips |
| Use LED desk lamp | Open windows during work |
| Adjust lamp angle for shadow-free view | Install a small exhaust fan |
| Keep extra bulbs ready | Use fume extractor if possible |
Organizing Tools
Arrange your tools so you can reach them quickly. Keep soldering iron, wires, and flux in one place.
- Use small containers for screws and wire pieces
- Place soldering iron on a stand
- Keep a damp sponge nearby to clean the tip
- Label your tools for easy finding
- Clear your workspace after each use
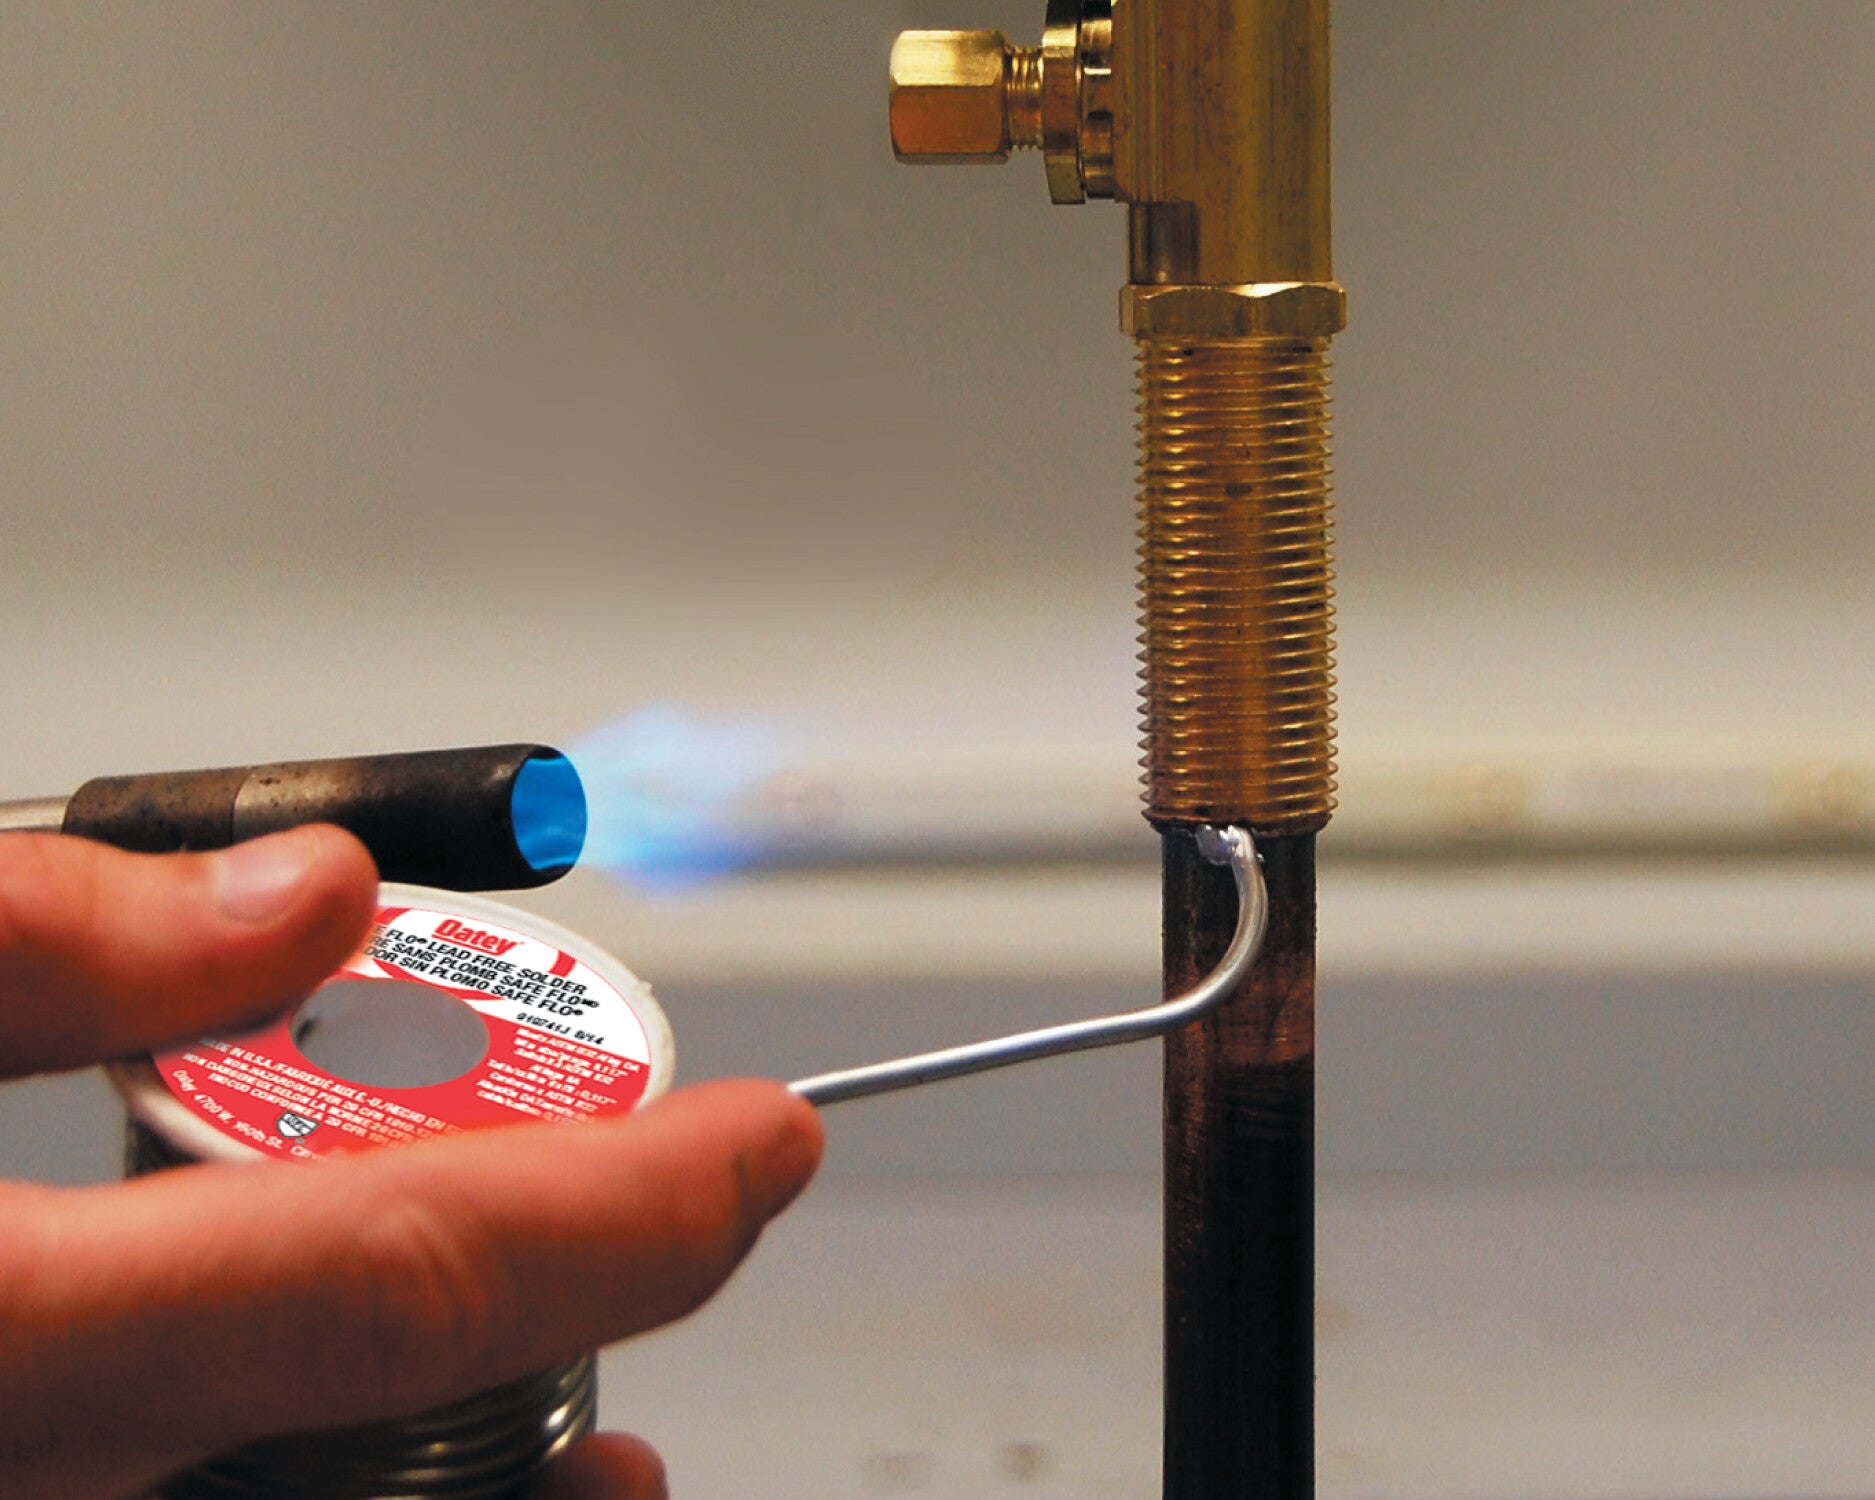
Credit: www.oatey.com
Soldering Techniques
Soldering electrical wires needs care and the right method. Good techniques help make strong and safe connections. This guide covers key steps for soldering wires well.
Learn how to prepare your soldering iron, heat wires properly, melt solder the right way, and avoid common mistakes. Follow these tips for better results.
Tinning The Soldering Iron Tip
Tinning means coating the soldering iron tip with solder before use. This helps heat transfer and prevents oxidation. A well-tinned tip lasts longer and works better.
To tin the tip, heat the iron and apply a small amount of solder. Spread the solder evenly on the tip. Wipe off excess solder with a damp sponge.
Applying Heat To Wires
Heat the wires before adding solder. Hold the soldering iron tip on the wire joint to warm it. The solder will flow better if the wires are hot enough.
- Twist wire strands tightly for good contact
- Place the iron on the wire, not on the solder
- Heat the joint for a few seconds before soldering
- Avoid overheating to protect wire insulation
Melting Solder Correctly
Apply solder to the heated wire, not the iron tip. The solder should melt and flow smoothly around the wires. This creates a strong electrical connection.
| Action | What to Do |
| Where to apply solder | On the heated wire, not the iron tip |
| Amount of solder | Just enough to cover the joint |
| Melting time | Only a few seconds to avoid damage |
| After soldering | Remove iron and let the joint cool |
Avoiding Cold Joints
Cold joints happen when solder does not flow well. These joints look dull and weak. They cause poor electrical contact and can fail later.
Tips to avoid cold joints:
- Make sure wires and tip are clean before soldering
- Heat wires enough before applying solder
- Use the right solder for electrical work
- Do not move wires while solder cools
- Check joints visually; they should be shiny and smooth
Joining Different Wire Types
Soldering wires is a common task in electrical work. Joining different wire types can be tricky. Knowing how to handle each type helps create strong connections.
This guide covers solid vs. stranded wires, joining different gauges, and soldering shielded wires safely.
Solid Vs. Stranded Wire
Solid wires have a single metal core. Stranded wires have many small wires twisted together. Both types need different handling when soldering.
Solid wire is easier to solder because it is stiff and holds shape. Stranded wire is flexible but needs extra care to keep strands together.
- Strip insulation carefully from stranded wire to avoid cutting strands.
- Twist stranded wire strands tightly before soldering.
- Use enough heat to melt solder but avoid damaging wire insulation.
Joining Different Gauges
Wire gauge means wire thickness. Joining thick and thin wires requires care. Thicker wire needs more heat and solder than thinner wire.
| Wire Gauge | Heat Needed | Solder Amount |
| Thin Wire (22-26 AWG) | Low | Small |
| Medium Wire (18-21 AWG) | Medium | Moderate |
| Thick Wire (14-17 AWG) | High | Large |
When joining different gauges, heat the thicker wire longer. Apply solder to the joint, making sure both wires get coated well.
Soldering Shielded Wires
Shielded wires have a metal shield to block interference. You must keep the shield intact for good protection.
Tips for soldering shielded wires:
- Strip only the outer insulation and expose the shield carefully.
- Twist shield wires together tightly.
- Solder the inner conductor first.
- Fold shield over the solder joint and solder it to maintain grounding.
- Use heat shrink tubing to cover and protect the joint.
Inspecting And Testing Joints
Checking soldered electrical joints is important for safety and performance. Good inspection helps find faults early.
Testing joints ensures wires carry electricity properly and stay strong over time.
Visual Inspection Tips
Look closely at each solder joint before use. The joint should be smooth and shiny. Avoid joints that look dull or cracked.
- Check for shiny, clean solder surfaces
- Look for no cracks or holes in the solder
- Ensure wire insulation is not burned or melted
- Make sure wires are well joined without gaps
- Avoid excess solder that creates bumps or blobs
Conductivity Testing
Test if the joint lets electricity pass freely. Use a multimeter set to measure resistance. Low resistance means good conductivity.
| Resistance Level | Result |
| 0 to 0.1 ohms | Excellent conductivity |
| 0.1 to 1 ohm | Acceptable conductivity |
| Above 1 ohm | Poor conductivity, re-solder needed |
Mechanical Strength Checks
Make sure the joint holds wires firmly. Gently pull or twist the wires to test strength. A strong joint will not move or break.
- Grip the wire near the joint
- Apply light pulling force
- Check if wire slips or detaches
- Try slight twisting motion to test bond
- Reject joints that feel loose or weak
Common Mistakes To Avoid
Soldering electrical wires needs careful work. Mistakes can cause weak connections or damage. Avoid these common errors to get safe and strong joints.
Read each section below to learn what to watch out for when soldering wires. Fixing these mistakes helps your project last longer.
Overheating Wires
Too much heat can damage the wire and insulation. It makes the wire weak and may cause it to break. Use a soldering iron at the right temperature and work quickly.
Signs of overheating include:
- Discolored or burned insulation
- Wire strands melting or breaking
- Joint looking dull or rough
Using Excessive Solder
Adding too much solder causes weak joints and shorts. It can block connections and make wires stiff. Use just enough solder to cover the wire and pad.
| Problem | Effect |
| Too much solder | Cold joints, short circuits |
| Too little solder | Weak electrical connection |
| Proper amount | Strong, reliable joint |
Ignoring Safety Precautions
Soldering involves heat and fumes. Not following safety rules can hurt you. Always work in a well-ventilated area and wear safety gear.
- Wear safety glasses to protect eyes
- Use a fume extractor or fan to clear smoke
- Keep flammable materials away from your workspace
- Unplug the soldering iron when not in use

Credit: www.familyhandyman.com
Maintaining Soldering Equipment
Good soldering work needs well-kept tools. Keeping your soldering equipment in shape saves time and ensures safe use. Regular care keeps the iron working well and extends its life.
This guide covers key ways to maintain your soldering gear. You will learn how to clean the iron tip, when to replace parts, and how to store your tools correctly.
Cleaning The Iron Tip
Cleaning the soldering iron tip is important to keep good heat transfer. A dirty tip can cause poor joints and damage the iron. Clean the tip often while working to remove old solder and dirt.
- Use a damp sponge or brass wool to wipe the tip
- Apply fresh solder to the tip after cleaning to protect it
- Avoid using sandpaper or files as they can harm the tip
- Turn off the iron before deep cleaning or using chemicals
Replacing Consumables
Consumables wear out with use and need regular replacement. These parts keep your soldering iron working safely and efficiently. Replace them as soon as you notice damage or poor performance.
| Consumable | When to Replace |
| Tip | When it becomes pitted, bent, or no longer holds solder |
| Heating Element | If the iron heats unevenly or fails to reach temperature |
| Tip Cleaner | When it is dirty or no longer cleans effectively |
| Solder Wire | If it is old, rusty, or contains impurities |
Storage Tips
Proper storage protects your soldering equipment from damage and dirt. Keep your tools dry and safe to avoid rust and wear. Use storage that keeps the iron tip clean and the cord untangled.
- Store the soldering iron on a stand when not in use
- Keep the iron in a dry place to prevent rust
- Wrap cords loosely to avoid damage
- Cover tips with a protective cap or wrap in anti-rust paper
Frequently Asked Questions
What Tools Are Essential For Soldering Electrical Wires?
Essential tools include a soldering iron, solder wire, wire strippers, heat shrink tubing, and a helping hand tool. These ensure precise, safe, and effective soldering results every time.
How Do You Prepare Wires Before Soldering?
Strip insulation from wire ends, twist strands to prevent fraying, and clean with alcohol. Proper preparation ensures strong, reliable solder joints.
What Is The Best Solder Type For Electrical Wires?
Use rosin-core solder with a 60/40 tin-lead ratio or lead-free solder. This provides good conductivity and strong, durable connections.
How Long Should I Heat Wires During Soldering?
Heat wires for 1-3 seconds until solder flows smoothly. Avoid overheating to prevent wire damage and weak joints.
Conclusion
Soldering electrical wires can seem tricky at first. Practice makes your joints strong and neat. Always keep safety in mind while working. Use the right tools for better results. Clean connections help electricity flow smoothly. Take your time and work carefully.
Soon, you will feel more confident soldering wires. This guide helps you start with simple steps. Keep learning and improving with each project. Soldering skills can save time and money. Try small tasks before moving to bigger jobs. You have the basics now—go ahead and try!
