Are you ready to unlock the full potential of your multimeter? Whether you’re fixing a simple electrical issue or diving into complex projects, knowing how to use your multimeter properly can save you time, money, and frustration.
Imagine being able to quickly check voltages, test batteries, or troubleshoot circuits with confidence. This guide will walk you through every essential step, making sure you get accurate readings and stay safe while working. Keep reading, and soon you’ll handle your multimeter like a pro.

Credit: www.youtube.com
Multimeter Basics
A multimeter is a tool used to measure electrical values. It helps check voltage, current, and resistance.
Knowing how to use a multimeter is important for safety and accuracy in electrical work.
Types Of Multimeters
There are two main types of multimeters: analog and digital. Analog meters use a needle to show readings. Digital meters show numbers on a screen.
- Analog multimeters are simple but less accurate.
- Digital multimeters are easy to read and more precise.
- Some digital multimeters have extra features like temperature measurement.
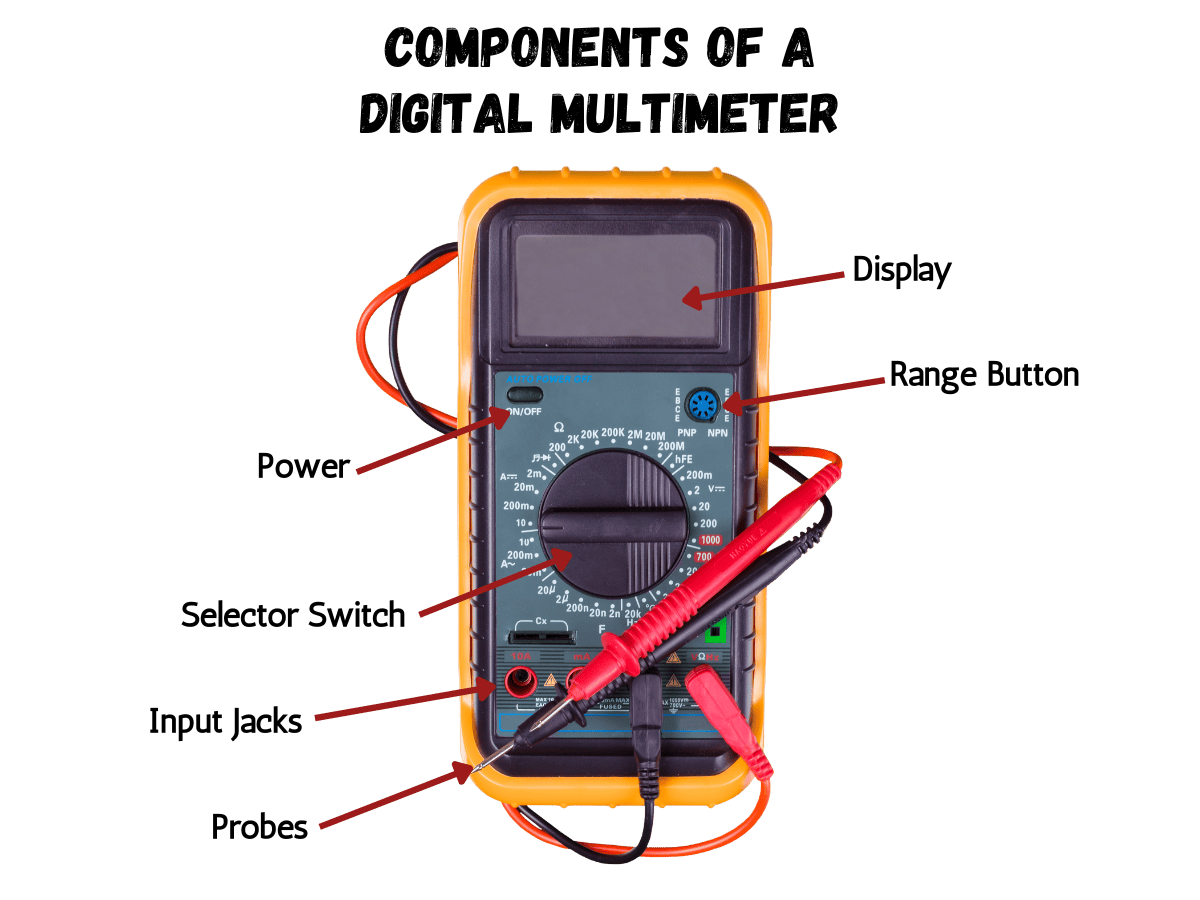
Key Components And Functions
| Component | Function |
| Display | Shows measurement values |
| Dial/Selector | Chooses measurement type and range |
| Probes | Connects to the circuit to measure |
| Battery | Powers the multimeter |
| Hold Button | Freezes the current reading |
The dial sets the multimeter to measure voltage, current, or resistance. Probes must be placed correctly for safe use.
Safety Precautions
- Always start with the highest measurement range.
- Check that probes are in good condition before use.
- Never touch metal probe tips during measurement.
- Turn off power before connecting the multimeter to a circuit.
- Use the correct setting for what you want to measure.

Credit: www.youtube.com
Setting Up Your Multimeter
Using a multimeter correctly starts with proper setup. You need to know how to prepare your device for accurate readings.
This guide covers choosing the right mode, selecting the proper range, and preparing your test leads.
Choosing The Right Mode
Select the correct mode on your multimeter based on what you want to measure. Common modes include voltage, current, and resistance.
- Use the voltage mode to measure electrical potential difference.
- Choose the current mode to measure the flow of electricity.
- Select resistance mode to check how much a device resists electrical flow.
- Some multimeters have special modes for testing diodes or continuity.
Selecting Proper Range
Pick the right range so your multimeter can measure accurately. If unsure, start with the highest range and move down.
| Measurement Type | Suggested Range Setting |
| Voltage (AC/DC) | Start high, then lower for precision |
| Current | Use highest range first |
| Resistance | Set to maximum range initially |
Preparing Test Leads
Check your test leads before use. Make sure they are clean, undamaged, and properly connected to the multimeter.
- Inspect leads for cracks or exposed wires.
- Plug the black lead into the common (COM) jack.
- Insert the red lead into the correct input jack depending on measurement.
- Hold leads firmly during testing to avoid slipping.
Measuring Voltage
Using a multimeter to measure voltage helps check if circuits work correctly. Voltage is the electric force that moves current through wires.
You must set your multimeter properly and connect it right to get accurate voltage readings.
Ac Vs Dc Voltage
Voltage comes in two types: AC (alternating current) and DC (direct current). AC changes direction many times per second. DC flows in one direction only.
Check if your multimeter is set to the right type before measuring. Using the wrong setting can give wrong results or damage the meter.
- AC voltage is common in homes and outlets
- DC voltage powers batteries and electronics
- Multimeters have separate settings for AC and DC
Connection Tips
Connect the multimeter probes correctly to measure voltage safely. Always connect the black probe to ground or negative side.
Touch the red probe to the point where you want to measure voltage. Hold the probes steady to avoid false readings.
- Turn off power before connecting probes for safety
- Use the right ports on the multimeter for voltage
- Keep fingers away from metal parts of the probes
Common Mistakes To Avoid
Many errors happen when using a multimeter. Avoid setting the meter to current mode when measuring voltage. This can damage the device.
Do not touch probe tips together during measurement. This can cause short circuits or wrong readings.
- Check battery and fuse in the multimeter before use
- Do not measure voltage above the multimeter’s limit
- Read the meter display carefully for unit and range
Measuring Current
Measuring current is important to check how much electricity flows in a circuit. A multimeter helps you do this by connecting it in the right way.
Always be careful and use the correct settings on your multimeter. This keeps you safe and gives good results.
Series Connection Setup
To measure current, connect the multimeter in series with the circuit. This means the current must pass through the meter.
Turn off power before connecting. Break the circuit and attach the meter leads where the break is.
- Set the multimeter to the correct current range (mA or A)
- Connect the red lead to the positive side of the break
- Connect the black lead to the negative side of the break
- Turn the power back on and read the current
Handling High Current Safely
High current can damage your multimeter or cause injury. Use a meter with a high current rating and proper fuses.
Never try to measure current that is higher than your meter’s limit. Use a clamp meter for very high currents.
- Check the multimeter’s maximum current rating
- Use proper fuse protection inside the meter
- Wear safety gloves and glasses
- Keep hands away from metal parts during measurement
Troubleshooting Readings
If the current reading is zero or very low, check if the meter is connected correctly in series. A wrong connection shows no current.
Also check the fuse inside the multimeter. A blown fuse stops current from passing through the meter.
- Ensure the circuit is powered on
- Verify leads are firmly connected
- Check multimeter fuse and replace if needed
- Confirm correct current range is set on the meter
Testing Resistance
Testing resistance helps check if electrical parts work correctly. A multimeter measures resistance in ohms.
Knowing how to test resistance keeps you safe and helps find problems in circuits.
Ensuring Circuit Is Powered Off
Always turn off the power before testing resistance. Electricity can harm you or damage your multimeter.
- Switch off the device or circuit.
- Unplug it from the power source.
- Press any buttons to release stored power.
- Double-check with a voltage test.
Interpreting Resistance Values
Resistance shows how much a part blocks electric current. The multimeter screen shows numbers in ohms (Ω).
| Resistance Value | Meaning |
| 0 to 10 Ω | Low resistance, good connection |
| 10 to 1000 Ω | Normal resistance, part working |
| Over 1,000,000 Ω | High resistance, possible open circuit |
| OL or no reading | Open circuit, no connection |
Using Continuity Mode
Continuity mode checks if electricity flows through a part. The multimeter beeps when the circuit is complete.
Tips for using continuity mode:
- Set multimeter to continuity mode (symbol looks like sound waves).
- Touch the test leads together to hear a beep.
- Place leads on each end of the part or wire.
- If you hear a beep, the path is good.
- No beep means a break or fault.

Credit: medium.com
Advanced Functions
Multimeters do more than measure voltage and current. Advanced features help test parts and circuits in detail.
Using these functions correctly gives better results and saves time during troubleshooting.
Capacitance Measurement
Capacitance measures a capacitor’s ability to store charge. Set your multimeter to the capacitance mode to test this.
- Discharge the capacitor fully before testing.
- Connect the probes to the capacitor leads.
- Read the value on the screen and compare it to the capacitor’s rating.
- A very low or zero reading means a bad capacitor.
Frequency Testing
Frequency testing checks how often a signal repeats per second. This is useful for clocks and oscillators.
| Setting | Purpose | Typical Range |
| Hz Mode | Measures frequency of signals | 1 Hz to 1 MHz |
| Signal Input | Where to connect test probes | Test points or circuit outputs |
| Display | Shows frequency value | Digital readout |
Diode And Transistor Checks
Multimeters can test diodes and transistors to find faults in circuits.
- Use diode mode to check if a diode is working. A good diode shows a voltage drop in one direction only.
- For transistors, identify the base, collector, and emitter pins.
- Measure between pins to check junctions; readings show if the transistor is good or bad.
- Zero or very high readings usually mean a damaged component.
Improving Measurement Accuracy
Using a multimeter correctly helps get precise readings. Accurate measurements avoid mistakes in your work.
Simple habits and care improve the accuracy of your multimeter. Follow basic tips to measure better.
Calibrating Your Multimeter
Calibration adjusts your multimeter to measure correctly. It fixes any errors caused by time or use.
Use a known reference voltage or current to check your multimeter’s readings. Adjust if needed.
- Turn the multimeter on and set it to the correct measurement type.
- Connect the probes to the calibration source or standard.
- Compare the reading to the known value.
- Adjust the multimeter if the reading is off.
- Repeat calibration regularly for best results.
Avoiding Interference
Interference can cause wrong readings on your multimeter. Keep away from strong electrical devices.
Work in a clean, quiet place. Use shielded cables to reduce noise and interference.
- Stay clear of motors, transformers, and radio signals.
- Use short and well-insulated test leads.
- Keep hands steady to avoid unstable readings.
- Turn off nearby devices if possible.
Maintaining Equipment
Proper care keeps your multimeter working well for a long time. Check and clean it often.
Replace batteries and fuses when needed. Store the multimeter in a dry and safe place.
- Clean the probes and display regularly.
- Inspect cables for cracks or damage.
- Replace batteries before they run out.
- Keep the multimeter away from dust and moisture.
Practical Tips For Everyday Use
A multimeter is a handy tool to measure electrical values like voltage, current, and resistance. Using it properly helps you get accurate results and stay safe.
These tips will help you organize your tools, record measurements, and keep your multimeter ready for use every day.
Organizing Your Tools
Keep your multimeter and accessories in one place. This saves time and avoids damage to parts. Use a toolbox or a pouch to store them neatly.
Label your test leads and probes to find them easily. Avoid tangling wires by wrapping them loosely.
- Use a small case or pouch for the multimeter and probes
- Label test leads with tape or markers
- Wrap wires gently to prevent damage
- Store extra batteries and fuses nearby
Recording Measurements
Write down the values you measure. This helps track changes over time or compare multiple tests. Use a notebook or a digital app to keep records.
Note the date, time, and settings used on the multimeter. This information is useful for troubleshooting or future reference.
- Record measurement value clearly
- Include date and time of the reading
- Write down the multimeter setting used
- Keep notes organized by project or task
Regular Battery Checks
Check your multimeter’s battery often to avoid surprises. A weak battery can cause wrong readings. Replace batteries as soon as you notice low power.
Some multimeters have a battery test feature. Use it to check power quickly before starting your work.
- Test battery level before use
- Replace batteries regularly, even if not used much
- Use the correct battery type recommended by the manufacturer
- Keep spare batteries handy
Frequently Asked Questions
What Is A Multimeter Used For?
A multimeter measures voltage, current, and resistance in electrical circuits. It helps diagnose electrical problems quickly and accurately, making it essential for both professionals and hobbyists.
How Do I Safely Use A Multimeter?
Always start with the highest measurement setting. Connect probes correctly, avoid touching metal parts, and never measure voltage on a circuit with power off unless specified.
Can A Multimeter Test Batteries?
Yes, a multimeter can test battery voltage and condition. Set it to DC voltage, place probes on battery terminals, and read the voltage to determine battery health.
What Are Common Multimeter Settings To Know?
Key settings include voltage (AC/DC), current (mA/A), and resistance (ohms). Understanding these allows accurate measurements and prevents damage to the multimeter or circuit.
Conclusion
Using a multimeter is easier than it seems. Start by reading the manual. Understand each setting and function. Always check your connections before measuring. Safety comes first. Wear protective gear if needed. Practice makes perfect. Experiment with different measurements. Test voltage, current, and resistance.
Don’t rush; take your time. Always switch off when not in use. Regular practice builds confidence. Over time, you’ll gain accuracy. Multimeters are great tools for troubleshooting. Handy for electricians and DIYers alike. Remember, patience and practice lead to mastery.
Enjoy exploring the world of electronics!
