If you work with pipes, you know how important it is to get a perfect fit every time. That’s where a pipe flaring tool comes in.
It helps you create clean, tight seals that prevent leaks and keep your system running smoothly. But if you’ve never used one before, it can feel tricky and confusing. Don’t worry—this guide will walk you through each step clearly and simply.
By the end, you’ll have the confidence to flare pipes like a pro and avoid common mistakes that could cost you time and money. Ready to master your pipe flaring tool? Let’s get started.
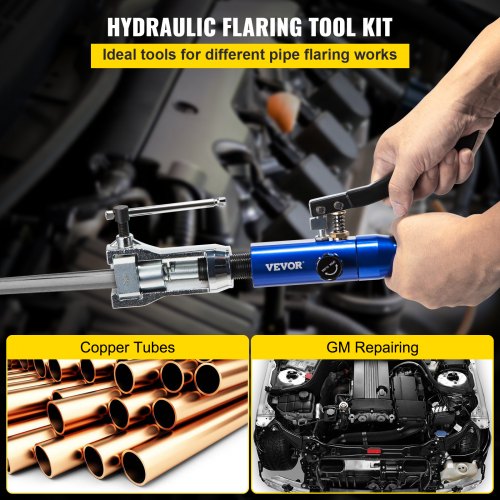
Credit: www.vevor.ca
Choosing The Right Pipe Flaring Tool
Choosing the right pipe flaring tool is important for good results. The tool helps shape pipe ends for strong connections.
Selecting the right tool depends on the type of flare and pipe you use. This guide will help you understand your options.
Types Of Flaring Tools
There are different flaring tools for various flare shapes. Each tool fits specific jobs and pipe types.
- Single flare tools: Make one flare at a time. Good for small jobs.
- Double flare tools: Create a stronger flare with two layers. Used in brake lines.
- Bubble flare tools: Form a rounded flare. Often used for softer pipes.
- Hydraulic flaring tools: Use pressure for clean flares on hard pipes.
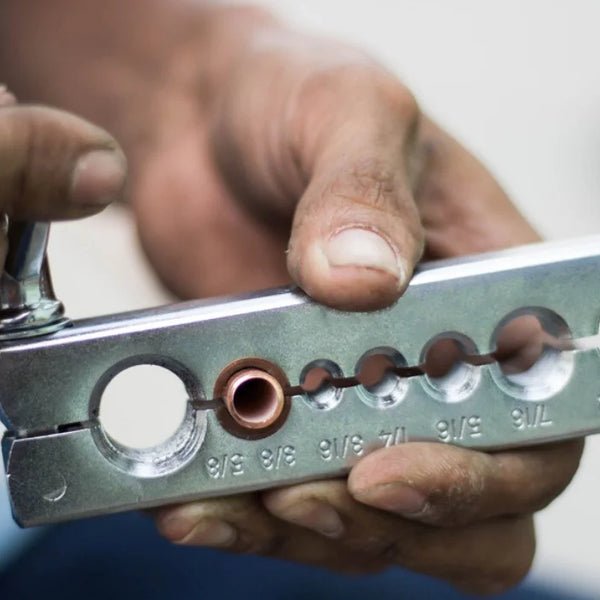
Materials And Sizes Compatibility
Flaring tools work with different pipe materials and sizes. Choose a tool that matches your pipe’s specs.
Common pipe materials include copper, aluminum, and steel. Each material needs a proper tool to avoid damage.
| Pipe Material | Tool Type | Size Range |
|---|---|---|
| Copper | Single or double flare tool | 1/8″ to 3/4″ |
| Aluminum | Bubble flare tool | 3/16″ to 1/2″ |
| Steel | Hydraulic flaring tool | 1/4″ to 1″ |
Preparing The Pipe For Flaring
Preparing a pipe correctly is important before using a pipe flaring tool. It helps make a strong and leak-free connection.
This guide explains how to prepare the pipe by cutting, deburring, and measuring it carefully.
Cutting The Pipe Cleanly
Cut the pipe straight and clean to get a good flare. Use a pipe cutter or a fine-toothed saw for best results.
Keep the pipe steady while cutting. Avoid crushing or bending it during the process.
- Use a pipe cutter for smooth cuts
- Rotate the cutter evenly around the pipe
- Do not rush; cut slowly and steadily
- Check that the cut is square and even
Deburring The Pipe Edges
Remove any sharp edges or burrs from the cut pipe. Burrs can cause leaks or damage the flaring tool.
Use a deburring tool or a round file to smooth out the inside and outside edges of the pipe.
- Insert the deburring tool inside the pipe and rotate
- File the outside edge gently to remove rough spots
- Check the pipe edge by running your finger carefully
- Ensure the edges are clean and smooth before flaring
Measuring And Marking The Pipe
Measure the pipe length carefully before flaring. Mark the spot where the flare will start.
Use a pencil or marker to make a clear mark on the pipe. This helps guide the flaring tool.
- Measure twice to avoid mistakes
- Mark the pipe edge clearly
- Use the flare tool’s guide to set the mark
- Keep the mark visible during the process
Setting Up The Flaring Tool
Setting up a pipe flaring tool correctly is important for good results. This guide covers the key steps to prepare your tool before use.
Focus on clamping the pipe securely and aligning the flaring cone properly. These steps help create a clean, even flare.
Clamping The Pipe Securely
First, place the pipe in the clamp of the flaring tool. Make sure the pipe end sticks out slightly from the clamp face.
- Open the clamp jaws wide enough for the pipe.
- Insert the pipe so that it extends about 1/8 inch beyond the clamp.
- Tighten the clamp screws firmly to hold the pipe in place.
- Check that the pipe does not move when you try to wiggle it.
Secure clamping prevents the pipe from slipping during flaring. It also keeps the flare shape uniform.
Aligning The Flaring Cone
Next, position the flaring cone above the pipe end. Proper alignment ensures the flare forms evenly around the pipe.
| Alignment Check | What to Do |
|---|---|
| Centering | Make sure the cone tip is centered over the pipe end. |
| Vertical Position | Lower the cone slowly until it touches the pipe end. |
| Steady Pressure | Apply steady pressure while turning the cone to flare the pipe. |
Keep the tool steady during the flare. Avoid tilting the cone to prevent uneven flares or damage.
Performing The Flare
Performing the flare correctly is key to creating a strong pipe connection. This step shapes the pipe end to fit tightly with the fitting.
Proper technique ensures the flare is smooth and secure. Follow simple guidelines to apply pressure and check the flare shape.
Applying Pressure Evenly
Apply pressure slowly and evenly as you tighten the flaring tool. Uneven pressure can cause cracks or an uneven flare.
- Place the pipe firmly in the flaring tool clamp.
- Turn the yoke screw to push the flaring cone into the pipe end.
- Keep turning until the pipe end forms a smooth, even flare.
- Do not force the tool too quickly; steady pressure works best.
Checking The Flare Shape
After flaring, inspect the flare shape carefully. The flare should be even and free from cracks.
| Flare Feature | Good Condition | Problem Signs |
|---|---|---|
| Edge Smoothness | Even, rounded edge | Rough or jagged edges |
| Flare Angle | Consistent angle matching fitting | Uneven or sharp angle changes |
| Cracks | No cracks visible | Any cracks or splits |
| Flare Width | Uniform width all around | Thin spots or uneven width |
Testing And Adjusting The Flare
After creating a flare on a pipe, it is important to test it. Testing helps ensure the connection is tight and safe. Adjusting the flare may be needed if leaks or weak spots appear.
This guide explains how to check your flare and fix it if necessary. Proper testing and adjustment keep your pipe connections strong and leak-free.
Ensuring Leak-free Connections
To make sure your flare does not leak, first connect the flare nut to the fitting. Tighten it by hand, then use a wrench to secure it firmly. Avoid over-tightening as it can damage the flare.
After tightening, test the connection by turning on the fluid or gas supply. Look for drops or hissing sounds that indicate leaks. If you see any, stop and fix the flare before use.
- Hand-tighten flare nut before using a wrench
- Use the wrench to secure but do not over-tighten
- Check for leaks by observing or listening
- Stop and fix any leak found immediately
Re-flaring Tips
If the flare leaks or looks uneven, you may need to re-flare the pipe end. First, cut off the bad flare cleanly with a pipe cutter. Make sure the pipe end is smooth and straight.
Use the pipe flaring tool again, aligning the pipe correctly in the tool. Apply steady pressure to form a smooth, even flare. Check the flare’s shape and size before connecting.
- Cut off the damaged flare cleanly
- Deburr and smooth the pipe edge
- Place the pipe properly in the flaring tool
- Apply steady, even pressure when flaring
- Inspect flare for evenness and size
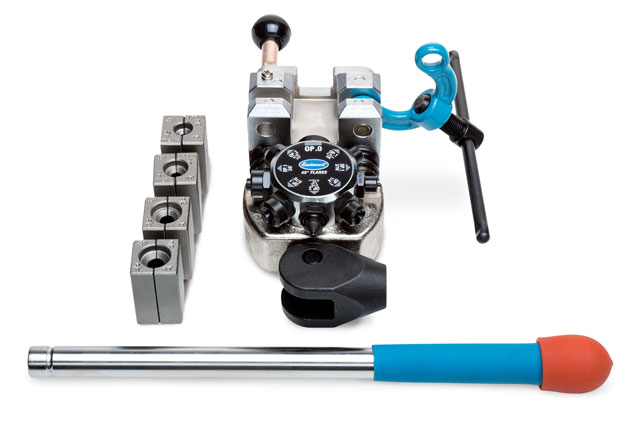
Credit: www.eastwood.com
Maintaining Your Flaring Tool
Taking care of your pipe flaring tool helps it last longer. A well-maintained tool gives better results.
Cleaning and storing the tool properly keeps it in good shape. This guide shows how to maintain it.
Cleaning After Use
Always clean your flaring tool after each job. Dirt and metal shavings can cause damage over time.
Use a brush or cloth to remove debris. Wipe the tool with a light oil to prevent rust.
- Remove metal shavings carefully
- Clean all moving parts
- Apply a small amount of machine oil
- Wipe off excess oil to avoid dust buildup
Storage Recommendations
Store your flaring tool in a dry place. Moisture can cause rust and damage the metal parts.
Keep the tool in its case or a toolbox to protect it from dust and impacts. Avoid leaving it in damp areas.
- Use a protective case or toolbox
- Keep away from moisture and humidity
- Store in a cool, dry place
- Check the tool regularly for rust or wear
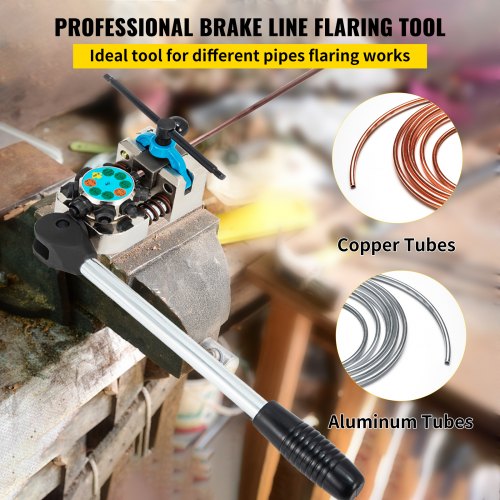
Credit: www.vevor.com
Frequently Asked Questions
What Is A Pipe Flaring Tool Used For?
A pipe flaring tool creates a flared end on metal tubing. This flare ensures a secure, leak-proof connection in plumbing and automotive systems. It helps join pipes to fittings tightly and prevents fluid or gas leaks.
How Do You Use A Pipe Flaring Tool Correctly?
First, cut the pipe squarely. Insert the pipe into the flaring bar. Tighten the clamp securely. Use the yoke to press the flaring cone into the pipe end. Remove and inspect the flare for evenness and smooth edges.
What Types Of Pipes Can A Flaring Tool Work With?
Flaring tools typically work with soft metals like copper, aluminum, and thin steel pipes. These metals bend easily to form a proper flare. Harder metals may require specialized tools or processes for effective flaring.
Why Is Proper Flaring Important In Plumbing?
Proper flaring creates a tight seal between pipes and fittings. This prevents leaks, which can cause water damage or system failure. A well-made flare also ensures long-lasting connections and maintains system pressure.
Conclusion
Mastering a pipe flaring tool is simpler than you think. Follow the steps carefully. Ensure your tool is in good condition. Practice makes perfect. The more you practice, the better your flares will be. This tool is essential for clean, secure connections.
Avoid leaks by ensuring a proper flare. Use the right size and type for your needs. Safety first: always wear protective gear. With patience, you’ll achieve professional results. A well-flared pipe enhances your project’s quality. Enjoy the satisfaction of a job well done.
Your work will be reliable and durable.
