
Have you ever wanted to create beautiful, hand-carved furniture that stands out in your home? Carving wood for furniture might seem tricky, but with the right steps, you can bring your ideas to life.
Imagine the satisfaction of turning a simple piece of wood into a unique work of art that everyone admires. In this guide, you’ll discover easy-to-follow tips and tricks that make wood carving enjoyable and rewarding. Keep reading, and soon you’ll be ready to craft furniture that reflects your personal style and skill.
Credit: davidffisher.com
Choosing The Right Wood
Choosing the right wood is very important for carving furniture. The wood affects how easy it is to carve and how the piece will look.
Some woods are soft and easy to shape, while others are hard and last longer. Knowing these differences helps you pick the best wood for your project.
Best Wood Types For Carving
Some woods are popular for carving because they are easy to work with and look great. Softwoods and hardwoods both have options for carving.
- Basswood: Soft, light, and carves smoothly. Great for beginners.
- Butternut: Light color, soft texture, easy to shape.
- Cherry: Harder wood with fine grain, good for detailed work.
- Walnut: Dark wood with rich color, strong and durable.
- Mahogany: Hard and smooth, holds detail well.
Wood Grain And Texture Considerations
Wood grain shows the direction of the wood fibers. It affects how the wood cuts and looks after carving.
Fine, straight grain is best because it is easier to carve and makes smooth shapes. Rough or uneven grain can cause the wood to split.
- Straight grain is smooth and easy to carve.
- Interlocking grain can be hard and cause chipping.
- Open grain wood may need extra finishing to look smooth.
Avoiding Common Wood Flaws
Flaws in wood can make carving hard and weaken your furniture. Always check wood before buying or using it.
Look for cracks, knots, and holes. These flaws can cause the wood to break or look bad after carving.
- Cracks weaken wood and can split further during carving.
- Knots are hard spots that can dull tools and create rough areas.
- Warped wood is twisted and hard to work with.
- Insect damage leaves holes and weak spots.
Essential Tools For Wood Carving
Wood carving for furniture needs the right tools. Choosing good tools helps you work safely and well.
Below are important tools and safety tips for carving wood used in making furniture.
Must-have Carving Tools
Start with basic carving tools that fit your project. Sharp blades and sturdy handles give better control.
- Gouges: for scooping wood and making curves
- Chisels: for straight cuts and shaping edges
- V-tools: for fine lines and details
- Mallet: to tap chisels gently
- Bench knife: for precise cuts and trimming
- Carving gloves: to protect your hands
Sharpening And Maintaining Tools
Keep your tools sharp for clean cuts. Dull tools can slip and cause accidents.
| Tool | Sharpening Method | Maintenance Tip |
| Gouges | Use slip stones or sharpening stones | Clean after use and oil the blade |
| Chisels | Sharpen with water stones or diamond stones | Store in a dry place to avoid rust |
| V-tools | Sharpen with fine-grit stones | Check edges regularly for chips |
| Bench Knife | Use a leather strop for final polish | Keep blade covered when not in use |
Safety Gear And Precautions
Wear safety gear to protect your body from injury. Work in a clean, well-lit space.
- Safety glasses to shield your eyes
- Cut-resistant gloves to protect hands
- Dust mask to avoid breathing sawdust
- Secure your wood piece firmly
- Keep your tools sharp and clean
- Work slowly and carefully
Preparing Your Wood
Preparing wood is the first step in carving furniture. Good preparation helps your carving look clean and last long.
Take time to choose, measure, and secure the wood before you start carving. This makes the work easier and safer.
Selecting And Measuring Wood Pieces
Pick wood that fits your furniture project. Hardwoods like oak or maple work well for carving.
Measure each piece carefully to match your design size. Accurate measurements reduce mistakes.
- Choose wood without cracks or knots
- Use a tape measure or ruler for precision
- Check wood thickness fits your carving depth
- Consider wood grain direction for smooth carving
Marking Your Design
Draw your carving design on the wood surface. Clear marks guide your carving tools.
Use a pencil or chalk to mark. These are easy to erase or sand off later.
- Sketch the main shapes and details lightly
- Double-check proportions before carving
- Use stencils for complex patterns
- Mark areas to avoid cutting
Securing Wood For Stability
Hold your wood firmly while carving. Stable wood prevents slips and mistakes.
Use clamps or a workbench to keep wood still. Check that the wood does not move at all.
- Clamp wood to a sturdy table or bench
- Use a non-slip mat under the wood if needed
- Check tightness before each carving session
- Adjust clamps to avoid damaging the wood

Credit: www.youtube.com
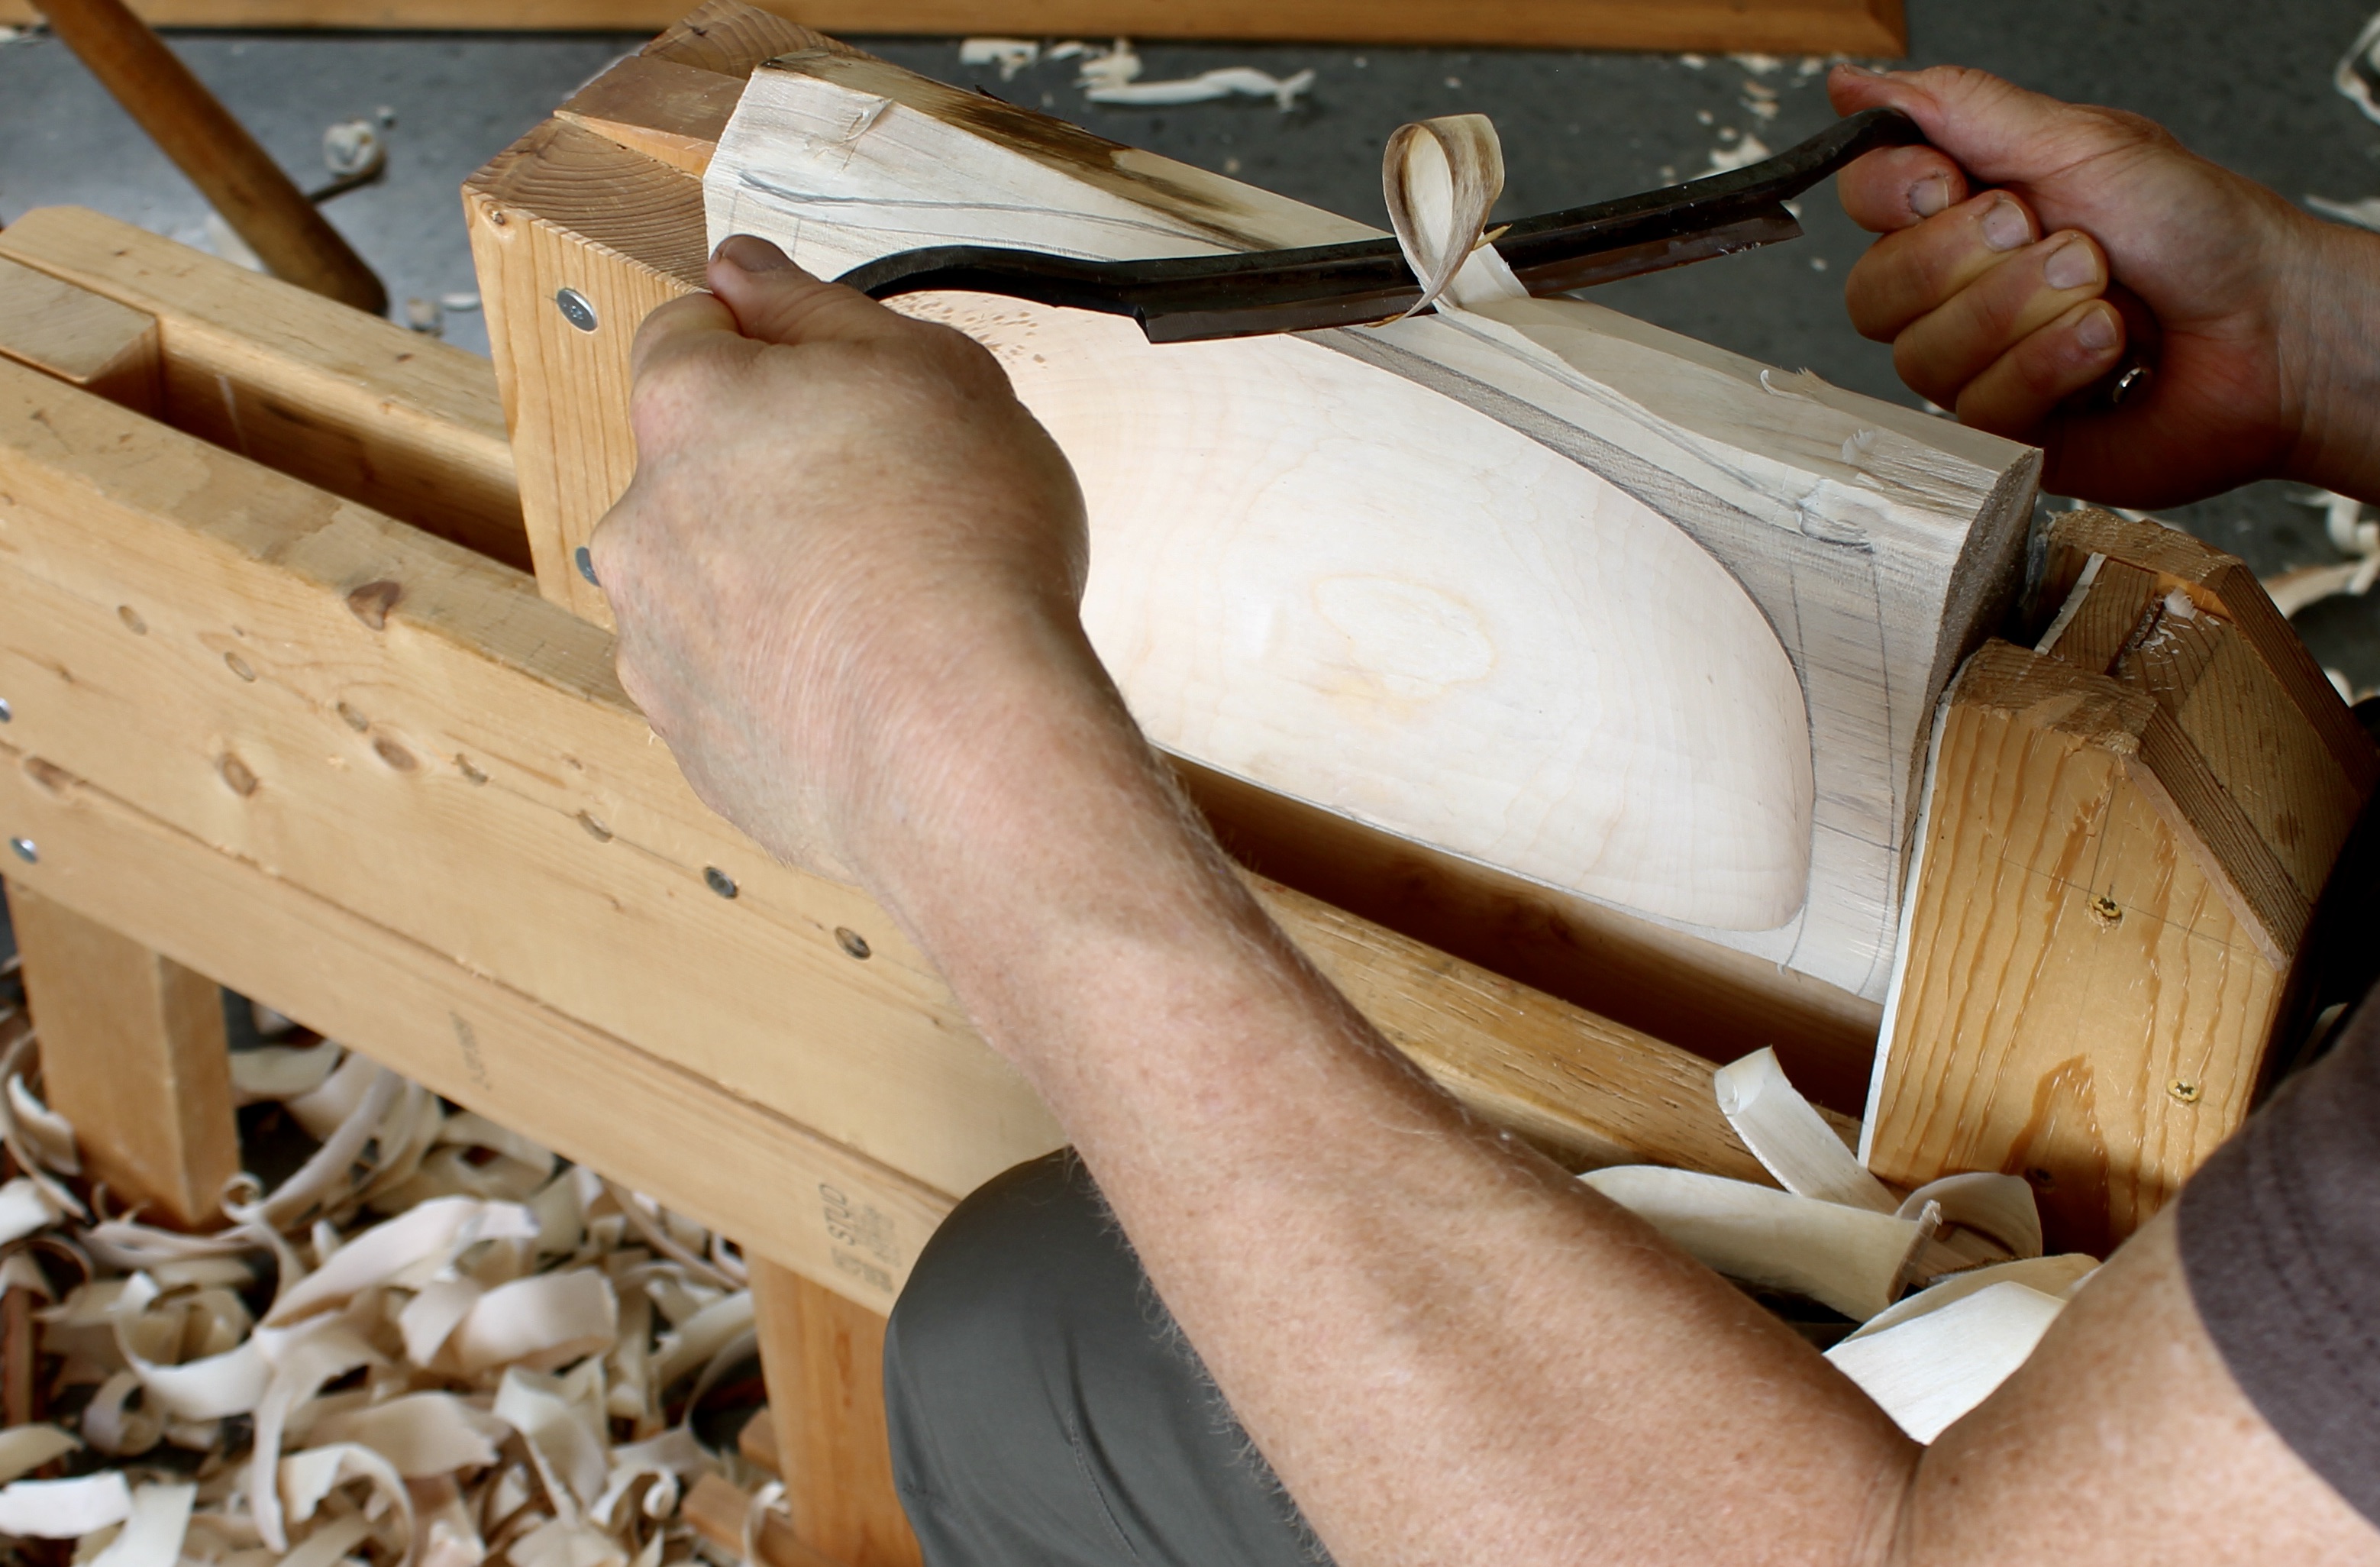
Basic Carving Techniques
Wood carving for furniture is an art that adds beauty and detail. Knowing basic carving techniques helps you create lovely designs.
This guide explains key carving styles you can use for furniture projects. Each technique has its own tools and methods.
Whittling And Chip Carving
Whittling uses a small knife to carve shapes from wood by shaving thin slices. It is simple and good for beginners.
Chip carving removes small chips of wood to create patterns. It uses sharp knives and precise cuts to form designs.
- Whittling shapes wood by slicing thin layers
- Chip carving makes geometric patterns by cutting chips
- Both need sharp knives and steady hands
Relief Carving Basics
Relief carving creates images that stand out from a flat wood surface. The design rises above the background.
Start by drawing your design on the wood. Then remove wood around the shapes to make them pop out.
- Draw your design on the wood surface
- Cut away background wood to raise the design
- Use steady cuts to keep design clear
Using Gouges And V-tools
Gouges have curved blades to scoop wood and make smooth cuts. They are good for shaping curves and hollows.
V-tools have a V-shaped blade. They cut fine lines and sharp details in the wood surface.
- Gouges carve curves and rounded areas
- V-tools create thin lines and sharp angles
- Use both tools to add depth and detail
Creating Furniture Details
Carving wood adds beauty and character to furniture. It makes simple pieces look unique and detailed.
Focus on small parts like legs, supports, and decorative patterns. These details show skill and style.
Carving Legs And Supports
Legs and supports hold the furniture and can be simple or fancy. Carving them makes the piece strong and pretty.
Start with basic shapes. Use carving tools to add curves or grooves. Keep the design balanced for stability.
- Use chisels to shape legs
- Create smooth curves for elegance
- Add grooves or flutes for texture
- Check the symmetry on all legs
Designing Decorative Elements
Decorative elements make furniture look artistic. You can carve flowers, leaves, or simple shapes on flat surfaces.
Choose designs that match the furniture style. Use fine tools for small details and bigger tools for large shapes.
- Sketch the design before carving
- Carve shallow outlines first
- Deepen the details carefully
- Smooth rough edges with sandpaper
Incorporating Patterns And Motifs
Patterns and motifs add rhythm and style to furniture. Use repeated shapes or symbolic designs for interest.
Common motifs include geometric shapes, vines, or cultural symbols. Keep the pattern even and consistent.
- Choose simple, repeating patterns
- Mark the pattern lightly on wood
- Use carving knives for sharp lines
- Keep spacing equal for neatness
Finishing Touches
After carving your wood furniture, finishing touches make it look smooth and beautiful. These steps protect the wood and show off your work.
Focus on sanding, applying stains or finishes, and protecting your carved furniture. Each step improves the wood’s feel and appearance.
Sanding And Smoothing Surfaces
Sanding removes rough edges and splinters from your carving. Use fine-grit sandpaper for a smooth surface. Sand gently to keep details sharp.
Work in small sections and sand along the wood grain. Clean dust with a soft cloth before moving to the next step.
Applying Stains And Finishes
Stains add color and highlight the wood’s natural patterns. Choose a stain that matches your furniture style and apply it evenly with a brush or cloth.
After staining, apply a finish like varnish or oil. This seals the wood and gives it a nice shine. Let each coat dry fully before adding another.
- Use a brush for detailed areas
- Wipe excess stain quickly
- Apply 2-3 finish coats for protection
Protecting Your Carved Furniture
Protect your furniture from damage by sealing it well. Use clear finishes like polyurethane or wax for long-lasting defense.
Keep furniture away from direct sunlight and moisture. Regular cleaning with a soft cloth helps maintain the finish and wood condition.
Troubleshooting Common Issues
Wood carving for furniture can have some problems. Knowing how to fix these helps you make better pieces.
Here are common issues and easy ways to solve them during your carving work.
Fixing Splits And Cracks
Splits and cracks can appear in wood while carving. These may weaken your furniture and look bad.
Fill cracks with wood glue or epoxy putty to hold the wood parts together. Clamp the piece until dry.
- Use thin wood glue for small cracks
- Epoxy putty works well on large splits
- Clamp firmly to prevent gaps
- Sand the area smooth after it dries
Dealing With Tool Marks
Tool marks happen when your carving tools leave unwanted scratches. They spoil the smooth look.
Fix tool marks by gently sanding with fine-grit sandpaper. Be careful not to remove details.
- Start with medium grit sandpaper
- Finish with fine grit for smoothness
- Use small sanding blocks for control
- Check often to avoid over-sanding
Correcting Design Mistakes
Design mistakes happen if a shape or detail does not look right. Fixing these keeps your piece balanced.
Remove extra wood carefully with small tools. Redraw the design if needed and carve slowly.
- Use fine chisels for small changes
- Check your design often while carving
- Take breaks to see mistakes clearly
- Practice on scrap wood to improve skills
Advanced Tips For Stunning Results
Carving wood for furniture can create beautiful and unique pieces. Using advanced techniques helps improve your work.
These tips focus on layering, joinery, and mixing materials to enhance your wood carving projects.
Layering And Texturing Techniques
Layering adds depth by carving different levels on the wood surface. Use carving tools to create raised and recessed areas.
Texturing gives a natural look. Try using gouges, veiners, or riffler files to make patterns or simulate wood grain.
- Start with rough cuts to shape layers
- Add fine details with smaller tools
- Use sanding to smooth or emphasize textures
- Experiment with different tool angles for varied effects
Combining Carving With Joinery
Carving can blend well with joinery to make strong, decorative furniture. Plan your carving around joints.
Use carving to highlight joints like dovetails or mortise and tenon. This adds beauty and function.
- Carve patterns around joint edges
- Keep joints tight for stability
- Test fit pieces before final carving
- Finish carving after assembling if needed
Incorporating Mixed Materials
Adding materials like metal, glass, or resin can make your carved furniture unique. Mix textures and colors.
Attach materials in carved recesses or on flat surfaces. Use adhesives or fasteners that suit both materials.
- Carve spaces to fit inlays or metal pieces
- Choose materials that match wood tones
- Secure mixed materials firmly to avoid damage
- Polish or finish all surfaces evenly

Credit: www.youtube.com
Frequently Asked Questions
What Tools Are Essential For Carving Wood Furniture?
Basic tools include carving knives, gouges, chisels, and mallets. These tools help shape wood precisely and safely. Good quality tools make carving easier and improve the final furniture quality. Beginners should start with simple tools before advancing to specialized ones.
Which Wood Types Are Best For Carving Furniture?
Softwoods like basswood and pine are beginner-friendly for carving. Hardwoods such as oak and walnut offer durability for finished furniture. Choosing the right wood depends on your skill level and furniture design. Proper wood selection ensures easier carving and a beautiful end product.
How Do I Maintain Sharp Carving Tools?
Sharpen tools regularly using whetstones or sharpening systems. Keep blades clean and dry to prevent rust. Properly sharpened tools cut smoothly and reduce accidents. Storing tools safely prolongs their lifespan and maintains performance.
What Safety Tips Should I Follow While Carving Wood?
Always carve away from your body to avoid injuries. Wear protective gloves and eye protection to stay safe. Use sharp tools to reduce the risk of slips. Work in a well-lit, clean workspace to maintain control and focus.
Conclusion
Wood carving for furniture can be simple and rewarding. With practice, you improve your skills. Start with basic tools and small projects. Safety is important, so use gloves and goggles. Choose soft wood for easier carving. Patience is key; take your time.
Enjoy the process and watch your creations come to life. Each piece tells a story. Your crafted furniture adds charm to any space. Keep learning and trying new techniques. Soon, you’ll create beautiful, unique pieces. Happy carving!
