If you want to create strong, clean joints for your woodworking projects, learning how to cut rabbet joints is a must. Whether you’re building cabinets, frames, or shelves, mastering this simple technique will make your work look professional and last longer.
In this guide, you’ll discover easy steps and tips to cut perfect rabbet joints every time—no matter your skill level. Ready to take your woodworking to the next level? Keep reading and see just how simple it can be.
Tools For Rabbet Joints
Rabbet joints are simple cuts used to join two pieces of wood. The right tools make cutting rabbet joints easier and more precise.
This guide explains the tools you need for cutting rabbet joints. It covers hand tools, power tools, and blade choices.
Essential Hand Tools
Hand tools work well for small projects and fine detail. They give you control over the cut depth and width.
Common hand tools for rabbet joints include chisels, hand saws, and marking gauges.
- Chisel:Used to clean and square the rabbet edges.
- Backsaw or Tenon Saw:Helps make straight, accurate cuts.
- Marking Gauge:Marks the depth and width of the rabbet line.
- Try Square:Checks the right angles of the joint.
Power Tools Options
Power tools speed up the rabbet cutting process. They are ideal for larger projects or repeated cuts.
Popular power tools for making rabbet joints are routers, table saws, and dado blades.
- Router:Allows precise control with a rabbet bit for clean cuts.
- Table Saw:Can cut rabbets using the blade height and fence setup.
- Dado Blade:Used on table saws to cut wider rabbets in one pass.
Choosing The Right Blade
The blade choice affects cut quality and wood tear-out. Use blades designed for smooth, clean cuts.
Look for blades with more teeth and a fine tooth pattern for rabbet joints.
- High Tooth Count:Reduces splintering on the wood edge.
- Flat Top or Alternate Top Bevel:Good for clean cuts in soft and hardwood.
- Sharp Edges:Keep blades sharp to avoid rough cuts.
- Use Carbide-Tipped Blades:Last longer and stay sharp.
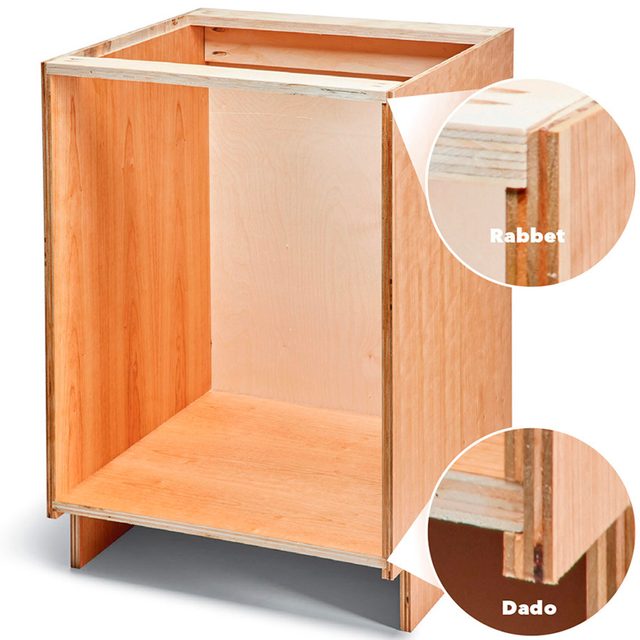
Credit: www.familyhandyman.com
Preparing The Wood
Cutting rabbet joints starts with good preparation of the wood. Proper steps help ensure strong and accurate joints.
Focus on selecting the right wood, measuring carefully, and securing the wood before cutting. These steps make the process easier.
Selecting Wood Types
Choose wood that matches your project needs. Hardwoods are strong and good for furniture. Softwoods are easier to cut and work with.
- Use hardwoods like oak or maple for durability.
- Softwoods like pine are good for beginners.
- Avoid warped or cracked wood.
- Check for smooth surfaces to make marking easier.
Measuring And Marking
Measure the wood accurately to get clean rabbet joints. Mark the cut lines clearly before you start cutting.
| Tool | Purpose |
| Measuring tape | Measure lengths and widths |
| Combination square | Mark straight lines and angles |
| Pencil | Make visible marks |
| Marking gauge | Mark consistent depths |
Securing The Workpiece
Hold the wood firmly to avoid movement while cutting. Use clamps or a vise to keep it steady.
Here are tips for securing the wood:
- Use clamps to fix the wood to your workbench.
- Position clamps where they do not block your cutting path.
- Check that the wood does not wobble before you start.
- Use a non-slip mat under the wood for extra grip.
Cutting Techniques
Cutting rabbet joints requires precision and the right tools. Each method has its own steps and benefits.
Choose the best technique based on the tools you have and the project details. Safety and accuracy are key.
Using A Router
A router can cut clean and precise rabbet joints. Use a straight bit set to the depth needed.
- Secure the wood firmly to your workbench.
- Set the router bit depth to match the rabbet width.
- Use a guide or fence to keep the cut straight.
- Make multiple shallow passes for a smooth finish.
Using A Table Saw
A table saw can quickly cut rabbets with the right setup. Adjust the blade height and fence distance.
| Adjustment | Purpose |
| Blade Height | Set to rabbet depth |
| Fence Distance | Set to rabbet width |
| Blade Type | Use a dado blade for wider rabbets |
Push the wood steadily along the fence. Use a push stick for safety.
Hand Saw Methods
Hand saws work well for small projects or when power tools are not available. Use a backsaw for best control.
- Mark the rabbet width and depth clearly on the wood.
- Cut along the marked lines carefully.
- Remove waste wood with a chisel.
- Check the joint fit often and adjust as needed.
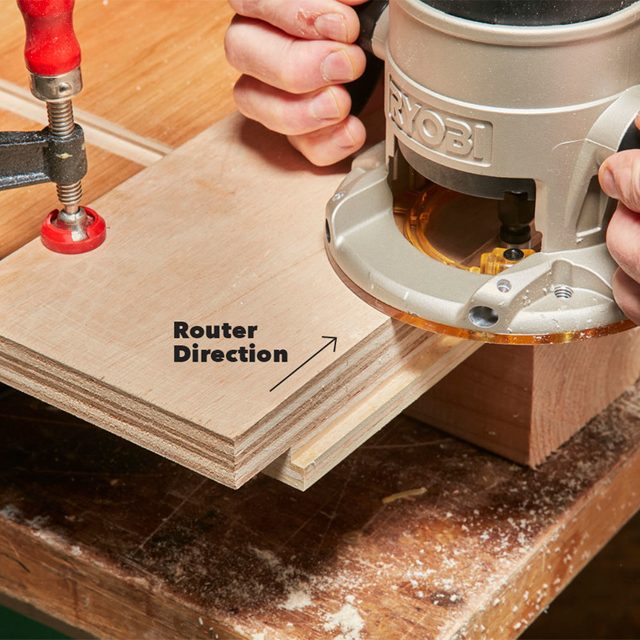
Credit: www.familyhandyman.com
Ensuring Accuracy
Cutting rabbet joints requires careful measurement and control. Accuracy ensures strong and clean fits in your woodworking projects.
Use precise tools and methods to avoid mistakes. Follow these tips to cut rabbet joints accurately every time.
Setting Depth And Width
Begin by setting the correct depth and width on your cutting tool. This controls how much material you remove from the wood.
- Measure the rabbet width using a ruler or caliper.
- Adjust the cutting blade or router bit to the exact width.
- Set the cutting depth to match the joint design.
- Double-check measurements before making any cuts.
Using Guides And Fences
Guides and fences help keep your cuts straight and consistent. Attach them securely to your workpiece or tool.
- Use a fence on your table saw for straight rabbet cuts.
- Clamp a guide to handheld routers for better control.
- Check that fences are square and tight before cutting.
- Move the wood steadily along the fence without forcing it.
Checking For Square
After cutting, verify the rabbet joint is square. A perfect 90-degree angle ensures a tight and strong connection.
| Tool | Purpose |
| Try square | Check inside corners for perfect right angles |
| Combination square | Measure both depth and angle of the rabbet |
| Calipers | Confirm width and depth measurements |
Joining And Assembly
Cutting rabbet joints is just the first step in making strong wood connections. Proper joining and assembly ensure the joint holds well.
This section covers fitting the rabbet joint, applying adhesives, and clamping tips for a secure bond.
Fitting The Rabbet Joint
Check that the rabbet fits snugly against the mating piece. It should not be too loose or too tight.
Test fit the parts before gluing to avoid gaps or misalignment.
- Hold the pieces together and check for gaps
- Ensure edges line up evenly
- Smooth any rough edges with sandpaper
Applying Adhesives
Use wood glue designed for strong bonds. Apply glue evenly on both rabbet surfaces.
Too much glue can cause mess and weak joints. Too little glue reduces strength.
- Spread a thin layer of glue with a brush or finger
- Cover all surfaces that will touch
- Remove excess glue quickly with a damp cloth
Clamping Tips
Clamp the joint firmly to hold the pieces in place while the glue dries. Use enough pressure without damaging the wood.
Check the alignment again before tightening the clamps fully.
- Use bar clamps or C-clamps for even pressure
- Place scrap wood between clamps and workpieces
- Keep clamps on for the time recommended by the glue maker
Common Mistakes To Avoid
Cutting rabbet joints requires precision and attention to detail. Mistakes can weaken the joint or cause alignment problems. Knowing what to avoid helps you get better results.
This guide covers common errors like misalignment, cutting mistakes, and safety issues. Avoiding these keeps your woodworking safe and accurate.
Misalignment Issues
Misalignment happens when the two pieces do not fit flush. This can leave gaps and weaken the joint. Check measurements twice before cutting.
- Use a square to check corners before cutting.
- Mark the wood clearly with a pencil.
- Clamp pieces securely to prevent movement.
- Cut slowly and follow your marks closely.
Overcutting Or Undercutting
Cutting too deep or too shallow affects how the pieces join. Overcutting weakens the wood; undercutting creates gaps.
| Cut Type | Problem | Fix |
| Overcutting | Weak joint, less wood strength | Adjust tool depth and cut again |
| Undercutting | Loose joint, visible gaps | Make a second pass to deepen cut |
Tool Safety Precautions
Using tools safely prevents accidents and damage. Always follow safety rules to protect yourself.
- Wear safety glasses and hearing protection.
- Keep hands away from blades.
- Check tool condition before use.
- Use push sticks for small pieces.
- Unplug tools before changing blades or bits.
Finishing Touches
Cutting rabbet joints is just the start. Finishing touches make the joint strong and look good. This guide covers sanding, sealing, and keeping the joint strong.
These steps help your woodworking project last longer and look neat. Take your time with each part for the best results.
Sanding And Smoothing
Use sandpaper to smooth all edges of the rabbet joint. Start with coarse grit, then move to fine grit for a clean surface.
- Sand the inside corners carefully to remove rough spots.
- Check for any splinters or uneven edges.
- Use a sanding block to keep surfaces even.
- Wipe dust off with a dry cloth before sealing.
Sealing And Staining
Sealing protects the wood from moisture and dirt. Staining adds color and highlights the wood grain.
| Type | Purpose | Application Tips |
| Wood Sealer | Protects from water damage | Apply with brush; let dry fully |
| Wood Stain | Adds color and depth | Use cloth or brush; wipe excess |
| Clear Finish | Gives shine and extra layer | Apply thin coats; sand between coats |
Maintaining Joint Strength
Strong joints last longer and support more weight. Use glue and clamps properly to keep the rabbet joint tight.
- Apply wood glue evenly inside the rabbet groove.
- Press pieces together firmly without gaps.
- Use clamps to hold the joint while drying.
- Check the joint after drying for any movement.
- Reinforce with screws or nails if needed.

Credit: www.youtube.com
Frequently Asked Questions
What Tools Are Needed To Cut Rabbet Joints?
To cut rabbet joints, you need a router, table saw, or dado blade. Measuring tools and clamps help ensure accuracy. Safety gear like goggles is essential. These tools allow precise and clean cuts for strong joints.
How Do You Measure For Rabbet Joints Accurately?
Measure the width and depth of the rabbet carefully using a ruler or caliper. Mark the cut lines clearly on the wood. Double-check measurements before cutting to ensure the joint fits perfectly and holds firmly.
Can Rabbet Joints Be Cut Without A Router?
Yes, rabbet joints can be cut using a table saw or dado blade. You can also use hand tools like chisels and a saw for small projects. Routers make the process faster but are not mandatory.
What Wood Types Work Best For Rabbet Joints?
Hardwoods like oak, maple, and walnut work best for rabbet joints. They provide strength and durability. Softwoods like pine can also be used but may wear faster over time.
Conclusion
Learning to cut rabbet joints enhances your woodworking skills significantly. These joints provide strength and aesthetic appeal to your projects. Start with basic tools and practice regularly for improvement. Follow safety measures to prevent accidents and ensure precision. Patience and attention to detail make a big difference.
Remember, every cut counts towards your craftsmanship. Enjoy the process and watch your abilities grow over time. Each project offers a new chance to refine your technique. So grab your tools and start creating today. Your woodworking journey is just beginning.
Keep experimenting and discovering new possibilities.