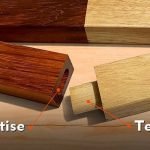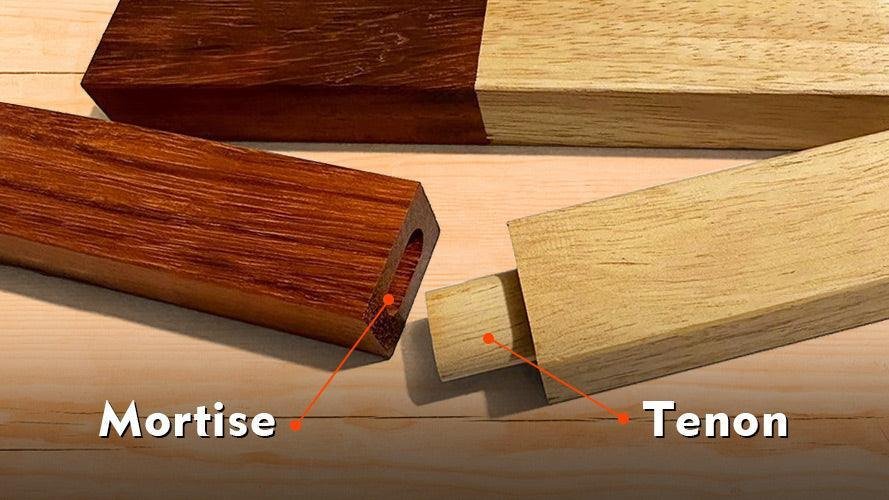
If you want to create strong, lasting joints in your woodworking projects, mastering how to cut tenons and mortises is a must. These classic joints lock pieces of wood together like a puzzle, giving your work both strength and a professional finish.
But if you’ve ever felt unsure about where to start or worried about making mistakes, you’re not alone. You’ll discover simple, step-by-step methods that make cutting tenons and mortises easier than you think. By the end, you’ll have the confidence and skills to build joints that hold tight and look great.
Ready to take your woodworking to the next level? Let’s dive in.

Credit: www.familyhandyman.com
Tools For Tenons And Mortises
Cutting tenons and mortises requires the right tools to make precise joints. These tools help you shape wood accurately for strong connections.
Using the correct hand and power tools saves time and improves the quality of your woodworking projects.
Essential Hand Tools
Hand tools give you control and precision when cutting tenons and mortises. They are useful for small jobs and fine details.
Common hand tools include saws, chisels, and marking gauges. They help you mark and remove wood carefully.
- Tenon saw – for cutting precise tenons
- Mortise chisel – designed to remove wood from mortises
- Marking gauge – marks the wood for accurate cuts
- Try square – checks angles and alignment
- Mallet – taps chisels without damage
Power Tools And Machines
Power tools speed up cutting tenons and mortises. They are great for larger projects or repeated cuts.
Common power tools include routers, drill presses, and band saws. These tools make clean and consistent cuts.
- Router with mortising jig – cuts precise mortises
- Drill press – drills holes for mortises quickly
- Band saw – cuts tenon shoulders and cheeks
- Table saw with tenoning jig – cuts tenon cheeks and shoulders
Choosing The Right Chisels
Chisels are key for cleaning and shaping mortises and tenons. Choosing the right type improves your work.
Look for chisels with sharp, strong blades. The handle should feel comfortable for better control.
- Mortise chisels – thick and strong for heavy chopping
- Paring chisels – thin and sharp for fine trimming
- Bevel-edge chisels – good for tight corners and detailed work
- Look for high-carbon steel blades for long-lasting sharpness
Preparing The Wood
Cutting tenons and mortises requires careful preparation of the wood. This ensures strong joints and clean cuts. Proper preparation helps avoid mistakes and wasted material.
Start by selecting the right wood, marking precise layouts, and securing your workpieces firmly. Each step builds the foundation for successful joinery.
Selecting Suitable Wood Types
Choose wood that is stable and easy to work with. Hardwoods like oak, maple, and cherry are good for strong joints. Softwoods such as pine can be used but may not hold as well.
Avoid wood with knots, cracks, or warping. These defects weaken the joint and make cutting difficult. Look for straight-grain wood for cleaner cuts and better fit.
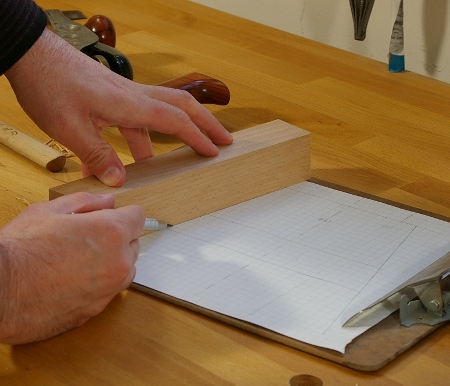
Marking Accurate Layouts
Marking the wood clearly helps guide your cuts. Use sharp pencils or marking knives for fine lines. Measure twice to avoid errors.
- Start by marking the length and width of the tenon or mortise.
- Use a square to keep lines straight and angles correct.
- Label each part to avoid confusion during assembly.
- Double-check measurements before cutting.
Securing Workpieces
Hold the wood firmly while cutting to prevent movement. Use clamps or a vise to keep the workpiece steady. This ensures safety and accuracy.
| Tool | Recommended Use |
| Bar Clamp | Secures long workpieces flat on the bench |
| Quick-Release Clamp | Good for fast adjustments |
| Woodworking Vise | Holds small pieces tightly for detailed cuts |
| Screw Clamp | Strong hold for heavy or thick wood |
Cutting Tenons
Cutting tenons is a key skill in woodworking. Tenons fit into mortises to join wood pieces tightly.
To cut tenons well, you need to measure, saw carefully, and use chisels to finish.
Setting Tenon Dimensions
Start by measuring the thickness of the wood piece. The tenon should be about two-thirds of that thickness.
Set the width and length of the tenon to fit the mortise snugly. Use a marking gauge or pencil for accuracy.
- Tenon thickness: about two-thirds of wood thickness
- Tenon width: match the mortise width
- Tenon length: usually 1 to 1.5 times the wood thickness
Using Saws For Precision Cuts
Use a backsaw or tenon saw for clean and straight cuts. These saws give better control on small cuts.
Cut along the marked lines carefully. Start with the cheeks of the tenon, then cut the shoulders.
- Use a saw with fine teeth for smooth cuts
- Keep the saw vertical and steady
- Cut slowly to avoid splintering the wood
Fine-tuning With Chisels
After sawing, use sharp chisels to clean edges and fit the tenon perfectly. Remove small amounts of wood at a time.
Test the tenon fit often. The tenon should slide into the mortise with little force but not be loose.
- Use a mallet to tap the chisel gently
- Work slowly to avoid removing too much wood
- Check the fit frequently during trimming

Credit: www.familyhandyman.com
Cutting Mortises
Cutting mortises is a key skill in woodworking. It helps join pieces of wood firmly.
This guide focuses on cutting mortises precisely and cleanly. Good mortises make strong joints.
Marking Mortise Locations
Mark the mortise location carefully before cutting. Use a pencil and ruler for accuracy.
Check measurements twice to avoid mistakes. Mark edges clearly so you can see them well.
- Use a marking gauge for consistent width
- Draw outline on both faces of the wood
- Mark depth using a pencil or knife
Drilling Techniques For Mortises
Drilling is a fast way to remove most wood inside the mortise. Use a drill press or hand drill.
Choose a drill bit smaller than the mortise width. Drill holes close together inside the outline.
- Clamp wood securely before drilling
- Keep drill vertical for straight holes
- Drill multiple holes along the mortise length
- Remove wood chips often to avoid jams
Cleaning And Squaring Mortise Walls
After drilling, clean the mortise walls with a chisel. This makes the walls flat and square.
Use a sharp chisel and tap gently. Check the mortise with a square tool to ensure straight edges.
- Start by paring the sides and ends of the mortise
- Remove small amounts of wood at a time
- Test the fit of the tenon often
- Adjust until the tenon fits snugly without force
Fitting And Adjusting Joints
Cutting tenons and mortises is key to making strong wood joints. Fitting these parts well ensures the joint holds tight and lasts long.
This guide explains how to test fit your joints, fix common problems, and make sure the joint is strong and tight.
Test Fitting Tenons And Mortises
After cutting, gently insert the tenon into the mortise to check the fit. The tenon should slide in with little force but not be loose.
Look for any tight spots or gaps. These signs help you know if you need to adjust your cuts before gluing.
Common Fit Issues And Fixes
If the tenon is too tight, carefully trim it with a chisel or sandpaper. Remove a little wood at a time to avoid making it too loose.
If the mortise is too large, add thin shims or glue small wood pieces inside to tighten the fit. Then, test again.
- Tenon too tight: trim edges slowly
- Tenon too loose: add thin wood shims
- Mortise too large: glue small wood pieces inside
- Mortise too small: carefully widen with a chisel
Ensuring Strong, Tight Joints
A strong joint fits snugly without gaps. Make sure the tenon shoulders sit flush against the mortise face.
Use clamps to hold the joint tight while glue dries. This pressure helps create a firm, lasting bond.
- Check for flush shoulders
- Ensure no gaps between parts
- Apply wood glue evenly on tenon and mortise
- Use clamps to hold pieces firmly while drying
Credit: galoototron.com
Advanced Techniques
Cutting tenons and mortises requires skill and precision. Advanced methods help improve accuracy and speed.
Using special tools and techniques makes joints stronger and more attractive. These tips will enhance your woodworking.
Using Jigs For Consistency
Jigs hold wood pieces steady during cutting. They help create uniform tenons and mortises every time.
Using jigs reduces mistakes and saves time. You can make repeatable cuts easily with the right setup.
- Clamp the wood securely in the jig
- Set stops to control cut length
- Use guides to keep cuts straight
- Check measurements before cutting
Cutting Complex Mortises
Complex mortises have shapes beyond simple rectangles. They can include curves or angled sides.
Use chisels and routers carefully for these shapes. Mark the outline clearly before starting the cut.
- Draw the mortise shape on the wood
- Remove bulk wood with a router or drill
- Clean edges with sharp chisels
- Test fit the tenon often
Incorporating Decorative Elements
Decorative tenons and mortises add style to joints. These can include shapes like shoulders or chamfers.
Use carving tools or small routers to create details. Keep the joint strong while adding beauty.
- Add chamfers to tenon edges for a smooth look
- Use tapered tenons for visual interest
- Carve small grooves or patterns on the mortise face
- Sand decorations carefully to avoid damage
Safety Tips
Cutting tenons and mortises requires careful attention to safety. Protecting yourself helps prevent injuries. Following safety rules keeps your work smooth and secure.
Use the right tools and gear to stay safe. Keep your workspace neat and organized. These steps reduce accidents and improve your focus.
Protective Gear Recommendations
Always wear safety gear to protect your body and eyes. Gear shields you from flying wood chips and sharp edges. Choose items that fit well and feel comfortable.
- Safety glasses to protect your eyes
- Ear protection to reduce noise
- Dust mask to avoid breathing sawdust
- Gloves to protect your hands
- Wear close-fitting clothes to avoid snags
Safe Handling Of Tools
Handle your tools with care. Sharp blades and bits cut clean but can hurt you. Follow these rules to stay safe with your tools.
- Keep blades sharp and clean for smooth cuts
- Use clamps to hold wood firmly in place
- Cut away from your body at all times
- Turn off power tools before changing blades
- Store tools safely when not in use
Maintaining A Clean Workspace
A tidy workspace helps prevent trips and falls. Clean up sawdust and scraps often. Organize tools to find them quickly and avoid accidents.
| Task | Reason |
|---|---|
| Sweep sawdust regularly | Prevents slipping and fire risk |
| Remove wood scraps | Avoids tripping hazards |
| Arrange tools neatly | Reduces clutter and saves time |
| Check cords and plugs | Prevents electric shock |
Frequently Asked Questions
What Tools Do I Need To Cut Tenons And Mortises?
You need a tenon saw, chisel set, marking gauge, and a mortise machine or drill. These tools ensure precise cuts and clean joints.
How Do I Measure Tenons For A Perfect Fit?
Measure the mortise width and depth accurately. Mark the tenon to match these dimensions closely for a snug fit without gaps.
What Is The Best Technique For Cutting Mortises?
Use a mortising machine or drill holes along the mortise outline. Clean edges with chisels for a smooth, precise mortise cavity.
How Can I Avoid Tear-out When Cutting Tenons?
Score the edges with a sharp knife before sawing. Use sharp tools and slow, controlled cuts to prevent wood splintering.
Conclusion
Creating tenons and mortises is a skill worth learning. It enhances woodworking projects. Precision and patience are key to success. Always measure twice, cut once. Use sharp tools for clean cuts. Practice on scrap wood first. Understanding wood grain helps achieve better results.
Protect your hands and eyes. Safety should never be ignored. With practice, your skills will improve. Your furniture will be stronger and more beautiful. Enjoy the process of crafting with your hands. It’s a rewarding experience. Keep experimenting and learning new techniques.
Woodworking is a journey, not a destination. Enjoy each step of it.