Your welding gloves are more than just gear—they protect your hands from heat, sparks, and sharp metal. But if you don’t take care of them, they won’t last long or keep you safe.
Wondering how to keep your gloves in top shape? This guide will show you simple, effective steps to maintain your welding gloves so they stay durable and reliable. Keep reading to learn easy tips that save you money and protect your hands every time you weld.
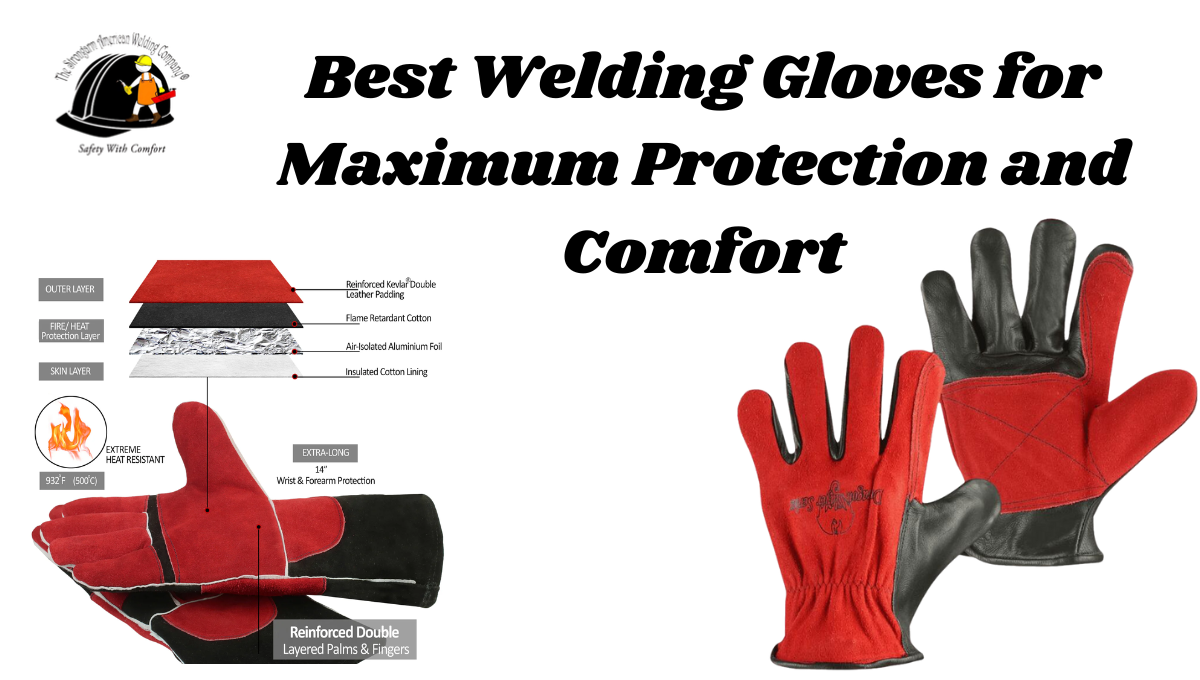
Choosing The Right Gloves
Welding gloves protect your hands from heat, sparks, and sharp edges. Picking the right gloves helps you work safely and comfortably.
Different gloves fit different jobs. It is important to choose gloves that suit your welding needs and keep your hands safe.
Material Types
Welding gloves come in many materials. Each type offers different protection and comfort levels.
- Leather:Most common. Durable and heat resistant.
- Split leather:Softer and flexible but less heat protection.
- Elkskin:Strong and comfortable, good for high heat.
- Deerskin:Lightweight and soft, good for precision work.
- Kevlar:Added cut resistance and heat protection.
Proper Fit
Gloves must fit your hands well. Too tight or too loose gloves can be unsafe.
Choose gloves that allow good finger movement and grip. They should cover your wrists properly.
- Measure your hand size before buying.
- Try gloves on if possible.
- Check for flexibility and comfort.
- Ensure gloves cover wrists fully.
Heat Resistance Levels
Different welding tasks expose your hands to different heat levels. Choose gloves that match your heat needs.
Higher heat resistance offers more protection but can reduce flexibility. Balance protection and comfort for your work.
| Heat Level | Recommended Gloves |
|---|---|
| Low heat (light welding) | Split leather gloves |
| Medium heat (arc welding) | Elkskin or deerskin gloves |
| High heat (heavy welding) | Kevlar-lined or thick leather gloves |
Credit: www.luxent.cz
Cleaning Techniques
Keeping welding gloves clean helps them last longer and work well. Dirt and grime can reduce their protection.
Use the right cleaning steps to keep gloves safe and comfortable.
Removing Dirt And Debris
Start by brushing off loose dirt and dust from your gloves. Use a soft brush or cloth for this job.
Check for small stones or metal pieces stuck in the gloves. Remove them carefully to avoid damage.
- Brush gloves gently with a soft brush
- Shake gloves to remove loose debris
- Use tweezers to pick out stuck particles
Washing Methods
Wash gloves using mild soap and lukewarm water. Avoid harsh chemicals that can weaken the material.
Gently rub the gloves to clean them. Do not scrub hard or use a washing machine, as this can cause damage.
- Fill a basin with lukewarm water
- Add a small amount of mild soap
- Soak gloves for a few minutes
- Gently rub dirt spots by hand
- Rinse gloves in clean water
Drying Tips
Air dry your gloves in a cool, shaded place. Avoid direct sunlight or heat sources like radiators.
Do not wring the gloves. Instead, squeeze gently to remove excess water before drying.
- Press gloves gently to remove water
- Place gloves on a flat surface to dry
- Keep gloves away from direct sunlight
- Do not use a dryer or heater
Storage Best Practices
Proper storage keeps welding gloves safe and ready for use. It helps protect gloves from damage and wear.
Good storage also extends the life of gloves. Follow simple tips to store gloves well.
Avoiding Moisture
Moisture can cause gloves to rot or grow mold. Keep gloves dry to keep them safe and clean.
Dry gloves after use before storing them. Never store gloves while they are wet or damp.
- Air dry gloves in a clean area
- Use moisture-absorbing packets if needed
- Avoid storing gloves near water or humidity
Safe Storage Areas
Store gloves in a safe place away from heat and sunlight. Heat can damage the glove material.
Choose a clean spot to stop dirt and dust from reaching your gloves. Use storage boxes or shelves.
- Keep gloves in a cool, dry place
- Use sealed containers or bags
- Avoid direct sunlight and heat sources
Preventing Deformation
Do not bend or squash gloves when storing. This can cause them to lose shape or crack.
Store gloves flat or hang them to keep their form. Avoid stacking heavy items on top.
- Lay gloves flat on shelves
- Use glove hangers or hooks
- Keep heavy objects away from gloves

Credit: www.weldersupply.com
Inspecting For Damage
Welding gloves protect your hands from heat and sparks. Checking them often keeps you safe. Look closely for any damage before each use.
Small problems can get worse if you ignore them. Catch damage early to avoid injuries and replace gloves when needed.
Identifying Wear And Tear
Wear and tear show as thin spots, holes, or cracks. These weaken the gloves and lower protection. Check the palms, fingers, and backs carefully.
- Look for shiny or smooth areas that mean fabric is thin
- Find holes or cuts that expose skin
- Check for stiff or cracked leather sections
Checking Seams And Stitching
Seams hold the glove parts together. Loose or broken seams can cause gloves to fall apart. Check all stitches for damage or gaps.
- Feel along the seams for loose threads
- Look for stitches that are missing or broken
- Press seams to check if they come apart easily
When To Replace Gloves
Replace gloves if damage is too big to fix. Do not use gloves with holes or broken seams. Worn-out gloves do not protect well.
- Replace if holes expose your skin
- Replace if seams keep coming apart
- Replace if leather is cracked or very thin
- Replace if gloves feel stiff or uncomfortable
Repairing Minor Issues
Welding gloves face wear and tear after regular use. Fixing small problems early keeps gloves safe and useful. Repairing minor damage helps avoid costly replacements.
This guide covers easy ways to repair your welding gloves. It explains patching holes, strengthening weak spots, and using special adhesives for heat resistance.
Patching Small Holes
Small holes can let sparks and heat in. Patching them quickly extends glove life. Use leather patches or strong fabric to cover holes.
- Clean the area around the hole
- Cut a patch slightly larger than the hole
- Apply strong glue or sew the patch in place
- Allow the patch to dry or set fully before use
Reinforcing Weak Areas
Weak spots can cause gloves to fail under pressure. Reinforce these areas by adding extra layers or stitching. Pay attention to fingers and palms.
| Weak Area | Reinforcement Method | Material Needed |
|---|---|---|
| Finger joints | Double stitching | Strong thread |
| Palm | Extra leather layer | Leather patch |
| Back of hand | Fabric overlay | Heat-resistant fabric |
Using Heat-resistant Adhesives
Heat-resistant adhesives bond glove parts safely. They resist high temperatures and keep patches secure. Use adhesives made for leather and heat.
Tips for using heat-resistant adhesives:
- Clean surfaces before applying glue
- Apply glue evenly on both surfaces
- Press surfaces firmly together for several minutes
- Let glue cure fully as per instructions
Extending Glove Lifespan
Welding gloves protect your hands from heat, sparks, and sharp objects. Keeping them in good shape saves money and ensures safety. Follow simple tips to make your gloves last longer.
Proper care helps avoid early wear and tear. Use these methods to keep your gloves ready for every welding job.
Rotating Gloves
Using more than one pair of gloves lets each pair rest and dry between uses. This stops moisture buildup and reduces damage from constant wear.
- Have at least two pairs of gloves for daily work.
- Switch gloves halfway through your shift.
- Store gloves in a dry place after use.
- Check gloves regularly for wear before rotating.
Avoiding Excessive Exposure
Limit your gloves’ exposure to heat, sparks, and chemicals to extend their life. Avoid using gloves for tasks they are not designed for.
| Exposure Type | Effect on Gloves | Prevention Tips |
| High Heat | Material breakdown and burns | Use gloves rated for high temperatures |
| Sparks | Holes and tears | Keep sparks away when not welding |
| Chemicals | Material weakening | Wear chemical-resistant gloves if needed |
Regular Maintenance Schedule
Clean and inspect gloves often. Removing dirt and checking for damage prevents small problems from becoming big ones.
- Brush off dirt and dust after each use.
- Spot clean with mild soap and water if needed.
- Dry gloves away from direct heat or sunlight.
- Inspect seams and material for holes or weak spots.
- Replace gloves if damage affects protection.
Credit: hivissafety.com
Frequently Asked Questions
How Often Should I Clean Welding Gloves?
It’s best to clean welding gloves after every use. Regular cleaning helps maintain their durability and safety. Use mild soap and water to remove debris and dirt. Avoid harsh chemicals that may damage the gloves’ material.
Can I Machine Wash Welding Gloves?
Machine washing welding gloves is not recommended. High temperatures and agitation can damage the gloves. Instead, hand wash them with mild soap and cool water. Gently scrub to remove grime, then air dry to maintain their shape.
How Do I Dry Wet Welding Gloves?
After washing, gently squeeze out excess water. Lay the gloves flat on a towel and air dry them. Avoid direct sunlight and heat sources that might cause shrinkage or hardening. This method helps maintain the gloves’ flexibility and fit.
How Can I Prevent Welding Gloves From Hardening?
To prevent hardening, regularly clean and condition your gloves. Use a leather conditioner on leather gloves to maintain softness. Store them in a cool, dry place to avoid moisture build-up. Proper care extends the life and usability of your gloves.
Conclusion
Proper care keeps welding gloves safe and long-lasting. Clean gloves after each use to remove dirt and sweat. Store them in a dry place away from heat. Check gloves regularly for holes or worn spots. Replace gloves if they become damaged.
Taking these simple steps protects your hands and tools. Small habits make a big difference over time. Stay safe and comfortable during every welding job. Good glove maintenance saves money and effort. Keep your gloves ready for the next task.
