When it comes to woodworking, one small mistake in marking your wood can lead to wasted materials and frustration. You want your cuts to be precise every time, saving you time and effort.
But how do you ensure your marks are accurate before you even pick up the saw? In this guide, you’ll discover simple, effective techniques that will help you mark wood with confidence. Whether you’re a beginner or looking to improve your skills, these tips will make your cutting projects smoother and more successful.
Keep reading, and you’ll never second-guess your measurements again.
Choosing The Right Tools
Marking wood accurately is key to making precise cuts. Using the right tools helps you mark lines clearly and measure well.
This guide covers the main marking tools and how to pick the best ones for your project.
Types Of Marking Tools
There are many marking tools for woodworkers. Each tool suits different tasks and wood types. Here are the common types:
- Pencils – easy to use and erase
- Markers – show bold, visible lines
- Marking gauges – make consistent parallel lines
- Scribes – scratch fine lines on wood
Selecting The Best Pencil Or Marker
Choose pencils or markers that fit your wood and project needs. Soft pencils leave dark marks but can smudge. Hard pencils make faint lines but stay sharp longer.
| Tool | Best For | Notes |
| Soft Pencil (B, 2B) | Rough wood | Dark marks, may smudge |
| Hard Pencil (H, 2H) | Smooth wood | Light lines, sharp tip |
| Permanent Marker | Dark or finished wood | Very visible, not erasable |
| Chalk Marker | Temporary marks | Easily wiped off |
Using Marking Gauges And Scribes
Marking gauges help you draw straight, parallel lines from edges. Scribes scratch fine lines for cutting guides on hardwood or oily wood.
- Adjust the marking gauge to the needed width
- Hold it firmly against the wood edge
- Slide it smoothly to score a line
- Use scribes to scratch thin, precise lines
Credit: medium.com
Preparing The Wood Surface
Marking wood for cutting needs a clean and smooth surface. Preparing the wood well helps you get exact cutting lines.
Start with a good surface. This guide shows how to clean, avoid flaws, and set up a flat work area.
Cleaning And Sanding
Remove dust and dirt before marking. Use a soft cloth to wipe the surface. Sand the wood lightly to smooth rough spots.
- Use fine-grit sandpaper for gentle sanding
- Sand along the wood grain to avoid scratches
- Wipe the surface again after sanding
- Make sure no debris remains before marking
Avoiding Surface Imperfections
Check the wood for dents, knots, or cracks. These flaws can cause inaccurate markings.
| Imperfection | Effect on Marking | What to Do |
| Dents | Lines may shift or break | Fill with wood filler and sand smooth |
| Knots | Surface is uneven and hard to mark | Mark around knots or replace wood piece |
| Cracks | Marking may not follow the crack | Fill cracks or avoid damaged area |
Ensuring A Flat Work Area
Place the wood on a flat, stable surface for marking. This helps keep lines straight and clear.
Tips for a flat work area:
- Use a sturdy workbench or table
- Check the surface with a level tool
- Support large wood pieces with extra stands
- Keep the work area clean and free of clutter
Measuring For Precision
Accurate marking is key to cutting wood correctly. Measuring carefully helps avoid mistakes. This guide covers essential tips for precise measurement.
Using the right tools and checking your marks can save time and material. Follow these simple steps for better results.
Using Rulers And Tape Measures
Choose a ruler or tape measure with clear, easy-to-read markings. Metal tape measures are durable and stay straight for better accuracy. Always start measuring from the zero mark, not the hook edge.
- Keep the tape straight and tight along the wood edge.
- Use the smallest units possible for finer precision.
- Mark measurements with a sharp pencil or fine-tip marker.
Marking Repeatable Measurements
Repeatable measurements save time when making several cuts of the same size. Use a marking gauge or a stop block on your saw to keep marks consistent.
| Tool | Purpose |
| Marking Gauge | Scores consistent lines parallel to wood edge |
| Stop Block | Limits wood travel to repeat cut lengths |
| Combination Square | Helps mark right angles and equal distances |
Double-checking Measurements
Always check your measurements twice before marking or cutting. Measure from the same starting point both times to avoid errors.
- Measure the length carefully and note it.
- Measure again from the same zero point.
- Compare both measurements to confirm accuracy.
- If they differ, measure a third time before marking.

Credit: www.familyhandyman.com
Marking Techniques
Marking wood accurately is key to making clean cuts. Clear marks guide your tools and reduce mistakes.
Using the right tools and methods helps you mark wood precisely. It saves time and improves your work.
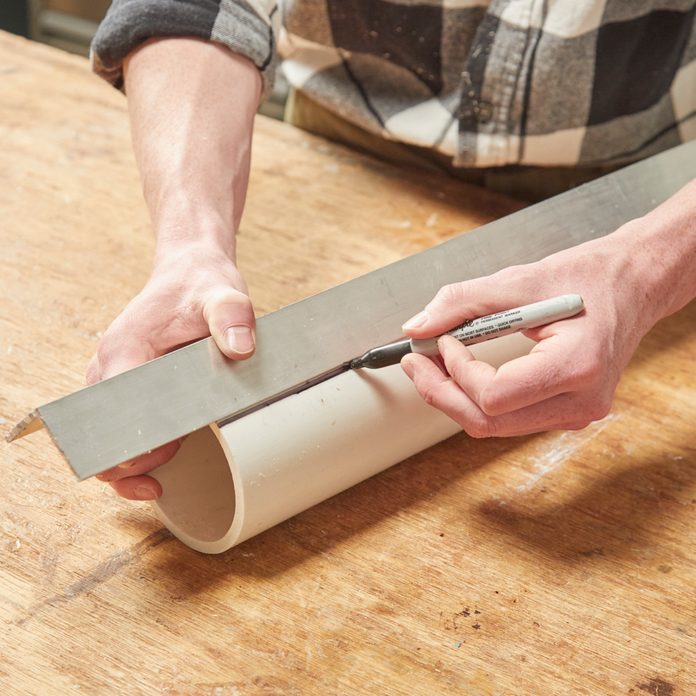
Creating Clear Cut Lines
Use a sharp pencil or marking knife for clear lines. A dull pencil can make thick, unclear marks.
Draw lines along the edge of a straight ruler or a metal square. This keeps lines straight and easy to see.
- Choose a fine pencil or marking knife
- Use a ruler or straight edge
- Mark on the wood’s face side
- Keep the tool steady while drawing
Using Combination Squares
A combination square helps measure and mark wood accurately. It has a ruler and a sliding head for angles.
Place the square’s head firmly against the wood edge. Slide the ruler to the needed measurement and mark the line.
- Check the square is clean and straight
- Hold the head tight to the wood edge
- Use the ruler to mark precise distances
- Double-check measurements before marking
Marking Angles And Curves
Marking angles needs a protractor or adjustable square. Set the tool to the correct angle before marking.
For curves, use templates or flexible rulers. Draw slow and steady lines to keep curves smooth and accurate.
- Use a protractor for exact angles
- Adjust squares to needed angle
- Use flexible rulers for curves
- Trace templates carefully for shapes
Tips For Consistent Accuracy
Marking wood accurately is important for clean cuts and good results. Small mistakes in marking can cause big problems in your project.
Use simple habits to improve your marking skills. These tips help you get consistent, exact lines every time.
Avoiding Parallax Errors
Parallax error happens when you look at the mark from an angle. This makes the line seem off from the real spot. Always look straight down at the wood to avoid this error.
Keep your eye level with the marking tool and the wood surface. This helps you place the mark exactly where you want it.
- Position your head directly over the mark
- Use a square or straight edge to guide your eye
- Check marks from multiple views if unsure
Working In Good Lighting
Good lighting makes it easier to see marks and lines clearly. Work in bright, natural light or use a bright lamp close to your work area.
Avoid shadows on your wood. Shadows can hide lines or make them look blurry. Keep light sources steady and evenly spread.
- Use daylight or bright LED lights
- Remove objects that cast shadows
- Check marks in different light angles
Using Clamps To Stabilize Wood
Clamps hold wood steady while you mark it. When the wood moves, your lines can shift and lose accuracy. Use clamps to keep wood from sliding or tipping.
Place clamps where they do not block your marking lines. This keeps your work area clear and stable.
- Secure wood firmly before marking
- Use soft pads on clamps to avoid damage
- Check wood stability before drawing lines
Common Mistakes To Avoid
Marking wood for cutting needs care and attention. Small mistakes can cause big problems in your project.
Knowing the usual errors helps you avoid them. This guide points out common pitfalls to watch for.
Relying On Faded Or Worn Tools
Using tools with faded or worn markings makes it hard to mark wood accurately. The lines may not show clearly, causing mistakes in cutting.
- Replace pencils with dull tips
- Sharpen marking knives regularly
- Clean rulers and squares before use
- Check measuring tapes for wear and tear
Ignoring Grain Direction
Wood grain affects how you should mark and cut. Ignoring grain direction can cause splintering or uneven cuts.
| Grain Direction | Effect on Marking |
| With the Grain | Lines stay clear and cuts are smooth |
| Against the Grain | Lines may blur and cuts can splinter |
| Across the Grain | Marking can be uneven and hard to follow |
Over-marking And Confusing Lines
Making too many marks or overlapping lines leads to confusion. It is hard to know which line to follow when cutting.
Tips to avoid over-marking:
- Use a single clear line for each cut
- Erase old or wrong marks before adding new ones
- Use different colors or styles for reference lines
- Keep your work area clean and organized
Advanced Techniques
Marking wood accurately is essential for a clean, precise cut. Advanced techniques help reduce errors and improve efficiency.
These methods use modern tools and smart approaches to ensure your marks are clear and exact every time.
Using Laser Guides
Laser guides project a straight, visible line on the wood surface. This line shows exactly where to cut.
- Attach the laser guide to your saw or workbench.
- Align the laser line with your cutting mark.
- Adjust the wood position until the laser matches the desired cut line.
- Use the laser as a steady reference during cutting.
Transferring Marks With Templates
Templates help copy complex shapes or repeated marks accurately. They save time and keep designs consistent.
| Template Type | Use Case | Material |
| Paper Template | Simple shapes or patterns | Cardstock or heavy paper |
| Wood Template | Repeated cuts or curves | Thin plywood or MDF |
| Metal Template | High durability for long use | Sheet metal |
Employing Digital Measuring Tools
Digital tools give exact measurements and can store multiple marks. They reduce human mistakes in marking wood.
- Use a digital caliper for small, precise measurements.
- Try a digital tape measure to quickly get lengths.
- Some digital tools connect to apps for saving marks.
- Check the tool’s calibration before use for accuracy.
Credit: www.familyhandyman.com
Frequently Asked Questions
How Do I Mark Wood Accurately For Cutting?
Use a sharp pencil or marking knife and a straight edge. Measure twice to ensure precision. Mark clear, thin lines to avoid cutting errors.
What Tools Help In Marking Wood Precisely?
A combination square, marking gauge, and sharp pencil are essential. These tools provide straight, consistent lines for accurate cuts.
Why Is Measuring Twice Important Before Cutting Wood?
Measuring twice prevents costly mistakes and wasted materials. It ensures your marks are exact, leading to cleaner, more accurate cuts.
How Can I Prevent Wood Splitting While Marking?
Use a fine-point marking knife instead of a pencil. It makes thinner lines, reducing the risk of wood fibers splitting during cutting.
Conclusion
Marking wood accurately is crucial for any woodworking project. Precise measurements ensure perfect cuts. This leads to a beautiful and functional finished product. Always use the right tools for the job. Measuring tape, square, and pencil are essentials. Keep tools sharp and well-maintained for best results.
Practice improves your skills over time. Double-check measurements before making any cuts. Mistakes can be costly and time-consuming. Accurate wood marking saves both time and resources. With these tips, your woodworking projects will shine. Happy woodworking, and enjoy your creations!