Measuring angles accurately is one of the most important skills you need for woodworking. If your cuts are off by even a few degrees, your pieces won’t fit together right.
But don’t worry—getting precise angle measurements is easier than you might think. You’ll learn simple, effective methods to measure angles with confidence. Whether you’re building a frame, a shelf, or a complex project, mastering this skill will save you time, reduce mistakes, and make your work look professional.
Keep reading, and you’ll soon know exactly how to measure angles like a pro.

Credit: www.wikihow.com
Tools For Measuring Angles
Measuring angles is important for woodworking projects. The right tools help get accurate cuts and fits.
Several tools can measure angles with ease. They vary by accuracy and ease of use.
Protractors And Angle Finders
Protractors are simple tools that measure angles in degrees. Angle finders are more flexible and can measure inside and outside angles.
- Manual protractors have a pivot and degree markings.
- Angle finders often have two arms that fold to match the angle.
- Both tools are useful for transferring angles to wood pieces.
Combination Squares
Combination squares measure angles and check straight edges. They have a ruler and adjustable head.
| Feature | Description |
| Adjustable Head | Allows angle setting for marking cuts |
| Ruler | Measures length and depth |
| Material | Usually steel for durability |
Digital Angle Gauges
Digital angle gauges show angles on a screen. They offer quick and precise readings.
- Easy to use with digital display
- Can store measurements for reference
- Works well for complex or repeated angles

Credit: m.youtube.com
Preparing Your Workspace
Measuring angles accurately is key in woodworking. A tidy and well-lit workspace helps you work safely and precisely.
Before you start, arrange your tools and materials in a way that supports clear focus and steady hands.
Clearing And Lighting
Clear your workspace of clutter to avoid distractions and accidents. Good lighting lets you see lines and marks clearly.
- Remove unnecessary tools and scraps
- Use bright, natural light or LED lamps
- Position lights to reduce shadows on your workpiece
- Keep your measuring tools within easy reach
Securing The Wood
Hold the wood firmly to keep it from moving while measuring. This prevents mistakes and ensures safety.
| Method | Description | Tip |
| Clamps | Use clamps to fix the wood to your workbench. | Check clamps for tightness before measuring. |
| Workbench Vise | Place wood in a vise to hold it steady. | Protect wood with soft jaws to avoid marks. |
| Non-Slip Mat | Put a rubber mat under wood to reduce movement. | Works well for light or small pieces. |
Basic Angle Measurement Techniques
Measuring angles is a key skill in woodworking. Accurate angles help pieces fit well together. You can use simple tools for this task.
This guide covers two basic methods. They are easy to learn and use for most woodworking projects.
Marking Angles With A Protractor
A protractor lets you measure and mark angles precisely. Place it on the wood, align the base, and mark the angle point.
- Place the flat edge of the protractor on the wood edge.
- Line up the center hole with the vertex of the angle.
- Find the desired degree on the curved edge.
- Mark the wood at that point using a pencil.
- Remove the protractor and draw a straight line from the vertex through the mark.
Using A Combination Square For Accuracy
The combination square is a versatile tool. It helps measure and check right angles and other common angles.
| Tool Part | Function |
| Blade | Used for measuring and marking lengths and angles. |
| Handle | Acts as a base to hold the blade steady. |
| Adjusting Screw | Locks the blade in place for accurate measurements. |
To use it, set the blade at the needed angle. Tighten the screw. Place the handle against the wood edge. Draw your line along the blade.
Measuring Complex Angles
Measuring complex angles is key in woodworking to ensure perfect joints. These angles are often irregular and need careful handling.
Using the right methods helps you transfer and measure these angles accurately. This guide covers useful techniques for tricky shapes.
Transferring Angles Between Pieces
To transfer an angle from one wood piece to another, use tools that capture the exact shape. This avoids guesswork and saves time.
- Use a bevel gauge to copy the angle directly.
- Lock the gauge once it fits the angle on the first piece.
- Place the gauge on the second piece to mark the angle.
- Double-check the mark before cutting to avoid errors.
- For complex angles, use a protractor to measure the degree precisely.
Using Digital Tools For Irregular Angles
Digital tools make measuring irregular angles easier and more precise. They help capture angles that are hard to measure with traditional tools.
| Tool | Function | Best For |
|---|---|---|
| Digital Angle Finder | Measures angles quickly with a digital readout | Both simple and complex angles |
| Laser Level | Projects straight lines to check angle alignment | Large or hard-to-reach areas |
| 3D Angle Gauge Apps | Use phone sensors to measure angles on irregular surfaces | Curved or uneven wood pieces |
Common Mistakes To Avoid
Measuring angles for woodworking needs care and attention. Small errors can cause big problems in your project. Avoiding common mistakes helps you get better results and saves time.
Below are some frequent errors to watch out for. Fixing these will make your angle measurements more accurate and your woodworking cleaner.
Misreading Tools
Reading angle tools wrong is a top cause of mistakes. Tools like protractors and angle finders can be tricky. You might see the wrong number or read the scale upside down.
- Always check the tool’s zero point before measuring.
- Look straight at the scale to avoid parallax errors.
- Use a tool with clear markings and good lighting.
Inconsistent Marking
Marking angles unevenly causes pieces to not fit well. Using different pencils or markers can change the line thickness. Also, marking at different points on the tool changes the angle.
| Cause | Effect |
| Using sharp pencil | Thin, precise lines |
| Using dull pencil | Thick, unclear lines |
| Marking at edge vs center | Angle changes by a few degrees |
Ignoring Tool Calibration
Tools can lose accuracy over time. Not checking calibration leads to wrong angle measurements. Calibrate your tools often to keep them reliable and precise.
To check tool calibration:
- Measure a known angle, like 90° from a square.
- Compare the reading on your tool.
- Adjust or repair the tool if readings do not match.

Credit: www.reddit.com
Tips For Improving Precision
Measuring angles correctly is key in woodworking. Small mistakes can cause big problems in your project.
Using careful methods helps you get exact angles. These tips make your work more accurate and neat.
Double-checking Measurements
Always check your measurements twice before cutting. This helps catch errors early.
- Measure the angle with your tool and note the reading.
- Measure again from the opposite side or with a different tool.
- Compare both measurements to confirm accuracy.
- Adjust if there is any difference before cutting.
Using Clamps For Stability
Clamps hold your wood steady while measuring and cutting. This stops movement that can cause errors.
- Place clamps to secure wood firmly on your work surface.
- Check that the wood is flat and not tilted.
- Use clamps that fit the wood size well to avoid slipping.
- Keep clamps tight but avoid damaging the wood.
Regular Tool Maintenance
Keeping your tools clean and sharp improves precision. Worn or dirty tools give wrong readings.
| Tool | Maintenance Tip |
| Protractor | Clean lens and check scale markings |
| Combination Square | Lubricate sliding parts and check ruler for wear |
| Angle Finder | Calibrate regularly and replace batteries |
| Saw Blades | Sharpen edges and remove pitch buildup |
Frequently Asked Questions
How Do I Measure Angles Accurately For Woodworking?
Use a protractor or angle finder for precise angle measurement. Align the tool’s baseline with the wood edge. Mark the desired angle carefully before cutting.
What Tools Are Best For Measuring Wood Angles?
Protractors, digital angle finders, and combination squares are ideal. They provide accuracy and ease when marking or cutting angles in wood.
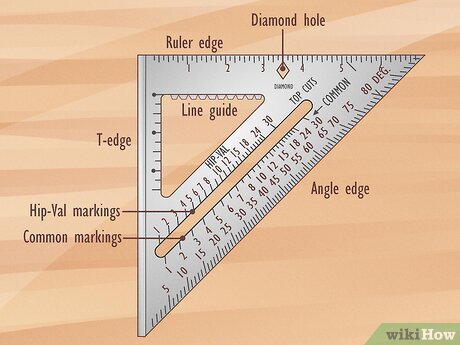
How To Measure Angles Without A Protractor?
Use a speed square or create a paper template. Align the tool with the wood and mark the angle visually.
Why Is Measuring Angles Important In Woodworking?
Accurate angle measurement ensures tight joints and smooth finishes. It prevents gaps and misalignments in your woodworking projects.
Conclusion
Measuring angles in woodworking is crucial for precise projects. Accurate angles ensure your work fits perfectly. Use tools like protractors and squares for best results. Practice regularly to improve your skills. Mistakes happen, but learning from them helps. Patience is key in mastering woodworking angles.
Always double-check measurements to avoid errors. Consistency makes projects look professional. With practice, measuring becomes second nature. Enjoy the satisfaction of well-crafted pieces. Happy woodworking!