Are your pruning shears struggling to cut cleanly through branches? Dull blades can make your gardening work harder and less precise.
But sharpening your pruning shears is easier than you think—and it can transform your tools instantly. In this guide, you’ll discover simple, step-by-step tips to sharpen your shears for perfect, precise cuts every time. Keep reading to unlock the secret to smoother, safer, and more effective pruning that will make your garden thrive.

Credit: www.youtube.com
Choosing The Right Tools
Sharpening pruning shears needs the right tools to get sharp blades. Using good tools helps you cut cleanly and work safely.
Picking proper sharpening and safety gear makes the job easier. This guide shows what tools you need.
Essential Sharpening Equipment
You need certain tools to sharpen pruning shears well. These tools help keep the blade sharp and smooth.
- Sharpening stone or whetstone: for grinding the blade edge
- Diamond file: for hard or very dull blades
- Lubricant oil: to reduce friction during sharpening
- Cleaning brush: to remove rust and dirt before sharpening
- Cloth: to wipe and dry the blade after sharpening
Safety Gear For Protection
Safety gear protects your hands and eyes from injury while sharpening. Use the right protection every time.
- Protective gloves: stop cuts and scratches
- Safety glasses: keep metal filings out of your eyes
- Long sleeves: protect your arms from sparks or sharp edges
- Work apron: prevents damage to clothing and adds a barrier
Preparing Pruning Shears
Sharpening pruning shears starts with proper preparation. This step helps keep your tools safe and effective. Clean and inspect the blades before any sharpening work.
Taking apart the shears can give better access to hard-to-reach areas. This makes the sharpening process easier and more precise.
Cleaning And Inspecting Blades
Cleaning the blades removes dirt and sap. This prevents damage during sharpening. After cleaning, inspect the blades for rust, cracks, or deep nicks. These problems affect cutting performance and may need repair.
- Use warm, soapy water and a brush to clean blades.
- Dry blades fully to avoid rust.
- Check edges for dullness or damage.
- Look for loose screws or worn parts.
Disassembling For Better Access
Removing the blades or loosening screws helps reach all surfaces. This step allows better sharpening and cleaning. Keep track of all parts to reassemble correctly.
| Tool | Purpose |
| Screwdriver | Remove screws carefully |
| Cloth | Wipe cleaned parts |
| Container | Hold small screws and parts |
Sharpening Techniques
Keeping pruning shears sharp makes cutting easier and cleaner. Sharp blades help plants heal faster and stay healthy.
This guide covers three ways to sharpen your pruning shears for precision and safety.
Using A Sharpening Stone
A sharpening stone smooths and sharpens the blade edge carefully. Use a fine grit stone for best results.
- Clean the blade to remove dirt and sap.
- Hold the stone at a 20-degree angle to the blade.
- Move the stone in one direction along the blade edge.
- Sharpen both sides evenly for a balanced cut.
- Wipe the blade clean and apply oil to prevent rust.
Employing A File
A file quickly shapes and sharpens dull pruning shears. Use a fine-toothed metal file for smooth edges.
Hold the file at the same angle as the blade’s bevel. Stroke it along the edge with steady pressure.
| File Type | Purpose |
| Flat File | Sharpen straight edges |
| Round File | Shape curved blades |
| Mill File | Remove rust and rough spots |
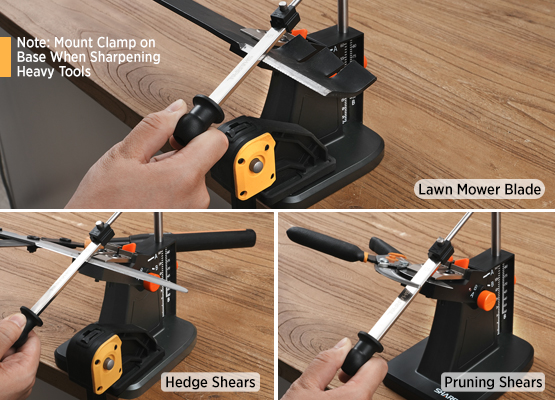
Applying A Sharpening Tool
Sharpening tools like rotary sharpeners or pull-through sharpeners offer fast results. Use them carefully to avoid over-sharpening.
Follow these tips when using sharpening tools:
- Secure the pruning shears before sharpening.
- Keep a consistent angle as recommended by the tool.
- Make several light passes instead of one heavy pass.
- Check the blade edge often to avoid removing too much metal.
- Clean and oil the shears after sharpening.
Maintaining The Blade Angle
Sharpening pruning shears correctly keeps them working well. Maintaining the blade angle during sharpening helps cut cleanly and precisely.
Keeping the right angle protects the blade and makes your work easier. Let’s look at how to identify and keep the correct blade angle.
Identifying The Correct Angle
The blade angle is usually between 20 and 30 degrees. This angle keeps the edge sharp and strong enough for pruning tasks.
- Check the original bevel on the blade before sharpening.
- Use a protractor or angle guide tool to measure the angle.
- Match the sharpening tool to the blade angle.
- Maintain the same angle throughout the sharpening process.
Tips For Consistent Sharpening
Consistency is key for a sharp and long-lasting blade. Follow these tips to keep the angle steady and get smooth cuts every time.
| Tip | Description |
| Use a sharpening jig | Holds blade at the correct angle while sharpening |
| Sharpen in one direction | Push the file or stone along the blade edge, not back and forth |
| Check angle often | Stop to verify the angle every few strokes |
| Apply light pressure | Too much force can change the blade angle or damage the edge |
| Finish with a fine stone | Polishes and smooths the sharpened edge |
Polishing And Finishing
Polishing and finishing pruning shears help keep the blades sharp longer. A smooth edge cuts cleanly and prevents damage to plants.
This stage removes small imperfections and protects the metal from rust. It improves cutting precision and tool lifespan.
Smoothing The Edge
After sharpening, use fine grit sandpaper or a sharpening stone to smooth the blade edge. This step removes roughness left from coarse sharpening.
- Wrap fine grit sandpaper around a small block.
- Hold the blade at a consistent angle.
- Lightly rub the edge in one direction.
- Repeat on both sides for an even finish.
- Wipe the blade clean with a dry cloth.
Removing Burrs
Burrs are tiny metal fragments left on the blade after sharpening. Removing them improves cutting accuracy and safety.
| Tool | Use |
|---|---|
| Leather strop | Drag blade gently to polish and remove burrs |
| Fine whetstone | Lightly hone edge to lift off burrs |
| Soft cloth | Wipe blade clean after burr removal |

Credit: misterminit.co
Reassembling And Testing
After sharpening pruning shears, putting them back together properly is important. This ensures they work smoothly and safely.
Testing the shears for precision cuts helps confirm the sharpening was effective. It also shows if any adjustments are needed.
Putting Shears Back Together
Start by aligning the blades correctly. Make sure the pivot bolt fits tightly but allows smooth movement. Reattach the springs and handles carefully to restore full function.
- Place the sharpened blades in position.
- Insert the pivot bolt and tighten it just enough for smooth blade movement.
- Attach the spring or tension mechanism between the handles.
- Secure the handles with screws or rivets if needed.
- Check that the shears open and close without sticking.
Checking For Precision Cuts
Test the shears by cutting different plant stems. Look for clean, smooth cuts without crushing the stem. Sharp shears make pruning easier and healthier for plants.
| Test Material | Expected Result | Action If Failed |
| Soft stem (e.g., basil) | Clean, smooth cut | Resharpen blades or adjust tension |
| Hard stem (e.g., rose bush) | Even cut without crushing | Check blade alignment and pivot |
| Thin twig | Snaps cleanly with little force | Lubricate pivot and retest |
Routine Maintenance Tips
Keeping your pruning shears sharp ensures clean cuts and healthy plants. Regular care helps your tools last longer.
Simple maintenance steps prevent rust and damage. Follow these tips to keep your shears ready for use.
Regular Cleaning Practices
Clean your pruning shears after every use. Dirt and sap can dull the blades and cause rust.
- Wipe blades with a damp cloth to remove sap and dirt.
- Use a brush to clean hard-to-reach areas.
- Dry the shears completely to prevent rust.
- Apply a light coat of oil to the blades for protection.
Proper Storage Methods
Store your pruning shears in a dry place. Proper storage stops moisture from damaging the blades.
| Storage Tip | Reason |
| Keep shears in a toolbox | Protects from dust and moisture |
| Use blade covers | Prevents accidental cuts and dulling |
| Store in a dry room | Reduces rust formation |
| Hang shears on a pegboard | Keeps them off damp surfaces |
Credit: sharpal.com
Frequently Asked Questions
How Often Should I Sharpen Pruning Shears?
Sharpen pruning shears after every few uses or when cuts become rough. Regular sharpening ensures clean cuts and prolongs tool life. Inspect blades frequently for dullness or damage to maintain precision.
What Tools Do I Need To Sharpen Pruning Shears?
You need a sharpening stone, diamond file, or honing tool. Additionally, use a clean cloth and lubricant oil. These tools help restore blade sharpness efficiently and safely.
Can I Sharpen Pruning Shears At Home Easily?
Yes, sharpening pruning shears at home is simple with the right tools. Follow step-by-step guides and maintain blade angles for best results. Regular home sharpening saves money and improves cutting performance.
Why Is Sharpening Pruning Shears Important For Precision?
Sharpened shears make clean, precise cuts, reducing plant damage. Dull blades crush stems, causing stress and slower healing. Sharp tools help maintain healthy plants and improve gardening outcomes.
Conclusion
Sharpening pruning shears ensures clean, precise cuts. It’s simple and rewarding. Regular maintenance keeps your tools in top shape. Use a sharpening stone or file. Always check for rust and dirt. Clean the blades thoroughly. Remember to oil the pivot point.
This reduces friction and extends life. Store shears in a dry place. Protect them from moisture. Sharp tools make gardening easier and more enjoyable. Consistent care enhances performance. Enjoy a well-maintained garden with sharp, efficient pruning shears. Happy gardening!