If you’ve ever tried to connect or repair your TV or internet cable, you know how tricky it can be to strip a coaxial cable the right way. Do it incorrectly, and you risk damaging the cable or getting a weak signal.
But don’t worry—this guide will show you exactly how to strip coaxial cable properly, step by step. By the end, you’ll have the confidence and skill to handle your cables like a pro, saving time and avoiding costly mistakes. Keep reading, and you’ll never struggle with coaxial cables again.
Tools Needed
Stripping coaxial cable correctly needs the right tools. Using proper tools makes the job easier and safer.
This guide covers essential and optional tools for stripping coaxial cables.
Essential Stripping Tools
You need a few basic tools to strip coaxial cable well. These tools help remove the outer layers without damaging the wire inside.
- Coaxial Cable Stripper:A tool made to cut the outer jacket cleanly and evenly.
- Utility Knife:Useful for careful trimming of the cable jacket and shielding.
- Wire Cutters:To cut the cable to the correct length.
- Needle-Nose Pliers:Helps pull off small pieces of shielding or jacket.
Optional Accessories
Some extra tools can make the task easier but are not always required. These help improve precision and speed.
- Compression Tool:Used to attach connectors firmly after stripping.
- Coaxial Cable Gauge:Measures cable size to choose the right stripping depth.
- Electrical Tape:Useful for securing and protecting the cable ends.
- Wire Brush:Cleans the copper conductor to ensure a good connection.
Types Of Coaxial Cable
Coaxial cables carry signals for TV, internet, and other devices. Choosing the right type helps you get the best connection.
Two common types are RG6 and RG59. Each has different uses and features.
Rg6 And Rg59 Differences
RG6 cables are thicker and have better shielding. They work well for cable TV and internet signals.
RG59 cables are thinner and less shielded. They are best for short-distance video connections.
- RG6:Better signal quality over long distances
- RG59:Used for short runs and lower frequencies
- Shielding:RG6 has more layers to block interference
- Diameter:RG6 is thicker than RG59
Choosing The Right Cable
Pick a cable based on your needs and device types. Use RG6 for most home setups and internet.
Use RG59 if you have short cable runs or older equipment. Check the cable’s shielding for better signal quality.
- Choose RG6 for longer distances and high-frequency signals
- Choose RG59 for short distances and low-frequency signals
- Check cable thickness and shielding for signal strength
- Match cable type with your devices’ requirements
Preparing The Cable
Preparing a coaxial cable correctly is important for a good connection. It helps avoid signal loss and damage. Take your time to measure and mark the cable properly before stripping.
This guide covers two key steps: measuring the strip length and marking the cable. Follow each carefully for the best results.
Measuring Strip Length
Measure the right length of the cable to strip. This varies depending on the connector you use. Too short or too long can cause connection problems.
- Check the connector instructions for strip length.
- Use a ruler or tape measure for accuracy.
- Mark the length clearly on the cable.
- Double-check the measurement before cutting.
Marking The Cable
Mark the cable at the measured points. This makes stripping easier and cleaner. Use a pencil or marker that shows on the cable jacket.
| Mark Type | Purpose |
| Outer Jacket Mark | Shows where to cut the outer layer |
| Foil Shield Mark | Indicates where to fold back the shield |
| Dielectric Mark | Marks where to expose the center conductor |

Credit: www.assemblymag.com
Stripping Process
Stripping coaxial cable is a careful process. It needs the right tools and steps. This guide covers the main parts of stripping the cable.
The process includes removing the outer jacket, exposing the shield, trimming the dielectric, and preparing the inner conductor. Each step is important for a good connection.
Removing Outer Jacket
The outer jacket protects the cable from damage. Use a coaxial cable stripper or a sharp knife. Cut around the jacket without cutting inside layers. Pull off the jacket carefully to avoid nicking the shield.
Exposing The Shield
Under the outer jacket is the shield. It can be braided wire, foil, or both. Fold back the shield gently to expose the dielectric inside. Make sure the shield stays intact for good shielding.
Trimming The Dielectric
The dielectric is the white or clear insulation around the inner conductor. Cut it carefully to expose the correct length of the inner conductor. Do not cut too much to avoid shorts.
- Measure the needed length of dielectric to strip.
- Use a sharp blade or coaxial stripper tool.
- Make a clean cut without nicking the conductor.
- Remove the dielectric carefully.
Preparing The Inner Conductor
The inner conductor carries the signal. Check the conductor for any damage. Trim the end if needed to make a clean, straight edge. This helps in making a solid connection with connectors.
| Part | Purpose | Tool Needed |
| Outer Jacket | Protects cable | Coaxial stripper or knife |
| Shield | Blocks interference | Hands or pliers |
| Dielectric | Insulates inner conductor | Blade or coaxial stripper |
| Inner Conductor | Carries signal | Wire cutter or scissors |
Common Mistakes To Avoid
Stripping coaxial cable needs care and attention. Many make simple errors that cause damage.
Avoiding these mistakes helps keep the cable working well and makes connections easier.
Damaging The Conductor
Cutting or nicking the inner conductor can cause signal loss or failure. Use the right tools and be gentle.
- Do not use dull blades that crush the conductor.
- Avoid cutting too deep beyond the insulation.
- Keep the conductor straight and clean after stripping.
- Do not twist or bend the conductor sharply.
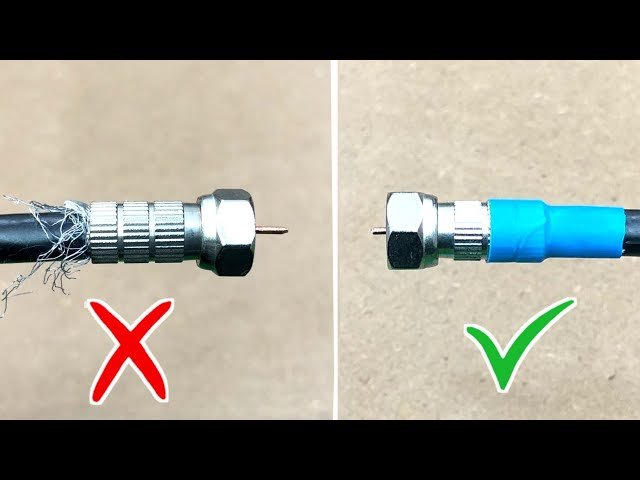
Improper Shield Handling
The shield protects the signal from interference. Mishandling it can cause noise and poor connection.
| Mistake | Effect |
|---|---|
| Cutting shield wires too short | Weakens grounding and signal quality |
| Crushing or tearing shield | Allows interference and signal loss |
| Pushing shield inside the cable core | Causes short circuits or poor contact |
| Not folding shield back properly | Hard to attach connectors securely |
Testing The Stripped Cable
After stripping a coaxial cable, testing it ensures it works correctly. Testing helps find problems early.
Two main ways to test a stripped cable are visual inspection and using a cable tester. Both are simple to do.
Visual Inspection
Look closely at the stripped cable to check for any damage. Make sure the inner conductor is straight and clean.
- The outer shield should be evenly trimmed and not cut too short.
- The insulation must not be nicked or torn.
- The center conductor must be free of bends or breaks.
- No stray wires should touch the center conductor.
- The cable jacket should be intact near the stripped area.
Using A Cable Tester
A cable tester checks the electrical signals and connection quality. It helps find shorts or breaks inside the cable.
| Test Type | What It Checks | Result Meaning |
| Continuity Test | Checks if the cable wires are connected properly | Pass means no breaks; fail means a broken wire |
| Short Circuit Test | Detects if wires touch each other wrongly | Pass means no shorts; fail means wires are touching |
| Signal Loss Test | Measures how much signal weakens over the cable | Low loss means good cable quality; high loss means cable problems |
Tips For Better Results
Stripping coaxial cable properly is important for a strong connection. Doing it right prevents damage and signal loss.
Using the right methods and tools helps you get clean and accurate results every time.
Maintaining Tool Sharpness
Sharp tools make stripping easier and reduce cable damage. Dull blades can cut inner wires or crush the cable.
- Check your blade before each use.
- Replace or sharpen blades regularly.
- Store tools in a dry place to avoid rust.
- Clean blades after use to remove residue.
Working In Good Lighting
Bright light helps you see cable layers clearly. This reduces mistakes and speeds up the process.
| Lighting Type | Best Use | Notes |
| Natural Light | Daytime work | Soft and even illumination |
| LED Work Light | Indoor or dark spaces | Bright, focused light with low heat |
| Headlamp | Hands-free tasks | Good for tight spots |

Credit: www.youtube.com

Credit: www.truecable.com
Frequently Asked Questions
How Do You Strip Coaxial Cable Without Damage?
Use a coaxial cable stripper tool to avoid damaging the inner conductor. Adjust the blade depth carefully and rotate the tool smoothly. Avoid cutting too deep to maintain cable integrity and ensure a proper connection.
What Tools Are Needed To Strip Coaxial Cable?
You need a coaxial cable stripper, utility knife, and wire cutters. The stripper removes the outer jacket precisely. A utility knife helps with fine trimming, and wire cutters cut the cable to length.
How Much Coaxial Cable Should Be Stripped?
Strip about 1/2 inch of the outer jacket and 1/4 inch of the dielectric insulation. This exposes the center conductor and shield without damaging them, ensuring a secure and clean connection.
Can I Strip Coaxial Cable By Hand?
Yes, but it requires steady hands and precision. Use a sharp utility knife carefully to avoid nicking the center conductor or shield. Manual stripping is less consistent and riskier than using a specialized stripper.
Conclusion
Stripping coaxial cable isn’t hard with the right steps. Practice makes it easier. Use the right tools for clean cuts. Protect the wire inside. Safety first, always. Check your work for errors. No rush needed. Take your time. It’s worth it.
Good cable prep leads to better connections. Enjoy your projects more. Happy wiring!