
Are you struggling to measure small parts with precision? If so, you’re not alone.
Many people find it challenging to get accurate measurements, especially when dealing with tiny components. This is where a micrometer comes in handy. It’s a tool designed to give you precise measurements down to the smallest detail. Imagine being able to measure with such accuracy that you eliminate any guesswork, leading to better results in your projects.
In this guide, we’ll explore how to use a micrometer effectively, ensuring that you achieve the high-level precision you need for your tasks. So, if precision is your priority, keep reading to discover the secrets of mastering a micrometer.

Credit: www.wikiwand.com
Micrometer Basics
A micrometer is a tool for measuring small parts with high accuracy. It is often used in workshops and labs to measure thickness or diameter.
This guide covers the main types of micrometers, their key parts, and how measurement units work.
Types Of Micrometers
Micrometers come in different types based on the parts they measure and their design. Each type fits specific measurement needs.
- Outside Micrometer: Measures outer dimensions like thickness and diameter.
- Inside Micrometer: Measures inner dimensions such as holes or slots.
- Depth Micrometer: Measures depth of holes or slots.
- Vernier Micrometer: Includes a vernier scale for more precise readings.
Key Components
A micrometer has several parts that work together to provide accurate measurements. Knowing these parts helps in using the tool correctly.
| Component | Function |
| Frame | Holds the parts in place and provides stability. |
| Anvil | Fixed measuring surface that contacts the part. |
| Spindle | Moves toward the anvil to clamp the part. |
| Thimble | Rotates the spindle for fine adjustment. |
| Lock Nut | Secures the spindle to hold the measurement. |
| Scale | Shows the measurement reading. |
Measurement Units
Micrometers display measurements in different units. Some models show metric units, others use imperial units, and some have both.
- Metric Units: Millimeters (mm) and micrometers (µm) are common.
- Imperial Units: Inches and thousandths of an inch (mils) are used.
- Digital Micrometers: Show measurements on a screen and can switch units.
Credit: www.regionaltech.com.sg
Preparing The Micrometer
Using a micrometer correctly starts with good preparation. This helps get accurate measurements for small parts.
Before measuring, you must check and set up the micrometer. This ensures it works well every time.
Calibrating The Tool
Calibration sets the micrometer to measure correctly. It compares the tool to a known standard.
Use a calibration gauge or standard block to adjust the micrometer. Turn the thimble until the tool matches the standard size.
- Choose the right calibration standard for your micrometer
- Close the micrometer on the standard gently
- Adjust the sleeve or thimble to the correct reading
- Lock the setting if your micrometer allows it
Cleaning The Surfaces
Clean the micrometer’s measuring surfaces before use. Dirt or oil can cause wrong readings.
Use a soft cloth or tissue to wipe the anvil and spindle. Make sure both are dry and free of dust.
- Use a lint-free cloth for cleaning
- Do not use abrasive materials that can scratch
- Check for any debris stuck on the surfaces
- Clean the object you want to measure as well
Checking Zero Accuracy
Zero accuracy means the micrometer reads zero when fully closed. This is important for correct measurements.
Close the micrometer gently until the measuring faces touch. Check if the scale shows zero or very close to it.
- If the reading is not zero, adjust the micrometer
- Use the zero adjustment screw or ring if available
- Repeat until the micrometer reads zero when closed
- Do not force the spindle to avoid damage
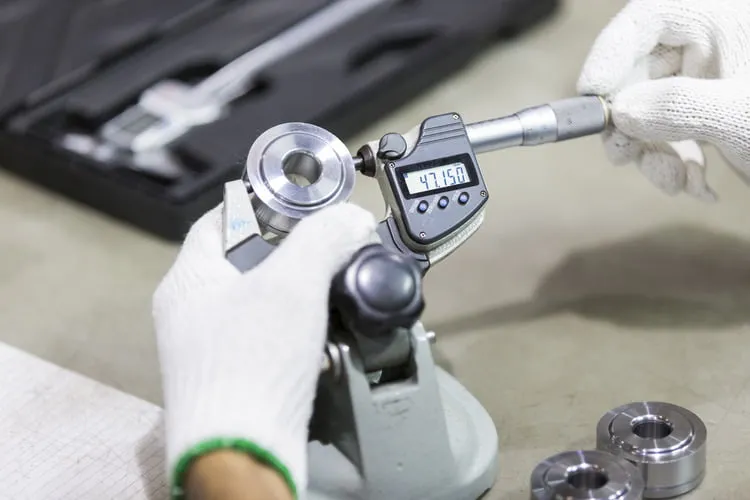
Measuring Small Parts
Using a micrometer helps measure small parts with high accuracy. It is a tool that measures thickness, diameter, or length.
To get correct readings, you must handle the micrometer and parts carefully. This guide explains how to use a micrometer for small parts.
Proper Handling Techniques
Hold the micrometer by its frame to avoid adding heat from your hands. Heat can change the size of the tool and cause errors.
Turn the thimble gently using your fingers. Do not force it or you might damage the tool or the part.
- Keep the micrometer clean and dry
- Use the ratchet stop for consistent pressure
- Store the tool in its case after use
Positioning The Part
Place the small part between the anvil and spindle carefully. Make sure it sits flat and does not tilt.
Close the spindle slowly until it touches the part. Use the ratchet stop to apply the right pressure without squeezing the part.
- Check that the part is clean and free of debris
- Hold the part steady to avoid movement
- Align the micrometer perpendicular to the part surface
Reading The Scale
Look at the sleeve and thimble scales to read the measurement. The sleeve shows whole millimeters or inches.
The thimble scale shows the fractions of a millimeter or inch. Add these numbers to get the final size.
- Read the last visible mark on the sleeve scale
- Note the number on the thimble aligned with the sleeve line
- Add the two numbers for the total measurement

Credit: www.angi.com
Common Mistakes To Avoid
Using a micrometer for small parts needs care and attention. Small errors can cause wrong measurements. Knowing common mistakes helps to get accurate results.
Below are key errors to watch for. Avoiding these keeps your measurements reliable and precise.
Applying Excessive Pressure
Pressing too hard with the micrometer can damage the part or tool. It also changes the reading by squeezing the object.
- Use the ratchet or friction thimble to control pressure.
- Stop tightening when you feel resistance.
- Practice gentle handling to protect both parts and tools.
- Check the micrometer’s instructions for proper pressure guidance.
Misreading The Scale
The micrometer scale can be tricky to read at first. Mistakes happen if you confuse lines or numbers.
| Part of Scale | How to Read |
|---|---|
| Sleeve Scale | Read the whole millimeters and half-millimeters marked on the sleeve. |
| Thimble Scale | Check the number aligned with the sleeve line for hundredths of a millimeter. |
| Vernier Scale (if present) | Use it to read thousandths of a millimeter for precise measurement. |
Ignoring Calibration
Calibration keeps your micrometer accurate. Skipping this leads to wrong measurements over time.
Calibration tips:
- Check zero reading by closing the micrometer on a standard gauge block or a clean surface.
- Adjust the zero if it does not line up perfectly.
- Calibrate regularly, especially before important tasks.
- Keep the micrometer clean and store it properly.
Advanced Tips For Precision
Using a micrometer for small parts requires care and attention. Small errors can cause big problems in measurements.
This guide offers advanced tips to improve your measuring accuracy with a micrometer.
Using A Ratchet Stop
The ratchet stop helps apply consistent force when measuring. This avoids squeezing the part too tightly or too loosely.
- Turn the ratchet until it clicks to apply equal pressure each time.
- Avoid forcing the spindle by hand to prevent damage.
- Use the ratchet stop for all measurements to keep results uniform.
Temperature Considerations
Temperature changes affect micrometer readings. Metal parts and tools expand or contract with heat.
| Temperature | Effect on Measurement | Tip |
| Cold (below 20°C / 68°F) | Parts shrink, readings may be low | Warm parts to room temperature before measuring |
| Room Temperature (20-25°C / 68-77°F) | Stable readings | Ideal measuring environment |
| Hot (above 25°C / 77°F) | Parts expand, readings may be high | Allow parts to cool before measuring |
Regular Maintenance
Regular cleaning and calibration keep your micrometer accurate and lasting longer.
- Clean the spindle and anvil with a soft cloth after each use.
- Apply a light oil layer to prevent rust.
- Check calibration with a gauge block monthly.
- Store the micrometer in a protective case.
Frequently Asked Questions
What Is The Purpose Of A Micrometer For Small Parts?
A micrometer measures the precise dimensions of small parts. It ensures accuracy in manufacturing and quality control. The tool provides readings in microns or thousandths of an inch. This precision is crucial for engineering and mechanical tasks.
How Do You Properly Zero A Micrometer?
To zero a micrometer, close the spindle gently on the anvil. Check the reading; it should show zero. If not, adjust the sleeve or thimble accordingly. Proper zeroing ensures accurate measurements every time you use the micrometer.
Can A Micrometer Measure Inside Dimensions?
No, a standard micrometer measures outside dimensions only. For inside dimensions, use an inside micrometer or calipers. Each tool is designed for specific measurement tasks to maintain accuracy.
How To Read A Micrometer Scale Accurately?
Read the sleeve scale first, noting whole and half-millimeter marks. Then, read the thimble scale to find the exact fraction. Combine both readings for the precise measurement. Practice helps improve accuracy and speed.
Conclusion
Using a micrometer correctly helps you measure small parts with ease. Take your time and read the scale carefully. Keep the tool clean and handle it gently for best results. Practice often to improve your skill and confidence. Accurate measurements lead to better work and fewer mistakes.
Now, you can measure small objects precisely every time. Simple steps make a big difference in your projects.
