Are you ready to transform your woodworking projects with precision and ease? The secret weapon you need is the carpenter’s square.
This humble tool might not look like much at first glance, but it holds the power to revolutionize your craftsmanship. Whether you’re a seasoned woodworker or just starting out, mastering the use of a carpenter’s square can be a game changer.
Imagine creating perfectly square corners, ensuring your cuts are accurate, and bringing your creative visions to life with newfound confidence. You’ll discover essential tips that will help you unlock the full potential of your carpenter’s square. Keep reading to learn how this simple tool can make your projects not only easier but also more professional-looking. Let’s dive into the world of precision and craftsmanship!

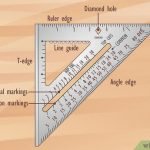
Credit: www.wikihow.com
Choosing The Right Carpenter’s Square
A carpenter’s square helps you make accurate cuts and measurements. Picking the right one makes your work easier and better.
There are many types of squares. You should think about the material and size before buying one.
Types Of Carpenter’s Squares
Carpenter’s squares come in different types for different jobs. Knowing each type helps you choose well.
- Try Square:Used for checking right angles and marking lines.
- Speed Square:A triangle shape for quick measurements and marking angles.
- Combination Square:Adjustable for measuring depth, marking angles, and checking level.
- Framing Square:Large L-shaped tool for framing and layout tasks.
Material And Durability
Carpenter’s squares come in metal, plastic, or wood. Each material affects how long the tool lasts.
- Steel:Strong and lasts a long time. Good for heavy work.
- Aluminum:Lightweight but still durable. Easy to carry.
- Plastic:Cheap and light but breaks easily. Best for light jobs.
- Wood:Classic look but can warp with moisture.
Size Considerations
Choose a size that fits your projects. A bigger square is good for large work, smaller for detailed jobs.
- 6-inch squares:Easy to carry and good for small cuts.
- 12-inch squares:Versatile size for many tasks.
- 24-inch or larger:Best for framing and big wood pieces.

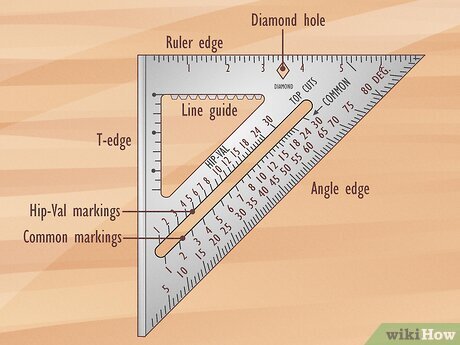
Credit: www.wikihow.com
Basic Handling Techniques
A carpenter’s square is a simple tool, but using it well helps make accurate cuts and marks. Learning how to hold and position the square is important for good results.
This guide explains two key handling techniques: proper grip and positioning, and aligning the square with workpieces.
Proper Grip And Positioning
Hold the carpenter’s square firmly to keep it steady while marking or measuring. Use your dominant hand to grip the handle or blade securely.
- Place your thumb on one side and fingers on the other side of the square’s handle or blade.
- Keep your wrist straight to avoid slipping or moving the square.
- Rest the corner of the square on the edge of the workpiece for a stable position.
- Apply gentle pressure to hold the square without bending it.
Aligning With Workpieces
Correct alignment ensures your lines are square and measurements are accurate. Use the edges and corners of the workpiece as guides.
| Alignment Step | What to Do | Tip |
|---|---|---|
| Place the square | Set the inside corner of the square at the edge of the workpiece | Make sure both arms touch the edges |
| Check the blade | Align the blade along the surface for marking or measuring | Keep it flush without gaps |
| Hold steady | Press the square firmly to avoid movement | Use your free hand to hold the workpiece if needed |
| Mark lines | Draw your pencil or marking tool along the blade edge | Keep your hand steady for a clean line |
Measuring And Marking Tips
A carpenter’s square is a handy tool for woodwork and construction. It helps measure angles and mark straight lines accurately. Using it right makes your projects fit better and look neater.
Below are key tips for accurate angle measurement, marking straight lines, and using the square for depth measurement.
Accurate Angle Measurement
Place the carpenter’s square firmly against the edge of your workpiece. Check that both arms of the square sit flat without gaps. This ensures the 90-degree angle is true before marking or cutting.
For angles other than 90 degrees, use the square as a guide with a protractor. Mark the angle lightly with a pencil, then double-check the line before cutting.
Marking Straight Lines
Use the carpenter’s square to draw straight lines by holding one arm against the wood edge. Run your pencil along the other arm to mark a clean, straight line.
- Keep the square steady to avoid slips.
- Use a sharp pencil for thin, clear lines.
- Mark lightly first, then darken the line if needed.
- Check the line with the square to confirm it is straight.
Using The Square For Depth Measurement
You can use the carpenter’s square to measure depth by placing one arm flat on the surface and measuring how far the other arm extends into a groove or hole.
| Method | How to Use |
| Flat Surface Check | Place one arm on surface; note depth on the other arm. |
| Groove Depth | Insert the arm into groove; measure from surface to bottom. |
| Step Height | Rest square on lower step; measure vertical distance to upper step. |

Credit: www.youtube.com
Ensuring Precision In Cuts
Using a carpenter’s square helps you make straight and accurate cuts. Precision is key to building strong and neat projects.
Taking time to check and adjust before cutting saves material and improves your work quality.
Checking Squareness Before Cutting
Make sure the carpenter’s square is perfectly aligned with the edge of your material. This ensures your cut will be at a true 90-degree angle.
Place the square firmly against the edge and look for any gaps. Even small gaps can cause inaccurate cuts.
- Hold the square tight against the material
- Look closely for gaps between the square and material
- Adjust the material until the square fits flush
Adjusting For Material Thickness
Thicker materials need careful marking to avoid cutting off the line. Use the carpenter’s square to measure the thickness and mark your cut line accurately.
Adjust your cutting tool slightly outside the line to allow for the blade width and material thickness.
- Measure the thickness with the square’s ruler
- Mark the cut line clearly on the material
- Plan your cut to avoid losing material or making the cut too small
Advanced Tricks For Complex Projects
Using a carpenter’s square can be simple for basic tasks. Complex projects need advanced tricks to get precise results. These tricks help you work faster and avoid mistakes.
This guide shows how to create compound angles, transfer measurements, and use the square for layouts in detailed projects.
Creating Compound Angles
Compound angles are two or more angles combined in one cut. Use the carpenter’s square to mark these angles accurately. Adjust the square by combining angle measurements.
First, mark one angle on your workpiece. Then rotate the square to mark the second angle. This helps you cut complex joints like hip rafters or stair stringers.
- Set the square for the first angle.
- Mark the line on your wood.
- Rotate the square to the second angle.
- Draw the second line intersecting the first.
- Cut along the combined lines.
Transferring Measurements
Transferring measurements ensures your cuts are exact. Use the carpenter’s square to copy measurements from one piece to another. This avoids guesswork and errors.
Place the square on the first piece and note the measurement on the ruler. Next, move the square to the second piece and mark the same length. This works well for matching cuts.
- Place the square on the reference piece.
- Align the ruler edge to the measurement point.
- Hold the square steady to prevent slipping.
- Move the square to the new piece.
- Mark the measurement exactly.
Using The Square For Layouts
The carpenter’s square helps create precise layouts. You can mark straight lines, squares, and even guide cuts for framing or cabinetry. This tool keeps your work neat and aligned.
Use the square’s edges to draw lines at right angles. You can also check if corners are square by placing the tool in the corner. Adjust your workpiece if the square does not fit perfectly.
- Place the square edge along the wood edge.
- Draw a straight line along the other arm.
- Check corners by fitting the square inside.
- Mark parallel lines using the ruler side.
- Use the square as a guide for saw cuts.
Maintaining Your Carpenter’s Square
A carpenter’s square is an important tool for accurate measurements and cuts. Keeping it in good shape helps you work better and faster.
Proper care extends the life of your square and keeps it reliable for every project.
Cleaning And Storage Tips
Keep your carpenter’s square clean to avoid rust and damage. Wipe it after each use with a dry cloth to remove dirt and moisture.
Store your square in a dry place, away from heavy tools that could bend or scratch it.
- Use a soft cloth for cleaning
- Apply light oil to metal parts to stop rust
- Keep it in a toolbox or hang it on a wall rack
- Avoid leaving it on wet surfaces
Checking For Wear And Calibration
Regularly check your carpenter’s square for signs of wear. Look for dents, bends, or worn edges that affect accuracy.
Test the square’s calibration by placing it against a known straight edge. The square should fit perfectly without gaps.
- Inspect edges for chips or bends
- Use a flat surface to test accuracy
- Replace the tool if it no longer measures correctly
- Keep a backup square for important tasks
Frequently Asked Questions
What Is The Main Purpose Of A Carpenter’s Square?
A carpenter’s square helps measure and mark precise right angles. It ensures accurate cuts and layouts in woodworking projects. It also aids in checking squareness and guiding saw cuts for better craftsmanship.
How Do You Use A Carpenter’s Square For Accurate Measurements?
Place the carpenter’s square firmly against the wood edge. Align the blade with your measurement mark. Use the square’s ruler to mark straight lines or check right angles for precise cutting and assembly.
Can A Carpenter’s Square Help In Marking Angles Other Than 90 Degrees?
Yes, many carpenter’s squares include angle markings. These help mark common angles like 45 degrees. This feature simplifies cutting and joining angled pieces accurately in woodworking.
How To Maintain And Care For A Carpenter’s Square?
Keep the square clean and dry to prevent rust. Store it in a protective case or toolbox. Regularly check for any damage or warping to maintain measurement accuracy.
Conclusion
Using a carpenter’s square makes your work accurate and neat. Follow the tips to measure and mark with confidence. Practice often to improve your skills and save time. Always check your square for damage before starting. Simple steps lead to better results in woodworking.
Keep your tools clean and ready for use. A good carpenter’s square helps create strong, precise projects. Try these tips to make your work easier and better.