Are you ready to give your room a stunning upgrade with crown molding but feel unsure about using a miter saw? You’re not alone.
Cutting perfect angles for crown molding can be tricky, but with the right approach, you can achieve professional-looking results right at home. In this guide, you’ll discover simple, step-by-step tips to master your miter saw and make clean, precise cuts every time.
By the end, you’ll have the confidence to tackle your molding project and transform your space with ease. Keep reading and unlock the secret to flawless crown molding cuts!
Credit: sawdustgirl.com
Choosing The Right Miter Saw
Using the correct miter saw is key for cutting crown molding accurately. The right saw makes your work easier and safer.
Focus on the type of saw and the blade you select. Both affect the quality of your cuts.
Types Of Miter Saws
There are three main types of miter saws to consider. Each offers different features for crown molding work.
- Standard Miter Saw:This saw only pivots left and right. It is good for simple angle cuts.
- Compound Miter Saw:It can tilt and pivot, allowing bevel and miter cuts. This is helpful for angled molding.
- Sliding Compound Miter Saw:This saw slides forward and backward. It cuts wider boards and is the most versatile.
Blade Selection For Crown Molding
Choosing the right blade improves cut quality and reduces damage to molding.
| Blade Type | Teeth Count | Best Use |
|---|---|---|
| Carbide-Tipped | 60-80 | Clean and smooth cuts on softwood and hardwood moldings |
| Fine-Tooth | 80-100 | Precise cuts with less tear-out on delicate crown molding |
| High-Speed Steel | 40-60 | Basic cuts but dulls faster; not recommended for fine molding |
Credit: ouraestheticabode.com
Preparing Your Workspace
Using a miter saw for crown molding needs a clean and safe workspace. Setting up properly helps you work better and avoid mistakes.
Take time to prepare your area before starting. This makes cutting and fitting easier and safer.
Setting Up A Stable Work Area
Find a flat, strong surface to place your miter saw. This keeps the saw steady while cutting.
Clear the area around the saw. Remove anything that can cause tripping or block your movement.
- Use a workbench or sturdy table
- Make sure the surface is level
- Keep enough space to hold long crown molding pieces
- Have good lighting so you see cuts clearly
- Organize tools nearby but out of the way
Safety Gear Essentials
Wear the right safety gear before using the miter saw. This protects you from dust and injury.
Always use safety glasses and hearing protection. Gloves help protect your hands but avoid loose ones that can catch in the saw.
- Safety glasses or goggles to protect your eyes
- Ear protection like earplugs or earmuffs
- Dust mask to avoid breathing sawdust
- Tight-fitting gloves for hand protection
- Wear closed-toe shoes to protect feet
Measuring Crown Molding Accurately
Measuring crown molding correctly is key to a clean and professional look. Accurate measurements help avoid waste and ensure the molding fits perfectly along your walls and ceilings.
Two important parts of measuring crown molding are taking wall angles and marking cut lines. Both steps need careful attention for the best results.
Taking Wall Angles
Wall angles are rarely exactly 90 degrees. Use a protractor or angle finder to measure the angle between the walls where the molding will go. This angle helps you set your miter saw correctly for precise cuts.
- Place the angle finder on the corner where walls meet.
- Read the measurement carefully and write it down.
- Check the angle at several points along the wall.
- Use the smallest angle measurement for your cuts.
Marking Cut Lines
Marking cut lines clearly on the molding helps you cut at the right spot. Use a pencil and a square to draw lines that match your measurements and angles.
| Tool | Purpose |
| Pencil | Mark cut lines on the molding |
| Combination Square | Draw straight, accurate lines |
| Measuring Tape | Measure length of molding pieces |
| Miter Saw | Cut molding at marked lines |
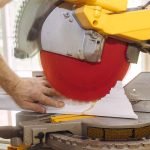
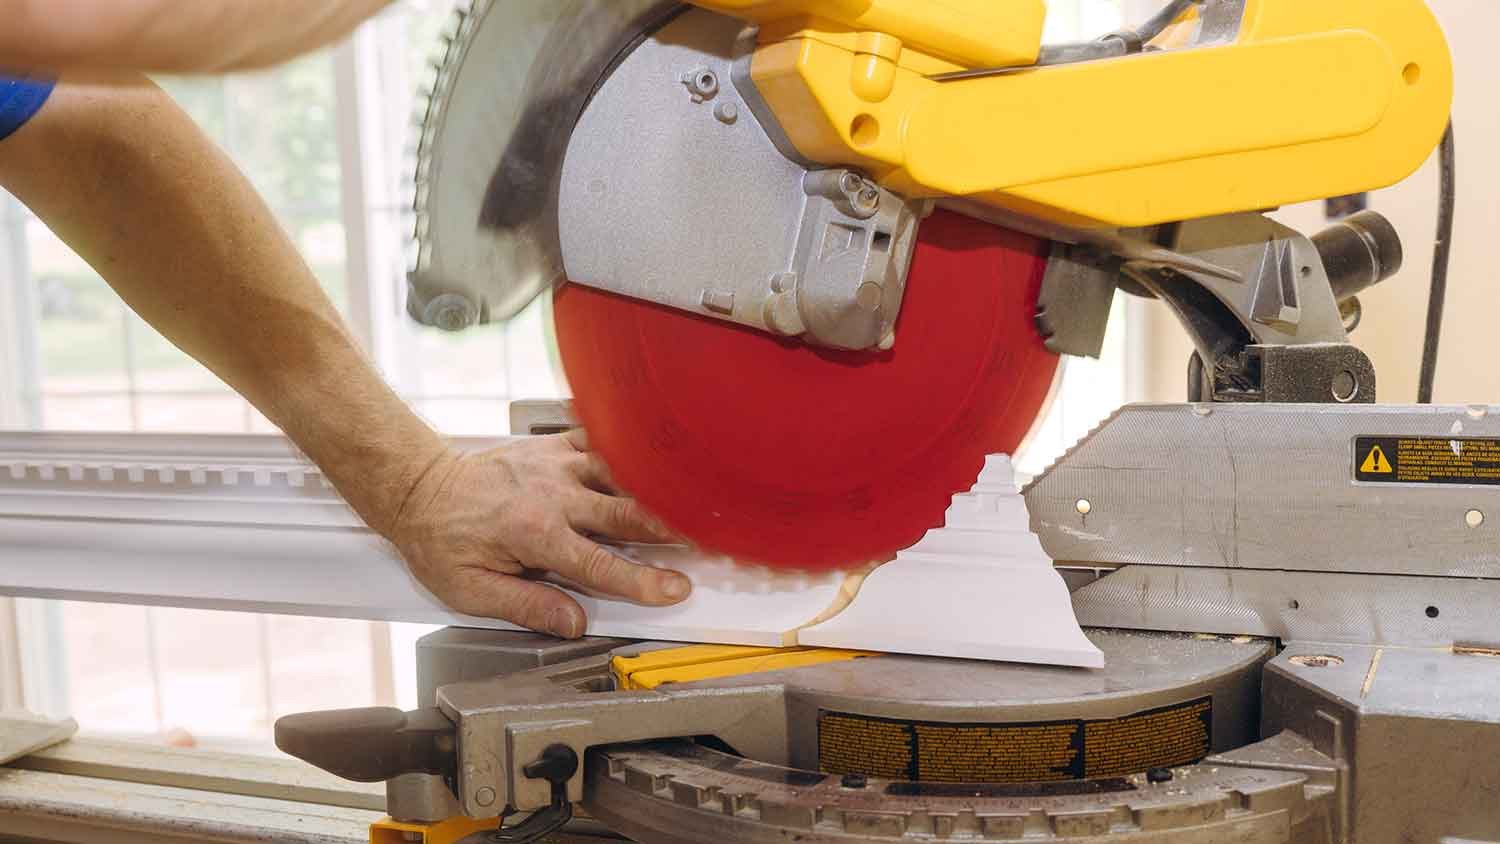
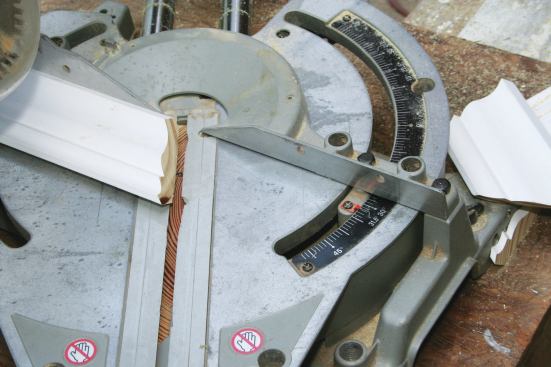
Positioning Crown Molding On The Saw
Cutting crown molding with a miter saw needs the right positioning. The molding shape makes it tricky to place on the saw.
This guide explains two key points: how to set up the molding face-up or face-down, and how to secure it for safe, accurate cuts.
Face-up Vs. Face-down Setup
There are two ways to place crown molding on a miter saw. You can cut with the molding face-up or face-down. Both methods work but have different results and challenges.
- Face-Up Setup:The front of the molding faces up, allowing you to see the cut line clearly.
- Face-Down Setup:The front of the molding faces down against the saw fence, which matches how the molding sits on the wall.
Face-up cuts show the exact line but may cause tear-out on the front edge. Face-down cuts reduce tear-out on the visible side but require careful measurement to avoid errors.
Securing The Molding
Hold the molding firmly to avoid movement during cutting. Loose molding leads to bad cuts and can be dangerous.
| Method | Description | Tip |
| Clamps | Use clamps to hold the molding tight against the saw fence and base. | Use padded clamps to avoid marking the molding. |
| Hands | Hold the molding firmly with your hand if no clamp is available. | Keep fingers away from the blade path. |
| Support Blocks | Place small blocks beside the molding for extra support and stability. | Ensure blocks do not interfere with the blade. |
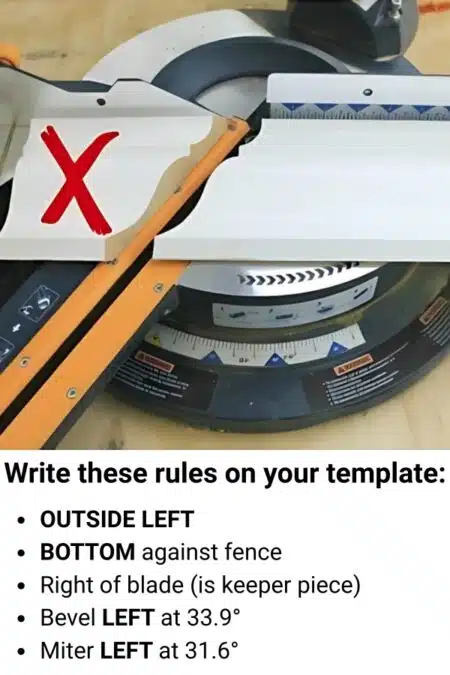
Cutting Inside And Outside Corners
Cutting crown molding needs careful angle work. Inside and outside corners need different cuts.
Using a miter saw helps make clean, accurate cuts for these corners. This guide explains the basics.
Adjusting Miter And Bevel Angles
The miter saw has two main angle settings: miter and bevel. These control the horizontal and vertical tilt.
For crown molding, adjust these angles to fit the corner type. Inside corners and outside corners need different setups.
- Miter angle moves the saw left or right.
- Bevel angle tilts the blade to the left or right.
- Correct angles create tight, clean joints.
Common Angle Settings
Most crown molding uses a 38-degree spring angle. This affects the miter and bevel settings on the saw.
| Corner Type | Miter Angle | Bevel Angle |
|---|---|---|
| Inside Corner | 31.6° | 33.9° |
| Outside Corner | 31.6° | 33.9° |
Set these angles on your miter saw for accurate cuts. Always test on scrap pieces first.
Handling Complex Cuts And Joints
Cutting crown molding with a miter saw can be tricky. The angles and joints need careful attention for a good fit.
Understanding complex cuts helps you create clean, tight corners on your molding projects.
Coping Techniques
Coping is a way to join molding pieces at inside corners. It hides gaps caused by uneven walls or cuts.
To cope, cut one piece square and the other with a coping saw to fit its profile. This creates a neat joint.
- Cut the first molding at a 90-degree angle
- Trace the profile of the first piece onto the second
- Use a coping saw to cut along the traced line
- Test fit and adjust the coping cut if needed
Dealing With Irregular Walls
Walls are rarely perfectly straight or square. This affects how crown molding fits and joins.
Use a flexible approach. Measure angles with a protractor or angle finder to adjust your miter saw settings.
- Check wall corners for squareness before cutting
- Adjust the miter saw angle based on your measurements
- Cut slightly longer pieces to trim for a perfect fit
- Use caulk to fill small gaps after installation
Finishing Touches
After cutting crown molding with a miter saw, the final steps make a big difference. These steps help the molding look smooth and fit well on walls and ceilings.
Finishing touches include sanding edges and fitting the pieces carefully. These small actions improve the overall look of your work.
Sanding And Smoothing Edges
Use sandpaper to smooth any rough cuts on the molding edges. This will help the pieces join tightly and look clean.
Lightly sand the cut edges with fine-grit sandpaper. Check for splinters or uneven spots and remove them.
- Sand both the front and back edges
- Use a sanding block for even pressure
- Wear a mask to avoid dust inhalation
- Wipe dust off with a dry cloth before fitting
Fitting And Installation Tips
Test fit each piece of molding before nailing it to the wall. Make small adjustments if needed to get tight corners.
Use a level and measuring tape to keep the molding straight and even. Secure pieces firmly to avoid gaps.
- Apply wood glue on mitered edges for a stronger bond
- Use finishing nails or a nail gun to attach molding
- Fill nail holes with wood filler for a smooth finish
- Caulk gaps between molding and wall for a clean look
Troubleshooting Common Issues
Using a miter saw for crown molding can sometimes cause problems. These issues affect the fit and look of your molding.
Knowing how to fix common problems helps you get better results. This guide covers two key issues and how to solve them.
Fixing Gaps And Misalignments
Gaps and misalignments happen when cuts are not accurate or angles are off. This can make the molding look uneven.
Check the angles carefully before cutting. Use a protractor or angle finder to confirm your settings. Also, clamp the molding tightly to avoid movement.
- Measure twice and cut once to reduce mistakes.
- Use painter’s tape to hold pieces together and check fit.
- Sand edges slightly if cuts are too tight.
- Fill small gaps with wood filler or caulk for a smooth finish.
Blade Dullness And Maintenance
A dull blade can cause rough cuts and splintering on crown molding. It also puts more strain on the saw motor.
Keep the blade clean and sharp for the best results. Replace or sharpen the blade if you notice burn marks or uneven cuts.
- Clean resin and pitch from the blade regularly.
- Use a blade designed for fine woodworking and crown molding.
- Check blade teeth for damage and replace if needed.
- Lubricate moving parts of the saw to keep it working smoothly.
Credit: www.jlconline.com
Frequently Asked Questions
What Is A Miter Saw Used For In Crown Molding?
A miter saw is essential for cutting precise angles. It ensures crown molding fits perfectly at corners. This tool allows for accurate bevel and miter cuts, crucial for seamless joints. Its adjustable features make it versatile for various molding projects.
How Do You Set Up A Miter Saw?
First, ensure the saw is on a stable surface. Adjust the angle settings for your desired cut. Secure the crown molding firmly. Always check the blade for sharpness. Proper setup ensures safety and accuracy in your cutting tasks.
What Angle Should A Miter Saw Be For Crown Molding?
Typically, set the miter angle to 45 degrees. Adjust the bevel angle to 30 degrees. These angles suit standard crown molding installations. Always check your molding specifications for exact angles. Precision in angle settings is crucial for perfect fits.
Can Beginners Use A Miter Saw For Crown Molding?
Yes, beginners can use a miter saw with practice. Start with simple cuts and gradually move to complex angles. Always follow safety guidelines and use protective gear. Watching tutorials can also help in understanding the process better.
Conclusion
Using a miter saw for crown molding takes practice and patience. Follow the steps carefully and measure twice before cutting. Take your time to set the angles right. Clean cuts make the molding fit perfectly. Safety matters—always wear goggles and keep hands clear.
With steady hands and focus, your project will look great. Keep practicing to improve your skills. Soon, you’ll enjoy adding a beautiful touch to your home. Crown molding adds style and value. Enjoy the process and the results.