
If you’re planning to use a power sander, safety should be your top priority. These tools can make your work faster and smoother, but they can also cause serious injuries if not handled correctly.
Imagine finishing your project without any accidents or setbacks—that’s exactly what you want. You’ll learn simple, practical tips to keep yourself safe while getting the best results from your power sander. Keep reading, and you’ll discover how a few easy steps can protect you and make your sanding job easier than ever.
Credit: www.familyhandyman.com
Choosing The Right Power Sander
Using a power sander makes woodwork and repairs faster. Picking the right sander helps you work safely and get good results.
There are different types of power sanders. Each one fits certain jobs better than others. Knowing the right sandpaper grit also affects your work.
Types Of Power Sanders
Power sanders come in several types. Each type is designed for a specific task or surface. Choosing the right type helps avoid damage and keeps you safe.
- Orbital Sander:Moves in small circles. Good for fine finishing and small areas.
- Belt Sander:Uses a continuous loop of sandpaper. Best for removing a lot of material fast.
- Detail Sander:Has a small triangular pad. Ideal for tight corners and detailed work.
- Random Orbital Sander:Combines spinning and orbital motion. Gives smooth finishes without swirl marks.
Selecting The Correct Sandpaper Grit
Sandpaper comes in many grits. The grit number shows how rough or smooth the paper is. Picking the right grit keeps the surface safe and smooth.
| Grit Number | Use |
| 40-60 | Remove old paint or rough wood |
| 80-120 | Smooth wood before finishing |
| 150-180 | Final sanding for smooth surfaces |
| 220+ | Fine sanding between finish coats |
Preparing Your Workspace
Setting up your workspace right makes sanding safer and easier. Clear space helps you move freely. A well-ventilated area keeps air clean.
Before you start, make sure everything is ready. This lowers risks and improves your work quality.
Clearing And Securing The Area
Remove items that can block your work or cause accidents. Keep cords and tools organized to avoid trips and falls.
- Clear loose objects from the floor and workbench
- Secure or roll up electrical cords
- Keep pets and children away from the area
- Place a drop cloth to catch dust and debris
- Check that your sander’s power cord is undamaged
Ensuring Proper Ventilation
Good airflow reduces dust and fumes. It protects your lungs and keeps the workspace fresh.
| Ventilation Method | Details |
| Open Windows | Allow fresh air to enter and dust to exit |
| Use Fans | Direct airflow away from your breathing zone |
| Wear a Dust Mask | Protect your lungs from fine particles |
Personal Safety Gear
Using a power sander can create dust and noise that harm your body. Wearing the right safety gear protects you from injury.
This guide covers essential gear to keep your eyes, ears, lungs, and hands safe.
Eye And Ear Protection
Eye protection stops dust and debris from hurting your eyes. Ear protection reduces loud noise that can damage hearing.
- Wear safety goggles that fit snugly around your eyes.
- Use earplugs or earmuffs to block out noise.
- Choose gear approved for construction or industrial use.
- Replace worn or damaged protection immediately.
Using Dust Masks And Gloves
Dust masks help you breathe safely by filtering harmful particles. Gloves protect your hands from splinters and vibration.
| Safety Gear | Purpose | Tips |
|---|---|---|
| Dust Mask | Filters dust and fine particles | Choose N95 or better for sanding |
| Gloves | Protects skin and reduces vibration | Use snug-fitting, durable gloves |
Setting Up The Power Sander
Using a power sander safely starts with proper setup. This helps you work better and avoid accidents.
Before sanding, check the tool and attach the sandpaper correctly. These steps make the sander ready for use.
Inspecting The Tool Before Use
Look over the power sander carefully before turning it on. Make sure it is in good shape and safe to use.
- Check the power cord for cuts or damage.
- Make sure the plug fits tightly in the outlet.
- Look for cracks or breaks in the sander body.
- Test the switch to see if it turns on and off smoothly.
- Listen for any unusual sounds when the tool runs briefly.
Attaching Sandpaper Correctly
Attach the sandpaper firmly to avoid slipping and ensure even sanding. Follow the tool’s instructions for your sander type.
| Type of Sander | Sandpaper Attachment Method |
| Orbital Sander | Use hook-and-loop backing to press sandpaper onto the pad |
| Belt Sander | Slide the sanding belt onto the rollers and tighten the tension lever |
| Detail Sander | Clamp the sandpaper edges under the clips on the sanding pad |
Safe Sanding Techniques
Using a power sander can make your woodworking faster and smoother. Safety is important to avoid accidents and get the best results.
Follow these simple techniques to hold, control, and move your sander safely and effectively.
Holding The Sander Properly
Hold the sander with both hands to keep it steady. Use a firm but relaxed grip to control the tool. Keep your fingers away from the sanding pad to avoid injury.
- Place one hand on the front handle for guidance
- Hold the main body with your other hand for balance
- Keep your wrists straight to reduce fatigue
- Stand with feet shoulder-width apart for stability
Controlling Speed And Pressure
Adjust the speed of the sander based on the material you are working on. Use light pressure to avoid damaging the surface or the sanding pad.
| Material | Recommended Speed | Pressure |
|---|---|---|
| Softwood | Medium | Light |
| Hardwood | Low to Medium | Medium |
| Metal | Low | Light |
| Painted Surfaces | Low | Light |
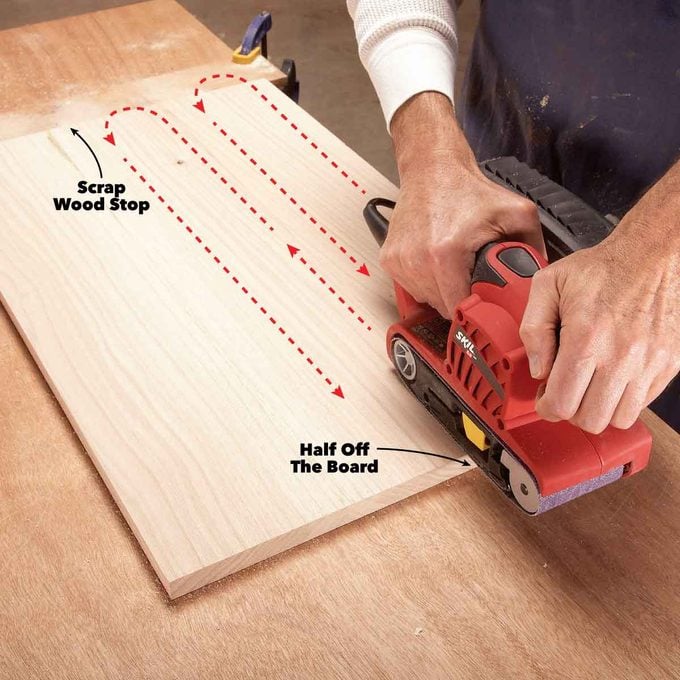
Sanding In The Right Direction
Sanding with the grain helps avoid scratches and rough patches. Move the sander evenly and smoothly in straight lines. Avoid staying too long in one spot to prevent gouges.
- Identify the grain direction before sanding
- Move the sander along the grain, not across it
- Keep the sander flat on the surface
- Overlap each pass slightly for even sanding

Credit: www.youtube.com
Avoiding Common Mistakes
Using a power sander can save time and effort on projects. Avoiding mistakes keeps you safe and protects your work.
Learn how to prevent common problems like overheating and surface damage. Follow these tips for better results.
Preventing Overheating
Overheating can damage the sander and cause burns. Keep the tool cool by using it correctly and checking it often.
- Use the right sanding pad for the material.
- Do not press too hard; let the sander do the work.
- Take breaks every few minutes to allow cooling.
- Keep vents and fans clean and clear.
- Unplug the sander if it feels hot or smells burned.
Avoiding Damage To Surfaces
Surface damage can ruin your project and waste materials. Sand carefully to keep surfaces smooth and even.
| Common Mistake | How to Avoid |
| Using too coarse sandpaper | Start with fine grit and move to coarser if needed |
| Holding the sander in one spot | Keep it moving in steady, even strokes |
| Skipping surface cleaning | Remove dust and debris before sanding |
| Applying uneven pressure | Use light, consistent pressure across the surface |
Cleaning And Maintenance
Keeping your power sander clean helps it last longer. Proper care prevents damage and maintains performance.
Regular cleaning and safe storage reduce wear and keep the tool ready for use.
Removing Dust And Debris
Dust and debris build up during sanding. Removing them prevents clogging and motor strain.
- Unplug the sander before cleaning.
- Use a soft brush to remove dust from vents and surfaces.
- Wipe the body with a dry or slightly damp cloth.
- Check and clean or replace sanding pads as needed.
- Empty or clean the dust collection bag or container.
Storing The Sander Safely
Proper storage protects your sander from damage and dust. It also keeps cords safe and untangled.
| Storage Tip | Reason |
| Keep in a dry place | Prevents rust and electrical issues |
| Wrap the cord loosely | Avoids cord damage and tangles |
| Store in a case or box | Protects from dust and impacts |
| Keep away from children | Ensures safety |

Credit: www.boschtools.com
Frequently Asked Questions
How Do I Prepare A Power Sander For Use?
Before use, check the sander’s power cord and dust bag. Attach the correct sandpaper grit securely. Wear safety gear like goggles and a mask. Ensure the work surface is clean and stable for best results.
What Safety Gear Is Essential When Sanding?
Always wear safety goggles to protect your eyes from dust. Use a dust mask to avoid inhaling particles. Hearing protection is important for loud sanders. Gloves can protect your hands from vibration and abrasion.
How Do I Maintain Control While Using A Power Sander?
Hold the sander firmly with both hands. Keep the sander flat against the surface. Move it steadily without pressing too hard. Avoid sudden jerks to prevent uneven sanding and tool damage.
How Can I Reduce Dust While Sanding?
Attach a vacuum or dust collection bag to your sander. Work in a well-ventilated area. Use sanding sheets designed to minimize dust. Regularly empty the dust bag to maintain efficiency.
Conclusion
Using a power sander safely is crucial for any project. Start by wearing protective gear like goggles and gloves. Always read the instruction manual carefully. Secure your workpiece before sanding. Keep your hands away from the moving parts. Regularly check the sander for any damage.
Disconnect the tool when not in use. Practice these safety tips to avoid accidents. A safe approach ensures smooth, efficient sanding. Remember, safety first leads to better results. So, stay focused and cautious. Happy sanding!
