
Measuring things accurately might seem simple, but even a small mistake can cause big problems. Whether you’re building furniture, hanging pictures, or working on a DIY project, using a tape measure correctly is key to getting it right the first time.
You’ll discover easy tips and tricks to master your tape measure. By the end, you’ll feel confident measuring like a pro and avoid costly errors. Ready to improve your skills and save time? Let’s dive in!
Choosing The Right Tape Measure
Using a tape measure correctly starts with choosing the right one. Different tasks need different tape measures. Picking the right tape helps you get accurate measurements every time.
This guide explains what to look for in tape measures. Learn about types, length, width, and material for the best choice.
Types Of Tape Measures
There are several types of tape measures. Each type suits different jobs. Some are made for small tasks, others for large projects.
- Steel Tape:Strong and good for long measurements.
- Cloth Tape:Flexible and useful for curved surfaces.
- Fiberglass Tape:Durable and resists stretching.
- Digital Tape:Shows measurements on a screen for easy reading.
Tape Length And Width
Choose tape length based on your project size. Longer tapes suit big jobs. Shorter tapes work well for small tasks. Tape width affects how easy it is to read.
| Length | Best Use | Width | Reason |
| 12-16 feet | Indoor projects | 1/2 inch | Compact and easy to carry |
| 25 feet | Most general use | 3/4 inch | Good balance of length and readability |
| 50-100 feet | Large outdoor jobs | 1 inch or more | Stiff tape that does not bend easily |
Material And Durability
Material affects how long your tape measure lasts. It also affects how easy it is to use in different conditions.
Materials common in tape measures:
- Steel: Very strong but can rust if not protected.
- Fiberglass: Does not rust and is good for wet areas.
- Plastic-coated steel: Protects the steel and lasts longer.
- Cloth: Flexible but can wear out quickly.
Choose a tape with a sturdy case to protect the tape inside. Look for features like a locking mechanism to hold the tape in place during use.
Credit: www.acservicetech.com
Preparing For Measurement
Using a tape measure correctly starts with good preparation. Taking time to prepare helps you get accurate results.
Before measuring, make sure the area is ready and you know how to position the tape. Avoid mistakes to save time.
Clearing The Measuring Surface
Clear the surface where you will measure. Remove objects and debris that can block the tape or cause errors.
A clean surface helps the tape lie flat and gives a true length reading.
Positioning The Tape Correctly
Place the tape measure firmly at the start point. Make sure the tape runs straight along the object or area you measure.
- Hook the metal end securely on one edge.
- Keep the tape flat without bends or twists.
- Hold the tape tight to avoid slack.
- Read the measurement at eye level.
Avoiding Common Mistakes
| Common Mistake | How to Avoid |
| Starting from the wrong edge | Check the tape’s zero mark before measuring |
| Tape not straight | Pull tape tight and keep it flat |
| Not reading at eye level | Align your eyes with the tape mark |
| Measuring over obstacles | Clear the surface first |
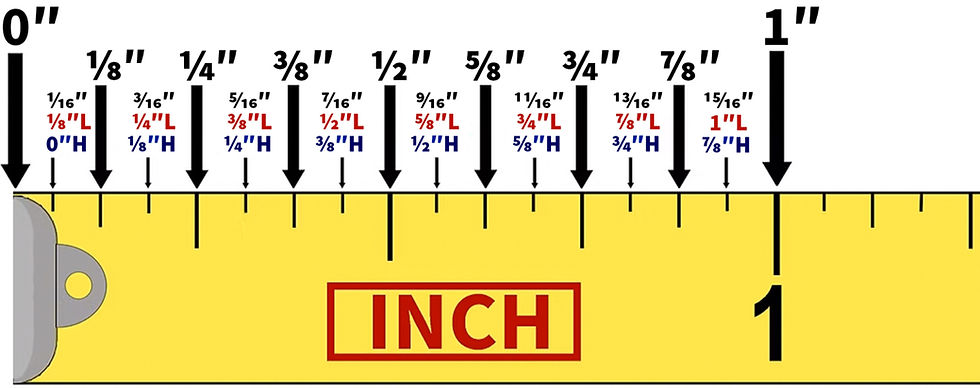
Reading The Tape Measure
A tape measure is a simple tool that helps you get exact lengths. Knowing how to read it well is key for good measurements.
This guide explains the marks on the tape and how to use both inches and centimeters. You will also learn about reading small fraction lines.
Understanding Measurement Marks
The tape measure has many lines and numbers. Each line shows a length, but some lines are longer or shorter.
Long lines usually mean full inches or centimeters. Shorter lines show smaller parts of those units.
- Longest lines mark whole numbers like 1 inch or 1 cm
- Medium lines show half or quarter units
- Shortest lines mark smaller fractions or millimeters
Using Both Imperial And Metric Units
Some tape measures show inches on one side and centimeters on the other. This helps in projects using different units.
Inches are divided into fractions. Centimeters are split into millimeters, which are smaller parts of a centimeter.
| Unit | Division | Example |
|---|---|---|
| Inch | 1/2, 1/4, 1/8, 1/16 | 1/4 inch |
| Centimeter | 10 millimeters | 5 mm |
Identifying Fractional Increments
Inches are often split into fractions to help measure small distances. Each fraction line has a different length.
Knowing these fractions helps you read the tape measure correctly and get exact numbers.
- Half inch is the longest mark after the inch mark
- Quarter inch marks are shorter than half inch marks
- Eighth and sixteenth inch marks are the shortest lines

Credit: learn.reeb.com
Techniques For Accurate Measuring
Using a tape measure correctly helps you get exact sizes. This guide shows easy ways to measure with a tape measure.
Follow these tips to avoid mistakes and get the best results every time you measure.
Measuring Straight Lines
Keep the tape measure flat and tight along the line you want to measure. Start at zero on the tape for the most accurate length.
Hold the tape at one end and stretch it straight to the other end without bends or slack. Read the number where the tape ends.
Handling Curves And Irregular Shapes
For curves, bend the tape gently to follow the shape. Do not twist the tape, or it may give a wrong reading.
Use a flexible tape measure made of cloth or soft plastic for better results on curves and odd shapes.
- Hold the tape firmly on one end
- Bend it smoothly along the curve
- Keep the tape flat on the surface
- Note the measurement where the tape ends
Measuring Inside And Outside Dimensions
Use the tape’s end hook for outside measurements. The hook catches the edge for a secure hold.
For inside measurements, press the tape’s end flat against one side. Stretch it across to the opposite side and read the number.
- Outside: Hook tape on the edge, pull tight
- Inside: Press tape flat inside space, stretch across
- Keep tape straight for accurate results
Using The Tape Measure In Different Scenarios
A tape measure is a simple tool that helps you get exact lengths and widths. You can use it in many jobs around your home or work.
This guide shows how to use a tape measure for carpentry, sewing, and home improvement. Each task needs a careful approach to get the best results.
Measuring For Carpentry
In carpentry, accuracy is key. Use the tape measure to mark wood before cutting or joining pieces. Keep the tape flat and tight against the surface to avoid errors.
- Lock the tape to hold the length steady.
- Measure twice before cutting to avoid mistakes.
- Use the tape’s end hook to catch edges.
- Check measurements at eye level for accuracy.
- Record measurements immediately to prevent forgetting.
Measuring For Sewing And Fabric
For sewing, use a soft tape measure that can bend easily around curves. Measure fabric carefully to cut the right size pieces for your project.
| Measurement Type | Tip |
| Waist | Keep tape snug but not tight |
| Length | Measure from shoulder to desired hem |
| Chest | Measure around fullest part |
| Seam Allowance | Add extra fabric for sewing |
Measuring For Home Improvement
Use a tape measure to size rooms, furniture, and fixtures. Make sure to measure in straight lines and note both width and height.
- Start from a fixed point like a wall corner.
- Keep the tape level for floor or wall measurements.
- Use a helper for long distances to hold the tape.
- Mark measurements clearly on your plan.
- Double-check measurements before buying materials.
Maintaining Your Tape Measure
Keeping your tape measure in good shape helps you get accurate measurements every time. Simple care and checks can extend its life.
Learn how to clean, store, check, and know when to replace your tape measure below.
Cleaning And Storage Tips
Cleaning your tape measure removes dirt and dust that can affect accuracy. Store it properly to avoid damage and rust.
- Wipe the blade with a dry cloth after use
- Use a soft cloth dampened with mild soap to clean sticky dirt
- Dry the blade fully before retracting it
- Keep the tape in a dry place to avoid rust
- Avoid bending or forcing the tape when storing
Checking For Wear And Tear
Regularly inspect your tape measure for damage. Wear and tear can cause wrong readings and unsafe use.
| Part | Signs of Wear | Action Needed |
| Blade | Faded numbers, bends, rust | Clean, straighten, or replace |
| Hook | Loose, bent, missing | Tighten or replace |
| Case | Cracks, broken lock | Repair or replace |
When To Replace Your Tape
Knowing when to replace your tape measure ensures safety and accuracy. Use a new tape if damage affects its function.
- The blade no longer retracts smoothly or gets stuck
- Measurement numbers are hard to read or missing
- The hook is broken or does not catch properly
- The case is severely cracked or the lock does not work
- Rust or corrosion covers large parts of the tape
Advanced Tips From Experts
Using a tape measure correctly helps you get precise results. Experts share tips that improve your measuring skills.
These tips focus on small details that make a big difference. Follow them to avoid common mistakes.
Using The Hook Correctly
The metal hook at the tape’s end is important for accuracy. It can move slightly to allow inside or outside measurements.
Make sure the hook grabs the edge or slides against the surface properly. This prevents errors in your measurement.
- For outside measurements, hook it firmly on the edge.
- For inside measurements, press the hook against the surface.
- Check that the hook moves slightly but stays flush.
Locking The Tape For Stability
Lock the tape to keep it from retracting while you measure. This helps maintain the exact length without slipping.
Use the tape lock button or switch to hold the tape steady. This is useful for long or tricky measurements.
- Pull the tape out to the needed length.
- Press the lock button firmly.
- Make sure the tape stays tight and does not sag.
Double Checking Measurements
Always measure twice to avoid mistakes. This simple step saves time and materials.
After the first measurement, repeat it from the same points. Compare both results for consistency.
- Mark your start and end points clearly.
- Measure once and write down the number.
- Measure again and check if both numbers match.
- If numbers differ, measure a third time.

Credit: www.youtube.com
Frequently Asked Questions
How Do I Read A Tape Measure Accurately?
To read a tape measure accurately, align the tape’s end with the object’s edge. Note the closest measurement marking. Use the smallest divisions for precise readings. Always keep the tape flat and straight to avoid errors.
What Tips Ensure Precise Tape Measure Use?
To ensure precision, hold the tape measure firmly and keep it taut. Avoid bending or twisting the tape. Use the hook at the tape’s end properly to anchor it. Double-check measurements before marking or cutting.
How Do I Measure Inside Corners With A Tape?
For inside corners, place the tape measure’s end at one corner. Extend it along the adjoining wall until you reach the desired point. Keep the tape straight to avoid inaccuracies. Use the measurement to mark or cut materials accurately.
Can I Trust Tape Measure Markings For Small Projects?
Yes, tape measure markings are reliable for small projects. Choose a tape with clear, easy-to-read increments. For extra precision, use a tape with metric and imperial units. Always verify measurements twice to prevent mistakes.
Conclusion
Using a tape measure accurately is simple with practice. Start by holding it steady. Ensure you read the numbers carefully. Remember, patience helps. With time, measuring becomes second nature. Always double-check your measurements. Mistakes can be costly. Use these tips to improve your skills.
Accurate measurements save time and resources. Keep your tape measure handy for all projects. It’s a valuable tool for any task. Happy measuring!
