Are you gearing up to tackle a roof construction project but feeling a bit overwhelmed by the intricacies of measuring angles? You’re not alone.
Accurate angle measurement is crucial to ensuring your roof is strong, safe, and aesthetically pleasing. But don’t worry; mastering this skill is entirely within your reach. You’ll discover practical and straightforward tips to help you measure angles like a pro.
With these insights, you can build a roof that stands the test of time and gain confidence in your construction skills. Stick around to learn techniques that could save you time, effort, and avoid costly mistakes. Ready to transform your roofing project from daunting to doable? Let’s dive in!

Credit: www.reddit.com
Essential Tools For Angle Measurement
Measuring angles correctly is very important in roof construction. Accurate angles help make strong and safe roofs.
Several tools can help measure angles. These tools make the work easier and more precise.
Types Of Protractors
Protractors are simple tools for measuring angles. They come in different types for various uses.
A basic protractor is a flat, semicircular tool marked with degrees from 0 to 180. It helps measure angles by aligning it with the roof edges.
- Plastic protractors are lightweight and affordable.
- Metal protractors are more durable for construction sites.
- Adjustable protractors can lock angles for repeated use.
Using A Speed Square
A speed square is a triangular tool used to mark and measure angles quickly. It is very popular among roof builders.
It has angle markings from 0 to 90 degrees. You place it on the roof frame and read the angle directly. It also helps draw straight lines.
- Hold the speed square against the edge of the board.
- Read the angle on the degree scale.
- Use it to mark cut lines for rafters and braces.
Digital Angle Finders
Digital angle finders show angles on a small screen. They are easy to read and very accurate.
These tools often have magnets to hold them on metal surfaces. They can measure angles between two surfaces fast and clearly.
- Turn on the device and place it on the surface.
- Read the angle shown on the digital display.
- Use the hold function to keep the measurement.

Credit: www.wikihow.com
Preparing The Roof Frame
Measuring angles correctly is important for building a strong roof. A well-prepared roof frame makes angle measurement easier and more accurate.
Start with a solid foundation. This helps avoid mistakes and saves time during construction.
Marking Reference Points
Mark key points on the roof frame before measuring angles. These points guide your measurements and cuts.
Use a pencil or chalk to mark where rafters and beams meet. Clear marks help keep measurements consistent.
- Mark ridge board ends
- Mark rafter positions
- Mark wall plates
Setting Base Lines
Draw base lines on the frame to use as measuring guides. These lines form the basis for angle calculations.
Use a chalk line or straightedge to make base lines. Align lines with reference points for accuracy.
- Draw horizontal lines along the wall plates
- Draw vertical lines at rafter positions
- Check lines for straightness before measuring
Ensuring Level Surfaces
Make sure the roof frame is level before measuring angles. Level surfaces give correct angle readings.
Use a spirit level or laser level to check the frame. Adjust any uneven parts to avoid errors.
- Check wall plates for level
- Level ridge board if possible
- Fix any sagging or tilted sections
Techniques To Measure Roof Angles
Measuring roof angles is important for building a strong roof. Accurate angles help ensure the roof fits well.
There are simple ways to measure roof angles using tools and math. These techniques help builders get the right slope.
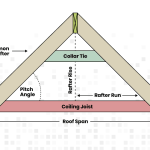
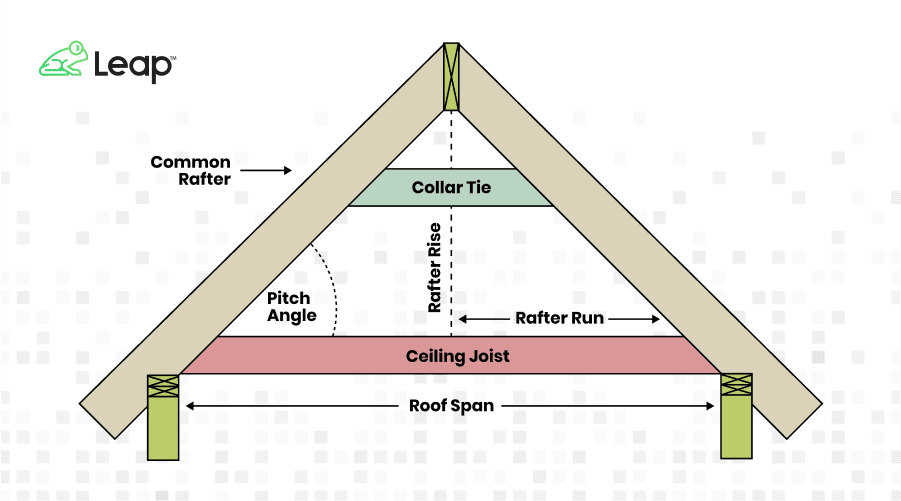
Measuring Pitch With A Level
Use a level to find the roof pitch easily. Place the level on the roof surface and check the bubble.
Measure the vertical rise over a 12-inch horizontal run. This gives the pitch as a ratio or fraction.
- Place the level flat on the roof
- Hold a ruler or tape at the end of the level
- Measure the height the roof rises in 12 inches
- Write the rise over run as pitch (e.g., 4/12)
Calculating Roof Slope
Roof slope shows how steep the roof is. It is the angle the roof makes with the horizontal ground.
To find slope, divide the roof rise by the roof run. Multiply by 100 to get a percentage slope.
- Measure vertical rise of the roof
- Measure horizontal run of the roof
- Divide rise by run (rise ÷ run)
- Multiply result by 100 for slope percentage
Using Trigonometry In Angle Measurement
Trigonometry helps find exact roof angles using math. You need to measure the roof’s rise and run first.
Use the tangent function: angle = arctangent(rise ÷ run). This gives the roof angle in degrees.
- Measure the vertical rise of the roof
- Measure the horizontal run of the roof
- Divide rise by run (rise ÷ run)
- Use a calculator to find arctangent of the result
- Read the angle in degrees for the roof pitch
Common Mistakes To Avoid
Measuring angles for roof construction needs care and precision. Mistakes can cause problems in the building process.
Knowing common errors helps you avoid them. This guide covers what to watch out for during angle measurement.
Incorrect Tool Usage
Using the wrong tools or using tools incorrectly can lead to wrong angle measurements. Always use tools made for roofing angles.
- Do not use a standard protractor if it cannot measure the needed angle size.
- Avoid using damaged or worn-out tools.
- Check if your angle finder or digital tool is calibrated before use.
- Do not guess measurements; always rely on the tool’s reading.
Ignoring Safety Precautions
Roof work is risky. Ignoring safety can cause injuries or mistakes in measurements due to accidents.
- Always wear a safety harness and non-slip shoes.
- Do not work alone on the roof.
- Secure your tools to prevent dropping them.
- Check weather conditions before starting work.
- Use ladders and scaffolds properly to reach measurement points.
Misreading Angle Measurements
Misreading angles can happen if you do not read tools carefully or confuse units. This causes errors in the roof’s shape.
| Common Error | How to Avoid |
| Reading degrees instead of radians | Know the units your tool shows and convert if needed |
| Mixing up inside and outside angles | Mark the angle sides clearly before measuring |
| Not aligning the tool properly | Place the tool flat and level before reading |
| Ignoring tool zero point | Reset or calibrate the tool to zero before use |
Tips For Accurate Measurement
Measuring angles correctly is key in roof construction. Accurate angles help create a strong and safe roof.
This guide shares tips to improve your angle measuring skills for better results.
Double-checking Angles
Always check your measurements more than once. Measuring twice can catch mistakes early and save time.
Use two different tools or methods to verify the angle. This ensures your readings are correct before cutting or fixing.
Using Templates And Jigs
Templates and jigs help keep your angle measurements consistent. They act as guides for repeated cuts.
- Create or buy templates for common roof angles.
- Use jigs to hold tools steady during measurement.
- Label templates clearly for easy identification on site.
- Store templates carefully to avoid damage or warping.
Regular Tool Calibration
Tools can lose accuracy over time. Regular calibration ensures your tools measure angles correctly.
| Tool | Calibration Frequency | Calibration Method |
| Protractor | Monthly | Check with a known angle standard |
| Speed Square | Every 3 months | Compare against a digital angle finder |
| Digital Angle Finder | Before each use | Reset on a flat surface |
Advanced Tools And Technology
Measuring angles accurately is important in roof construction. New tools and technology help make this task easier and more precise. They save time and reduce errors.
This guide covers three advanced tools: laser measuring devices, mobile apps for roof angles, and 3D modeling software. Each tool brings unique benefits to the job.
Laser Measuring Devices
Laser measuring devices send a laser beam to measure distances and angles quickly. They give accurate readings that help with roof slope and pitch calculations.
- Easy to use with one hand
- Works well in bright or low light
- Reduces the need for manual calculations
- Can measure long distances accurately
- Some models record and save data
Mobile Apps For Roof Angles
Mobile apps use your phone’s sensors to measure roof angles. They are handy and do not require extra tools. Many apps also include calculators for roof area and materials.
| Feature | Benefit |
| Angle measurement | Quick and easy readings |
| Pitch calculator | Helps with material estimates |
| Photo documentation | Records measurements visually |
| Sharing options | Send data to team members |
3d Modeling Software
3D modeling software creates a virtual model of the roof. It shows angles, slopes, and dimensions in detail. Builders can view the roof from any angle before starting work.
Key advantages of 3D modeling software include:
- Visualizing complex roof shapes
- Detecting design errors early
- Improving communication with clients
- Generating precise material lists
Adapting Measurements For Different Roof Types
Measuring angles is key for roof construction. Different roof types need different angle measurements. Adjusting angles helps fit the roof structure properly.
Using the right tools and methods makes measuring easier. Understanding roof shapes improves accuracy and safety during construction.
Gable Roofs
Gable roofs have two sloping sides that meet at a ridge. Measure the angle between the roof slope and the horizontal line. This angle is important for cutting rafters.
Use a protractor or angle finder to get the correct pitch. Check both sides because angles can differ slightly.
- Mark the ridge and base lines clearly
- Measure the slope angle from the base
- Double-check measurements before cutting
Hip Roofs
Hip roofs have slopes on all sides, meeting at a ridge or a point. Measuring angles is more complex than gable roofs. You need to measure both the main slope and the hip rafters.
Use a framing square to measure angles between hips and common rafters. Calculate the hip rafter angle using the roof pitch and building width.
- Measure the pitch of the main roof planes
- Calculate the hip rafter angle with formulas or tables
- Check angles at the ridge and eaves
Mansard Roofs
Mansard roofs have two slopes on each side. The lower slope is steeper than the upper. Measure angles separately for the upper and lower parts.
Use an angle finder for each slope. Keep in mind that the transition between slopes needs precise angle measurement for proper fitting.
- Measure the lower steep slope angle
- Measure the upper gentle slope angle
- Check the connection angle between slopes
Credit: www.diychatroom.com
Frequently Asked Questions
How Do You Measure Roof Angles Accurately?
Use a protractor or angle finder tool for precise measurement. Mark the angle clearly on the rafter or truss before cutting. Double-check measurements to avoid errors and ensure the roof fits correctly.
What Tools Are Best For Measuring Roof Pitch?
A speed square, angle finder, or digital inclinometer are ideal tools. These devices offer quick and reliable readings for roof pitch angles. Proper tools help maintain safety and construction accuracy.
Why Is Measuring Roof Angles Important In Construction?
Correct angle measurement ensures structural integrity and proper water drainage. It also affects roofing material fit and overall aesthetics. Accurate angles prevent costly mistakes and roof damage over time.
Can I Measure Roof Angles Without Professional Tools?
Yes, you can use a level and tape measure to calculate angles. Measure the rise and run of the roof, then apply basic trigonometry. This method works but may be less precise than specialized tools.
Conclusion
Measuring angles accurately ensures a strong and safe roof structure. Use the right tools and double-check your work. Small mistakes can lead to big problems later. Take your time and measure carefully every step. Clear, precise angles help the roof fit perfectly.
Follow these tips to build with confidence. Good measurement saves time and money. Keep practicing and improve your skills over time. A well-measured roof lasts longer and protects better. Simple steps make a big difference in construction quality.