When it comes to making curved cuts, the right tool can make all the difference. If you’ve ever struggled to get smooth, precise curves, a jigsaw might be exactly what you need.
But using a jigsaw for curved cuts isn’t always as simple as it sounds. You might wonder how to keep control, avoid splintering, or get that perfect edge every time. You’ll discover easy tips and techniques to help you master curved cuts with your jigsaw—making your projects look professional and saving you time and frustration.
Ready to take your cutting skills to the next level? Let’s dive in.
Credit: www.bosch-professional.com
Choosing The Right Jigsaw
A jigsaw is a helpful tool for making curved cuts in wood, plastic, and metal. Picking the right jigsaw makes your cuts cleaner and easier.
Look at the power, speed, and comfort of the jigsaw. These features affect how well you can control the tool for curves.
Types Of Jigsaw Blades
Different blades cut different materials and shapes. Using the right blade helps you make smooth curved cuts.
- Fine-tooth blades: Best for thin wood and metal sheets.
- Coarse-tooth blades: Cut thick wood faster but rougher.
- Reverse-tooth blades: Help reduce splintering on top surfaces.
- Specialty blades: Designed for plastics or ceramic tiles.
Choose a blade with a narrow width. Narrow blades bend easily and cut tight curves better.
Features To Look For
Some jigsaws have helpful features that improve curved cutting. Look for these when buying your tool.
- Variable speed control: Lets you adjust speed for different materials.
- Orbital action settings: Help control the cut’s smoothness.
- Bevel cutting ability: Allows angled cuts for more shapes.
- Comfortable grip: Reduces hand fatigue during long use.
- Blade change system: Makes swapping blades quick and safe.
A lightweight jigsaw is easier to guide along curves. Check the tool’s weight before buying.
Preparing Your Workspace
Using a jigsaw for curved cuts needs a clean and safe workspace. Good preparation helps you work better and avoid mistakes.
Organize your tools and materials before starting. This saves time and keeps your focus on the cut.
Securing The Material
Keep the material steady to get smooth and accurate cuts. Loose wood or metal can cause wrong cuts or accidents.
- Use clamps to hold the material tightly to your workbench.
- Check that the clamps do not block the cutting path.
- Place scrap wood under thin material to avoid bending.
- Make sure the work surface is stable and level.
- Wear safety glasses and gloves for protection.
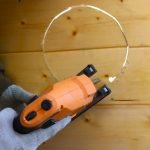
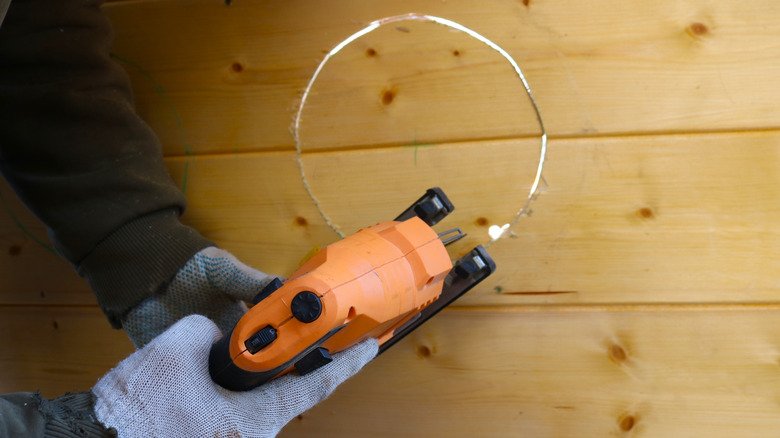
Marking Curves Accurately
Clear and precise markings guide your jigsaw along the curve. This helps you cut exactly where you want.
| Tool | Use |
| Pencil | Draw visible, thin lines on wood or metal |
| French Curve | Draw smooth, repeatable curves |
| Compass | Mark perfect circles or arcs |
| Masking Tape | Stick on the surface to mark curves that won’t smudge |
Techniques For Smooth Curved Cuts
Using a jigsaw for curved cuts needs care and control. A smooth curve looks clean and professional.
Learn how to handle the jigsaw well. Control and guide it to follow curves accurately.
Controlling The Speed
Keep a steady speed for smooth cuts. Too fast makes rough edges and mistakes.
Slow down on tight curves. This helps the blade turn easily without bending or breaking.
- Start at a medium speed for straight parts
- Reduce speed on sharp bends
- Keep pressure light to avoid forcing the blade
- Practice on scrap wood to find the best speed
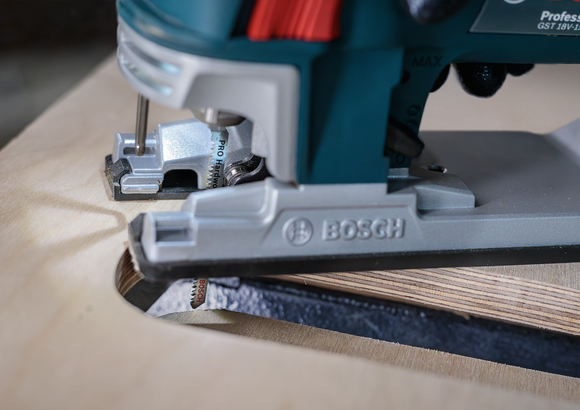
Guiding The Jigsaw Along Curves
Hold the jigsaw firmly but relaxed. Let the blade follow the curve without pushing hard.
Use your free hand to guide the wood if possible. Moving the wood smoothly helps the jigsaw stay on track.
- Mark the curve clearly before cutting
- Keep the base plate flat on the wood
- Turn the jigsaw gently, not abruptly
- Stop and check your progress often

Credit: www.youtube.com
Common Challenges And Solutions
Using a jigsaw to cut curves can be tricky for many people. The tool may not follow the line exactly, or the wood can get damaged.
This guide explains two common problems and how to fix them. These tips will help you get smoother and cleaner curved cuts.
Avoiding Blade Deflection
Blade deflection happens when the jigsaw blade bends or moves away from the cutting line. This causes the cut to be uneven or rough.
To avoid blade deflection, use the right blade and cut at a steady speed. Thin blades bend more easily, so pick one designed for curves.
- Choose a narrow blade for tight curves
- Keep the jigsaw steady with both hands
- Cut slowly to keep the blade straight
- Use a blade with fine teeth for control
Dealing With Tear-out
Tear-out happens when the wood splinters or chips on the cut edge. This makes the cut look rough and can damage the project.
To reduce tear-out, support the wood near the cut line and use a sharp blade. Cutting slowly and using painter’s tape on the wood helps too.
- Place scrap wood under the cutting area for support
- Use painter’s tape along the cut line
- Choose a sharp blade with fine teeth
- Cut slowly and avoid forcing the jigsaw
Finishing Touches
After cutting curves with a jigsaw, the edges need attention to look smooth and clean. Finishing touches improve the quality and life of your project.
Two key steps are sanding the edges and sealing the cuts. These steps protect your work and give it a polished appearance.
Sanding Edges
Sanding removes rough spots and sharp edges left by the jigsaw blade. It helps create a smooth, safe surface.
- Start with medium grit sandpaper (80-120 grit) to smooth rough areas.
- Use fine grit sandpaper (220 grit) for a softer finish.
- Sand along the curve to keep the shape intact.
- Use a sanding block or sponge for better control.
- Wipe dust away with a clean cloth after sanding.
Sealing And Protecting Cuts
Sealing the cut edges stops moisture from entering the wood. It also prevents splintering and wear over time.
| Sealing Method | Purpose | Tips |
| Wood Sealer | Blocks moisture and strengthens wood | Apply with a brush; let dry fully before sanding |
| Paint or Varnish | Adds color and extra protection | Use multiple thin coats for best results |
| Wax or Oil | Enhances natural wood look and feel | Reapply regularly for ongoing protection |

Credit: www.yahoo.com
Frequently Asked Questions
What Is The Best Jigsaw Blade For Curved Cuts?
A narrow, fine-toothed blade works best for curved cuts. It offers better control and smoother edges. Choose blades made of high-speed steel or bi-metal for durability.
How Do I Guide A Jigsaw For Precise Curves?
Use a steady hand and move the jigsaw slowly along the marked curve. Keep the base plate flat on the surface to maintain stability and accuracy.
Can I Use A Jigsaw For Tight Radius Curves?
Yes, a jigsaw can handle tight curves with the right blade and careful control. Practice on scrap wood to improve your skill before cutting final pieces.
How To Prevent Splintering When Making Curved Cuts?
Clamp the workpiece firmly and use painter’s tape over the cut line. Cutting slowly and using a fine-toothed blade also reduces splintering.
Conclusion
Mastering curved cuts with a jigsaw enhances woodworking projects. This tool is versatile. Perfect for creating intricate designs. Practice ensures smoother cuts and boosts confidence. Always prioritize safety while using a jigsaw. Choose the right blade for each material. This makes a significant difference.
Keep practicing to improve skills. Soon, you’ll achieve precise, curved cuts effortlessly. With patience, your craftsmanship will shine. Enjoy the creative process and embrace learning. A jigsaw can transform simple pieces into art. Start experimenting with curves today. Let your imagination guide your projects.
Happy cutting!