Are you ready to create beautiful wooden pieces but don’t know where to start? A wood lathe can turn simple blocks of wood into stunning bowls, spindles, and decorative art.
This beginner’s guide is made just for you. You’ll learn the essential steps, safety tips, and tools you need to get started quickly and confidently. Imagine holding your very first hand-turned creation—exciting, right? Keep reading to discover how you can master the basics and bring your woodwork ideas to life.
Credit: www.elephant-cnc.com
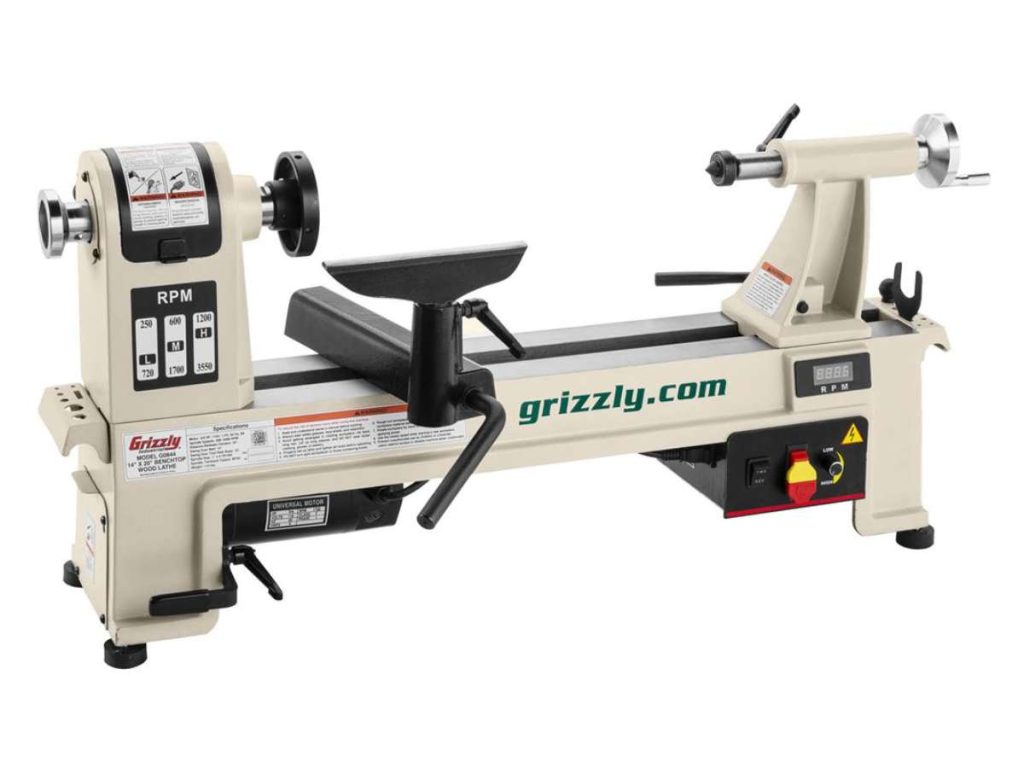
Choosing The Right Wood Lathe
Starting woodturning needs the right tools. A wood lathe is the main tool for shaping wood. Picking the best lathe helps you work safely and enjoy the craft.
There are many types of lathes. Each type fits different projects and skill levels. It is important to know what to look for before buying.
Types Of Wood Lathes
Wood lathes come in several types. Each type has a special use and size. Choose one that fits your project size and space.
- Mini Lathes:Small and good for light, detailed work.
- Midi Lathes:Medium size, fit for most hobby projects.
- Full-Size Lathes:Large and powerful, for big or heavy pieces.
- Bench Lathes:Mount on a workbench, save space.
- Floor Lathes:Stand on the floor, more stable for big projects.
Key Features To Look For
Good features make woodturning easier and safer. Look for parts that fit your needs and skills.
- Motor Power:Strong enough to handle your wood size and type.
- Swing Capacity:Maximum wood diameter you can turn.
- Distance Between Centers:Length of wood the lathe can hold.
- Speed Settings:Variable speeds for different projects.
- Stability:Solid base to reduce vibration.
- Tool Rest:Adjustable for comfortable tool use.
Budget Considerations
Wood lathes come in a wide price range. Your budget will affect the type and features you can get.
Start with a lathe that meets your basic needs. Avoid buying very cheap models with poor quality parts. Think about future projects and upgrades.
- Entry-level lathes: Good for beginners, less expensive.
- Mid-range lathes: More features, better build quality.
- High-end lathes: Best for serious hobbyists and professionals.

Credit: www.youtube.com
Essential Tools And Accessories
Wood lathe turning requires specific tools and safety gear. Choosing the right accessories makes your work easier. This guide covers basic tools, safety items, and extra attachments.
Using proper equipment helps you create smooth and precise wood projects. Always prepare your workspace with the correct tools and safety measures.
Basic Turning Tools
Every wood lathe user needs a few essential turning tools. These tools shape and smooth the wood while it spins on the lathe. Here are the main tools beginners should have:
- Gouges: Used for rough shaping and hollowing wood.
- Skew Chisel: Ideal for smooth cuts and finishing edges.
- Parting Tool: Cuts grooves and separates finished pieces.
- Scraper: Helps clean up surfaces and add detail.
- Calipers: Measure thickness and diameter accurately.
Safety Gear
Protecting yourself is very important during woodturning. Wear safety gear to avoid injuries from flying wood chips and sharp tools. Basic safety gear includes:
| Safety Item | Purpose |
| Face Shield | Protects eyes and face from flying debris. |
| Dust Mask | Prevents inhaling fine wood dust. |
| Hearing Protection | Reduces noise from the lathe motor. |
| Gloves | Protect hands but avoid loose fitting ones. |
| Apron | Keeps clothes clean and adds protection. |
Additional Attachments
Extra attachments make your lathe more useful for different projects. These accessories help with holding wood, measuring, and shaping. Common attachments include:
- Live Center: Holds the wood firmly while spinning.
- Faceplate: Attaches wood blanks for bowl turning.
- Tool Rest: Supports tools close to the workpiece.
- Chucks: Grips wood pieces tightly for detailed work.
- Steady Rest: Supports long or thin wood pieces.
Preparing Your Workspace
Before starting wood turning, prepare your workspace well. A good setup keeps you safe and helps work flow smoothly.
Organizing your area makes the project easier and more enjoyable. Take time to arrange your tools and space right.
Setting Up A Safe Area
Choose a place with enough room to move around the lathe. Keep the area clear of clutter to avoid accidents.
- Keep the floor clean and dry to prevent slips.
- Use safety guards on your lathe.
- Wear protective gear like goggles and dust masks.
- Make sure your power tools have emergency shut-offs.
- Keep a fire extinguisher nearby.
Lighting And Ventilation
Good lighting helps you see details and avoid mistakes. Use bright lights that do not cast shadows on your work.
Ventilation removes dust and fumes, keeping air fresh and safe. Open windows or use a fan to keep air moving.
| Lighting Tips | Ventilation Tips |
| Use daylight bulbs for natural color | Open a window or door |
| Position light above and in front of your work | Use a dust extractor if possible |
| Avoid glare on shiny surfaces | Wear a dust mask when needed |
Organizing Tools And Materials
Keep tools within reach but in safe spots. Sort your wood and supplies before starting your project.
- Arrange tools by size and use frequency.
- Use magnetic strips or pegboards for easy access.
- Label containers for small items like screws and sandpaper.
- Store sharp tools with covers.
Credit: www.familyhandyman.com
Selecting And Preparing Wood
Wood selection is key for a good turning project. It affects how easy the work will be and the final look.
Preparing wood properly helps avoid problems like cracks and warping. It makes turning safer and smoother.
Best Wood Types For Beginners
Softwoods and some hardwoods are good for beginners. They are easier to cut and shape on a lathe.
- Pine: Soft, affordable, and easy to shape.
- Maple: Hard but smooth, good for practice.
- Cherry: Fine grain and easy to work with.
- Poplar: Light, soft, and easy to turn.
- Walnut: Slightly harder but great for finished projects.
Wood Drying And Conditioning
Wood must be dry before turning. Wet wood can crack or warp as it dries on the lathe.
Air drying is slow but safe. Kiln drying is faster but costs more. Condition wood by storing it in a stable place.
- Store wood in a dry, shaded area.
- Stack wood with spacers for air flow.
- Use a moisture meter to check dryness.
- Ideal moisture content is 6-8% for turning.
Cutting And Mounting Blanks
Cut wood into blanks that fit your lathe and project size. Square blanks are easier to mount.
Mount blanks securely to avoid accidents. Use the right chuck or faceplate for your blank size.
- Cut blanks with a saw, keeping edges clean.
- Mark centers on both ends for balance.
- Use a drive center or faceplate to hold blanks.
- Tighten mounting hardware before starting the lathe.
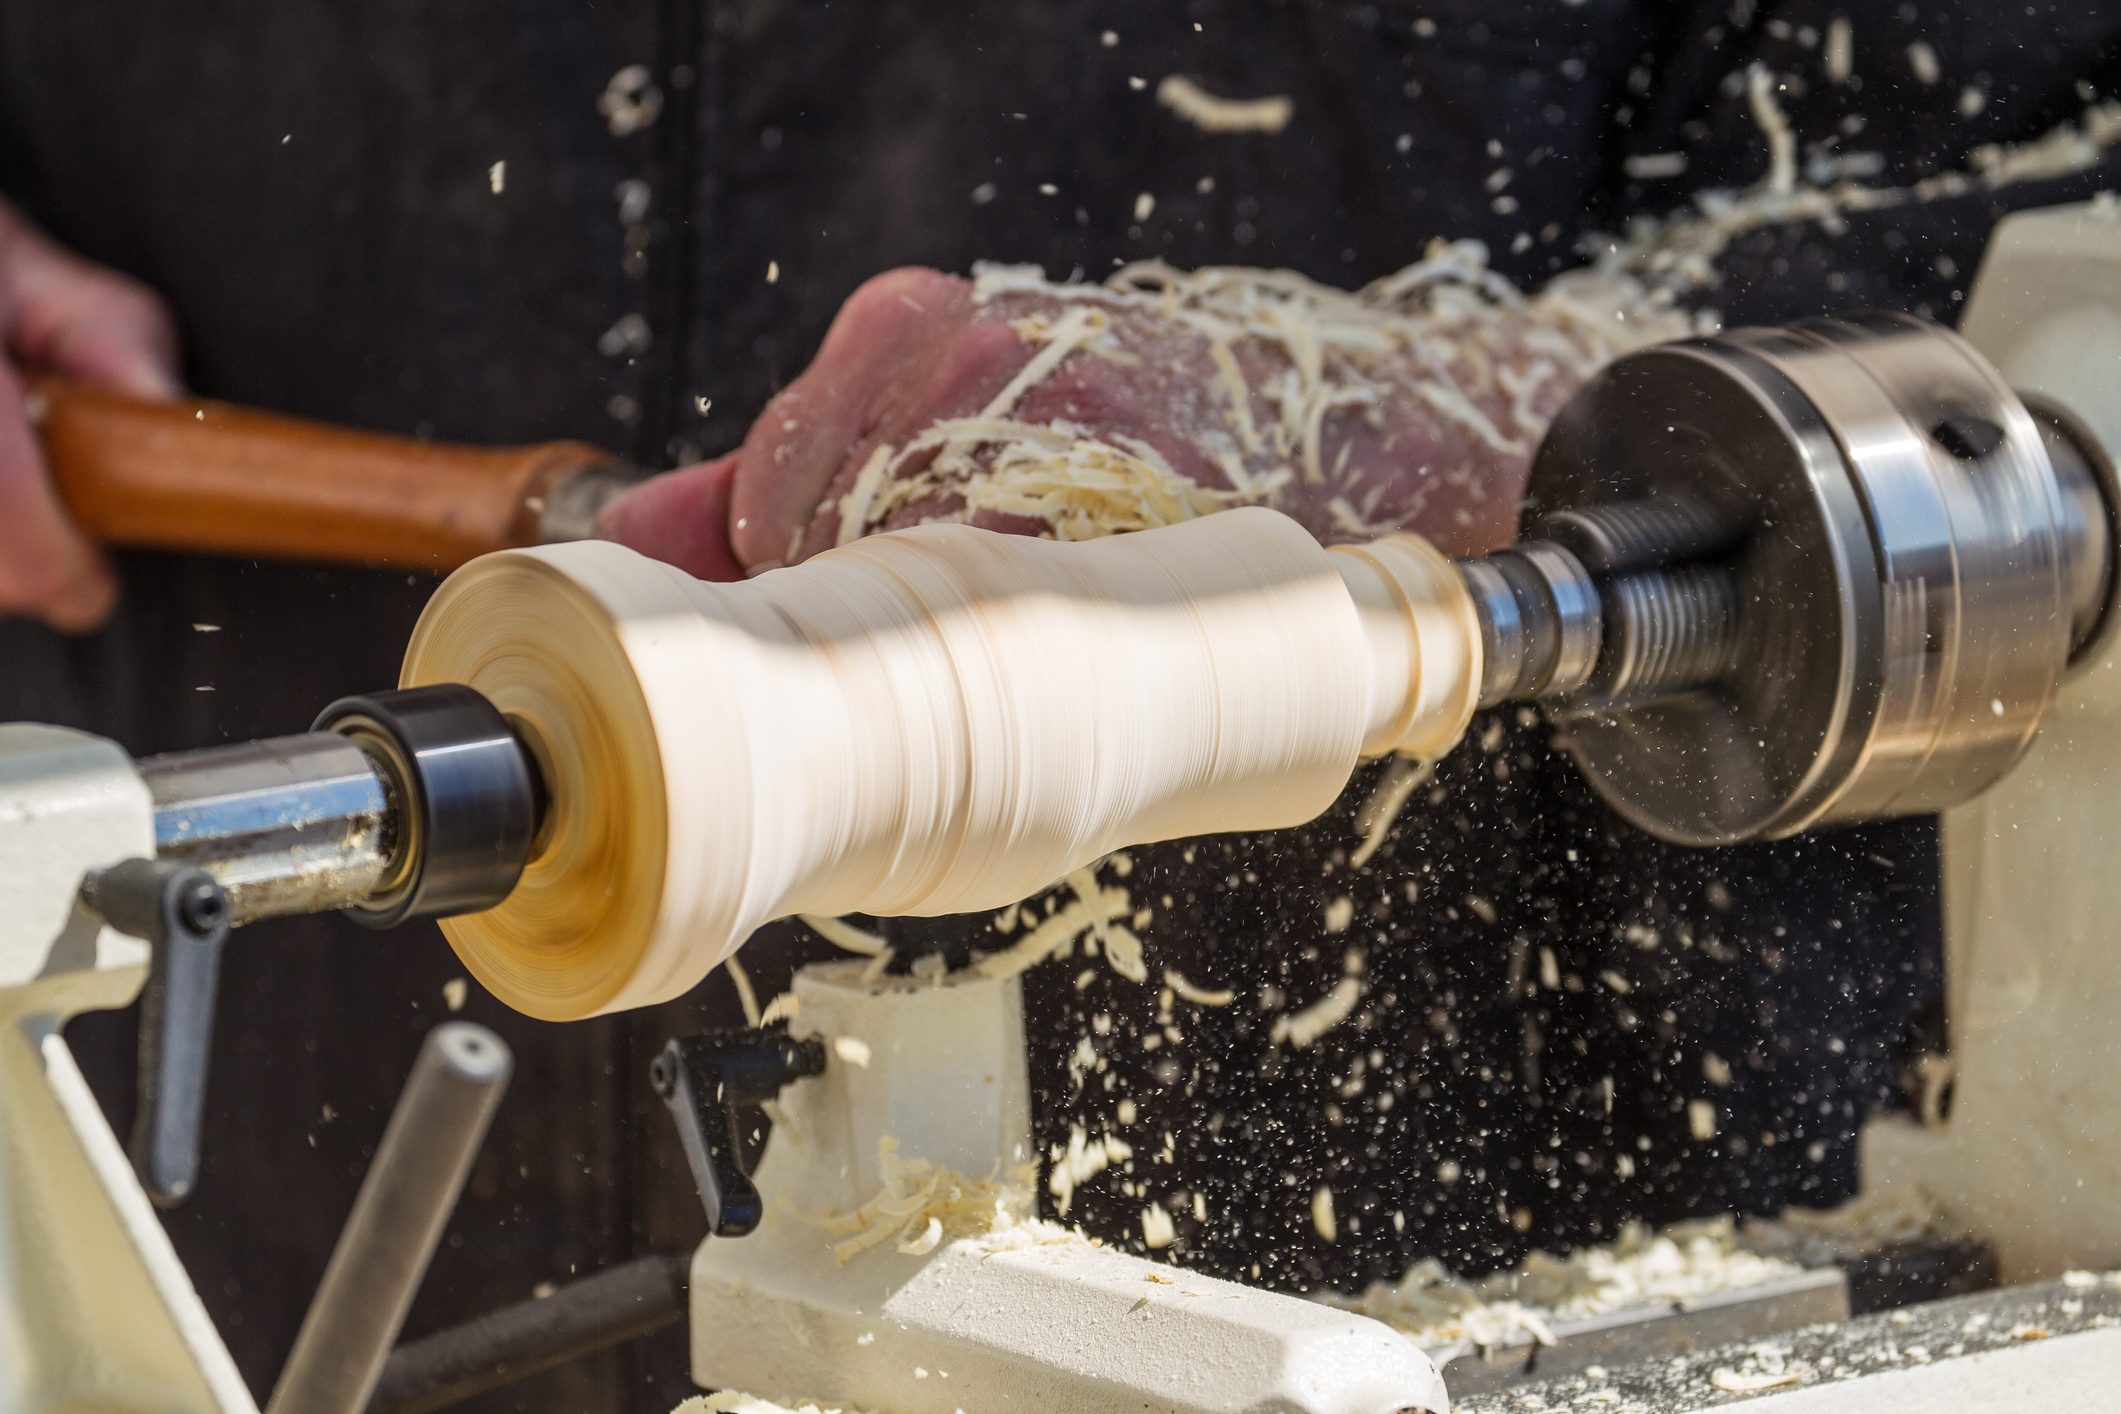
Basic Turning Techniques
Wood turning is a craft where you shape wood using a lathe. Learning the basic techniques helps you work safely and create smooth shapes.
This guide covers tool handling, spindle turning, and faceplate turning. Each section explains simple skills to get you started.
Tool Handling And Grip
Holding your tools correctly gives you control and safety. Use a firm but relaxed grip to reduce fatigue and improve precision.
- Hold the tool handle near the back end with your dominant hand.
- Use your other hand to guide the tool near the cutting edge.
- Keep your elbows close to your body for stability.
- Rest the tool on the tool rest to steady your movements.
- Always watch the cutting edge and the wood as you work.
Spindle Turning Basics
Spindle turning shapes wood that spins between two points. It is good for making long, thin objects like pens or table legs.
| Tool | Use | Tip |
| Spindle Gouge | Shaping curves | Keep a steady hand |
| Skew Chisel | Planing and smoothing | Cut with the bevel |
| Parting Tool | Cutting grooves | Use light pressure |
Faceplate Turning Fundamentals
Faceplate turning is for shaping wood attached to a faceplate. It works well for bowls and wider objects.
Keep these points in mind:
- Secure the wood firmly to the faceplate.
- Start with rough cuts to shape the outer form.
- Use a bowl gouge for inside hollowing.
- Slow the lathe speed for large or unbalanced pieces.
- Wear safety gear to protect from chips and dust.
Safety Practices On The Lathe
Working with a wood lathe can be fun and creative. Safety must come first every time you use the lathe. This guide helps beginners learn how to stay safe.
Knowing the right safety steps lowers the risk of injury. Always prepare before starting your project on the lathe.
Proper Clothing And Eye Protection
Wear tight-fitting clothes to avoid getting caught in the lathe. Loose sleeves, jewelry, and ties are dangerous near spinning parts.
Always wear safety glasses or a face shield. Wood chips and dust can hurt your eyes quickly. Eye protection keeps you safe.
- Use snug clothes without loose ends
- Remove rings, watches, and bracelets
- Wear sturdy closed-toe shoes
- Use safety goggles or a clear face shield
Avoiding Common Hazards
Keep your work area clean to avoid slips or trips. Check your tools and lathe before use. Broken parts or dull tools can cause accidents.
Never leave the lathe running unattended. Always stand to the side when turning the lathe on. This protects you if wood pieces fly off.
- Clear dust and scraps often
- Inspect tools for damage before starting
- Stand beside the lathe when turning it on
- Keep your hands away from moving parts
- Do not wear gloves while operating
Emergency Procedures
Know where the emergency stop button is on your lathe. Use it to stop the machine quickly if needed. Stay calm and act fast in emergencies.
Keep a first aid kit near your workspace. Learn basic first aid for cuts and splinters. Call for help if an injury is serious.
- Locate and test the emergency stop switch
- Keep a first aid kit accessible
- Learn simple first aid skills
- Call emergency services for serious injuries
Finishing And Enhancing Projects
Finishing your wood lathe projects gives them a smooth look and feel. It also protects the wood from damage and wear. Enhancing adds a personal touch to your work.
Learn basic sanding techniques, how to apply finishes, and ways to add decorative touches to improve your creations.
Sanding Techniques
Sanding makes your project smooth and ready for finishing. Use different sandpaper grits from coarse to fine. Always sand with the grain to avoid scratches.
- Start with 80 or 100 grit sandpaper to remove rough spots.
- Move to 150 or 180 grit for smoothing surfaces.
- Finish with 220 grit or higher for a fine finish.
- Use a sanding block or sponge to keep even pressure.
- Remove dust with a clean cloth before applying finishes.
Applying Finishes
Finishes protect wood and bring out its natural beauty. Choose oil, wax, or lacquer based on your project needs. Apply thin coats and let each dry fully.
| Finish Type | Advantages | Best Use |
| Oil | Penetrates deeply, enhances grain | Bowls, decorative items |
| Wax | Gives soft shine, easy to apply | Small projects, touch-ups |
| Lacquer | Dries fast, hard protective layer | Furniture, items needing durability |
Adding Decorative Touches
Decorative touches make your project unique. You can use wood burning, carving, or adding color with dyes and paints.
Popular decorative methods include:
- Wood burning designs with a pyrography tool
- Carving simple patterns using small chisels
- Applying colored wood dyes to highlight grain
- Using acrylic paints for vibrant accents
- Adding metal or resin inlays for contrast
Troubleshooting Common Issues
Woodturning on a lathe can have small problems that slow down work. Fixing these issues helps you get smooth results faster.
This guide covers how to fix tool marks, vibration, and mounting problems. Each section explains easy ways to solve these common troubles.
Fixing Tool Marks
Tool marks happen when the cutting tool leaves rough lines on the wood. This can make the surface uneven and hard to finish.
To reduce tool marks, keep your tools sharp and use steady, smooth cuts. Avoid pushing too hard or moving too fast.
- Sharpen tools regularly for clean cuts
- Use slow, even pressure when cutting
- Sand the wood lightly after turning
Dealing With Vibration
Vibration makes it hard to control the lathe and causes uneven cuts. It can also damage your tools or wood piece.
Check the lathe’s speed and make sure the wood is balanced. Tighten all parts and use a sharp tool to reduce shaking.
- Balance the wood before turning
- Tighten the lathe’s parts and tool rest
- Lower speed if vibration is strong
- Use sharp tools to cut smoothly
Correcting Mounting Problems
Mounting problems happen if the wood is not fixed properly on the lathe. This can cause wobbling and uneven shapes.
Make sure the wood is centered and tight. Use the right type of mounting, like a faceplate or chuck, for your project.
- Center the wood before tightening
- Use a chuck for small or irregular pieces
- Check that the wood is firmly fixed
- Replace worn mounting parts as needed
Project Ideas For Beginners
Starting woodturning can be fun and easy with simple projects. These projects help you learn basic skills on the lathe.
Try these beginner-friendly ideas to build your confidence and make useful items.
Simple Bowls And Plates
Bowls and plates are good beginner projects. They teach you how to shape and hollow wood.
Start with small, shallow bowls or flat plates. Use soft wood for easier turning.
- Choose a wood blank about 6 inches wide
- Turn the outside round and smooth
- Hollow the inside carefully
- Sand to a smooth finish
- Apply a food-safe finish
Spindles And Pens
Spindles and pens are small projects that improve your control on the lathe. They need precise shaping.
Making a pen helps you practice detailed work and sanding in tight spaces.
- Use a pen kit for easy assembly
- Turn a straight spindle shape
- Sand with fine grit paper
- Finish with polish or oil
- Assemble the pen parts carefully
Decorative Items
Decorative items include small sculptures, candle holders, and ornaments. These projects let you try new shapes.
You can mix wood types and add simple designs. This helps build creativity and skill.
- Start with easy shapes like spheres or cones
- Use a skew chisel for smooth curves
- Try adding grooves or beads
- Sand well for a clean look
- Use natural or colored finishes
Frequently Asked Questions
What Tools Do I Need To Start Wood Lathe Turning?
To start wood lathe turning, you need a lathe machine, chisels, gouges, and safety gear. A face shield and dust mask are essential. Quality tools improve precision and safety during woodturning projects.
How Do I Choose The Right Wood For Lathe Projects?
Choose softwoods like pine or basswood for beginners. These woods are easier to shape and less likely to damage tools. Avoid hardwoods until you gain more experience with wood lathe techniques.
What Safety Tips Should Beginners Follow On A Wood Lathe?
Always wear eye and ear protection. Secure your workpiece properly before starting. Keep tools sharp and handle them carefully. Avoid loose clothing and maintain a clean workspace to prevent accidents.
How Can I Improve My Wood Lathe Turning Skills Fast?
Practice regularly on simple projects like pens or bowls. Watch tutorial videos and join woodturning forums. Experiment with different tools and wood types to build confidence and technique.
Conclusion
Starting with wood lathes can be fun and rewarding. This guide provided essential tips for beginners. Practice regularly and improve your skills. Always prioritize safety when using your lathe. Remember, patience is key to success. Explore various projects to gain experience.
Each piece you create tells your story. Enjoy the process and embrace learning. Soon, you’ll craft beautiful wooden pieces. Keep your tools sharp and mind open. Happy turning, and enjoy the journey!