Are you tired of dealing with a malfunctioning power planer? Whether you’re a DIY enthusiast or a seasoned woodworker, a faulty planer can bring your projects to a grinding halt.
Imagine the frustration of uneven surfaces and rough edges when all you want is a smooth finish. But fear not! This guide to repairing power planers is here to help you get back on track. We’ll walk you through the most common issues and show you how to fix them, saving you time and money.
Ready to restore your power planer to its peak performance? Let’s dive in and get those woodworking projects back on the right path!
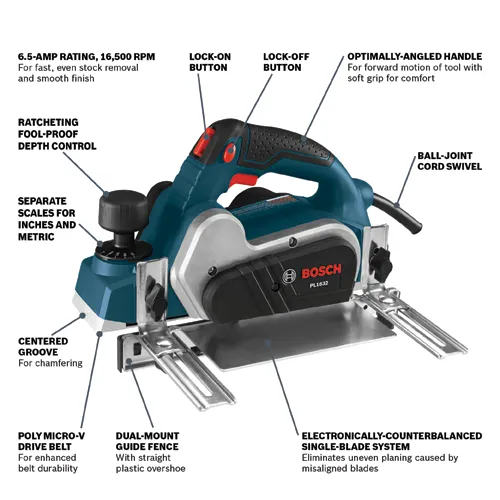
Credit: www.boschtools.com
Common Power Planer Issues
Power planers are handy tools for smoothing wood surfaces. They can develop problems that affect their work.
Knowing common issues helps you fix your planer and keep it running well.
Motor Problems
The motor is the heart of a power planer. If it stops working, the tool won’t run properly.
Motors may overheat, make strange noises, or fail to start. These issues often come from worn brushes or blocked vents.
- Check brushes for wear and replace if needed
- Clean air vents to avoid overheating
- Listen for unusual sounds during operation
Blade Dullness And Damage
Dull or damaged blades reduce cutting quality. They can cause rough surfaces and require more effort.
Blades can get nicked, bent, or worn down from use. Regularly checking and replacing blades keeps the planer effective.
- Inspect blades before each use
- Sharpen blades if they look dull
- Replace blades if they have chips or bends
Electrical Faults
Electrical problems can stop the planer from turning on or cause it to stop suddenly.
Common issues include damaged cords, loose connections, and faulty switches. Check these parts carefully for safety.
- Look for cuts or frays in power cords
- Ensure plugs and connections are secure
- Test the switch for proper function
Alignment And Calibration Issues
Proper alignment ensures smooth and even cuts. Misaligned parts cause uneven surfaces and poor results.
Calibration controls depth and angle of cuts. Regular checks help maintain precision in your work.
- Check the planer base is flat and not warped
- Adjust blade depth to match your cutting needs
- Test cuts on scrap wood to verify settings
Essential Tools For Repairs
Repairing a power planer needs the right tools. These tools help you fix issues quickly and safely.
This guide covers the main tools you need to keep your power planer working well.
Basic Hand Tools
Basic hand tools are the first set of items you need. They help with opening and adjusting parts of the planer.
- Screwdrivers for removing screws
- Pliers to hold or bend wires
- Wrenches for tightening nuts and bolts
- Hammer for light tapping and adjustments
- Utility knife for cutting debris or tape
Specialized Measuring Instruments
These instruments help you measure parts with accuracy. They ensure your repairs are precise.
| Instrument | Use |
|---|---|
| Caliper | Measures thickness and diameter |
| Feeler Gauge | Checks small gaps and clearances |
| Multimeter | Tests electrical circuits and voltage |
| Ruler or Tape Measure | Measures length and depth |
Safety Gear
Safety gear protects you during repairs. Always wear the right equipment to avoid injuries.
- Safety glasses to protect your eyes
- Work gloves to shield your hands
- Dust mask to avoid breathing sawdust
- Ear protection to reduce noise harm
Step-by-step Repair Process
Repairing a power planer can save money and extend its life. This guide shows each step clearly.
Follow these steps carefully to fix common problems with power planers.
Diagnosing The Problem
Start by checking what is wrong with the planer. Look for noises, vibrations, or no power.
Inspect the blades and motor for visible damage or wear. This helps find the exact issue.
- Check power supply and cord for damage
- Listen for unusual sounds during use
- Look for worn or dull blades
- Feel for motor overheating
Disassembling The Planer
Unplug the planer before taking it apart. Use the right tools to avoid damage.
Remove the blade guard and screws carefully. Keep parts organized for reassembly.
- Unplug the planer
- Remove screws with a screwdriver
- Take off the blade guard
- Keep parts in a safe place
Replacing Or Sharpening Blades
Check if the blades are dull or damaged. Replace if necessary or sharpen them carefully.
Use a blade sharpening tool or replace blades with the exact size for your planer.
- Wear gloves to protect your hands
- Remove blades following manufacturer instructions
- Sharpen blades using a file or sharpening tool
- Install new or sharpened blades securely
Fixing Motor And Electrical Components
Check the motor for dirt, dust, or worn parts. Clean or replace parts as needed.
Test the electrical components like switches and wires for damage or loose connections.
- Clean motor vents and brushes
- Check wiring for cuts or burns
- Replace faulty switches or cords
- Use a multimeter to test electrical flow
Reassembling And Testing
Put all parts back in the right order. Tighten screws but do not over-tighten them.
Plug in the planer and test it on scrap wood. Check for smooth operation and safety.
- Reinstall blade guard and screws
- Ensure all parts fit well without gaps
- Test planer at low speed first
- Listen and watch for unusual behavior

Credit: www.youtube.com
Maintenance Tips To Prevent Future Issues
Power planers need care to work well for a long time. Regular maintenance stops many problems. Simple steps keep your tool safe and sharp.
Following good habits helps avoid costly repairs. This guide shows easy ways to maintain your power planer.
Regular Cleaning And Lubrication
Dust and wood chips can build up inside your planer. Cleaning it often stops jams and wear. Lubricate moving parts to keep them smooth.
Use a brush or compressed air to remove debris. Apply oil to the blade and bearings to reduce friction.
- Clean dust from vents and blades after each use
- Lubricate metal parts every few uses
- Use recommended oils for your planer model
Proper Storage Practices
Store your power planer in a dry place to avoid rust. Keep it away from moisture and dust. Use a case or cover if possible.
Proper storage also protects the blades and motor. Avoid places with extreme heat or cold.
- Keep the planer in a clean, dry area
- Use a protective cover or case
- Store away from direct sunlight and moisture
Routine Inspections
Check your power planer regularly for signs of damage. Look at the blades, power cord, and switches. Early detection helps prevent failures.
Replace worn blades and fix loose parts right away. This keeps your tool safe and working well.
- Inspect blades for dullness or chips
- Check the power cord for cuts or frays
- Test switches and safety features often
When To Seek Professional Help
Power planers are useful tools for woodworking. Sometimes, repairs are simple. Other times, you need expert help.
Knowing when to call a professional can save time and avoid damage. This guide explains key situations to watch for.
Complex Electrical Repairs
Electrical parts in power planers are tricky. If the motor or wiring has problems, do not try to fix it yourself. Improper repair can cause shocks or fire.
- Burned smells or smoke from the tool
- Motor does not start or stops suddenly
- Visible damage to wires or plugs
- Repeated tripping of circuit breakers
Severe Mechanical Damage
Power planers have sharp blades and moving parts. If the body is cracked or the blade system is bent, professional repair is best. Fixing mechanical damage requires special tools and knowledge.
| Damage Type | Signs | Why Call a Pro |
| Cracked Housing | Loose parts, gaps | Safety risk, tool instability |
| Bent Blades | Uneven cuts, vibrations | Needs precise alignment |
| Worn Bearings | Noise, overheating | Requires special tools |
Warranty And Safety Considerations
Check your power planer’s warranty before any repair. Opening the tool can void your warranty. Also, some repairs need safety checks.
- Always review warranty terms first
- Use authorized service centers if available
- Professional repairs ensure safety standards
- Improper fixes can cause injury

Credit: www.youtube.com
Frequently Asked Questions
How Do I Fix A Power Planer That Won’t Start?
Check the power source and switch first. Inspect the power cord for damage. Clean or replace the carbon brushes if worn. Ensure the motor is free from debris. If problems persist, consult a professional technician.
What Causes Uneven Cuts In A Power Planer?
Uneven cuts often result from dull blades or incorrect blade depth. Check blade sharpness and adjust the depth setting. Also, ensure the planer’s base is clean and flat. Proper maintenance prevents uneven cutting.
How Often Should I Replace Power Planer Blades?
Replace blades when they become dull, chipped, or damaged. Typically, blades last several months with regular use. Frequent users may need to replace them more often. Sharp blades ensure smooth and efficient planing.
Can I Repair A Jammed Power Planer Myself?
Yes, you can clear minor jams safely. Turn off and unplug the planer first. Remove debris or wood chips blocking the blades. Avoid forcing parts to prevent damage. For complex jams, seek professional repair help.
Conclusion
Repairing power planers can save you time and money. Simple steps help keep your tool running smoothly. Regular checks prevent bigger problems later. Always follow safety tips to avoid accidents. With care and patience, repairs become easier. Your planer will work well for many projects.
Keep your workspace clean and organized. Small fixes today mean better results tomorrow. Stay confident and take it one step at a time.