
Are you ready to unlock the full potential of your DIY projects? Imagine transforming rough and dull surfaces into smooth, shiny masterpieces with ease.
A rotary tool can be your secret weapon for achieving professional-quality polishing results right at home. Whether you’re a seasoned craftsman or a curious beginner, this guide will show you how to use a rotary tool for polishing. Get ready to discover tips and tricks that will make your projects stand out and impress everyone who sees them.
By the end of this article, you’ll be equipped with the knowledge to tackle any polishing task with confidence and precision. Let’s dive in and unleash your creativity like never before!

Credit: sonaxusa.com
Choosing The Right Rotary Tool
Using a rotary tool for polishing makes your work faster and smoother. Picking the right tool helps you get better results.
Not all rotary tools work the same. You need to find one that fits your polishing needs.
Types Of Rotary Tools
Rotary tools come in different types. Each type suits different polishing tasks and materials.
- Electric Rotary Tools: Powered by electricity, good for most polishing jobs.
- Cordless Rotary Tools: Battery-powered, offer better mobility but less runtime.
- Pneumatic Rotary Tools: Use air pressure, ideal for heavy-duty polishing.
- Variable Speed Rotary Tools: Allow speed adjustment for precise polishing.
Key Features To Consider
Look for features that make polishing easier and safer. These features help you control the tool well.
- Speed Control: Lets you adjust the speed for different materials.
- Ergonomic Design: Makes the tool comfortable to hold for long times.
- Power Output: Higher power means better performance on tough surfaces.
- Accessory Compatibility: Check if it works with many polishing attachments.
- Durability: Choose tools made from strong materials for long use.
Recommended Brands
Some brands are known for making reliable rotary tools. Choosing a trusted brand helps avoid problems.
- Dremel: Popular for quality and many accessory options.
- Makita: Known for powerful and durable tools.
- DeWalt: Offers cordless tools with strong batteries.
- Bosch: Provides tools with good speed control features.
Essential Polishing Attachments
Using a rotary tool for polishing needs the right attachments. These tools help you get a smooth, shiny finish.
Choosing the correct polishing attachments makes your work easier and more effective.
Polishing Wheels And Pads
Polishing wheels and pads come in many shapes and sizes. They attach to your rotary tool and spin to polish surfaces.
Soft cloth wheels are good for light polishing. Foam pads work well with polishing compounds for a smooth shine.
- Cloth wheels: best for gentle polishing
- Foam pads: used with compounds for shine
- Felt wheels: suitable for fine polishing
- Brush attachments: clean and polish small areas
Buffing Compounds
Buffing compounds help remove scratches and bring out shine. They come in different types for various materials.
Use a mild compound for soft metals and a stronger one for hard surfaces. Apply a small amount on the polishing pad.
- White compound: for light polishing
- Red compound: for fine finishes
- Black compound: for heavy cutting
- Green compound: good for stainless steel
Accessory Compatibility
Check the size and type of your rotary tool before buying attachments. Not all accessories fit every tool.
Look for matching shank sizes and attachment types. This ensures safe and efficient polishing work.
- Shank size: common sizes are 1/8 inch and 1/4 inch
- Attachment type: some tools use quick-change systems
- Speed rating: match accessory speed limits to your tool
- Material compatibility: choose attachments for your work material
Preparing The Surface
Using a rotary tool for polishing needs a clean and ready surface. Preparing the surface well helps the polish last longer and look better.
Before you start polishing, follow these steps to get the surface perfect. This guide covers cleaning, inspecting, and safety tips.
Cleaning Techniques
Cleaning removes dirt, dust, and grease from the surface. This step is key for a smooth polish.
- Use a soft cloth to wipe loose dust away.
- Apply mild soap and water for sticky spots.
- Rinse with clean water to remove soap.
- Dry the surface fully with a clean towel.
- Avoid harsh chemicals that can damage the surface.
Surface Inspection
Check the surface for scratches, dents, or cracks. These flaws can affect polishing results.
| Issue | Check For | Action |
| Scratches | Visible lines or marks | Lightly sand before polishing |
| Dents | Indented or uneven areas | Fill or smooth if needed |
| Cracks | Fine or deep splits | Avoid polishing or repair first |
Safety Precautions
Safety is important when using a rotary tool. Follow these rules to avoid injury or damage.
- Wear safety goggles to protect your eyes.
- Use gloves to keep your hands safe.
- Work in a well-ventilated area to avoid dust buildup.
- Keep hair and loose clothes away from the tool.
- Check the rotary tool and attachments for damage before use.
Step-by-step Polishing Process
Using a rotary tool for polishing can make surfaces shine quickly. This guide helps you polish safely and well.
Follow each part carefully to get smooth, clean results on metal, plastic, or wood.
Setting Up The Rotary Tool
Start by preparing your rotary tool for polishing. Check the tool’s speed settings and attachments.
- Attach the polishing wheel or buffing pad securely.
- Set the rotary tool to a medium speed, usually between 3,000 and 10,000 RPM.
- Wear safety gear such as goggles and gloves.
- Make sure your workspace is clean and well-lit.
Applying Polishing Compounds
Use the right polishing compound for your material. Apply a small amount to the polishing pad.
- Start with a coarse compound for rough surfaces.
- Use a finer compound for smooth finishing.
- Do not overload the pad with compound to avoid splatter.
- Apply compound evenly on the surface after starting the tool.
Polishing Techniques
Use smooth, even movements to polish the surface. Keep the tool steady and avoid pressing too hard.
| Technique | Details |
|---|---|
| Light Pressure | Prevents damage and heat buildup |
| Slow Movement | Ensures even polishing |
| Circular Motion | Helps cover the entire surface |
| Keep Tool Flat | Maintains consistent contact with the surface |
Finishing Touches
After polishing, clean the surface and inspect your work. Use a soft cloth to remove any residue.
- Check for missed spots or scratches.
- Apply a wax or sealant if needed to protect the surface.
- Store your rotary tool and accessories properly.
Common Mistakes To Avoid
Using a rotary tool for polishing can give your projects a smooth finish. Many people make simple mistakes that harm their work.
Avoiding these errors will help you get better results and protect your materials and tools.
Overheating The Surface
Polishing too long in one spot causes heat to build up. This can damage the surface you are working on.
Heat can change the color or texture of your material. It may even cause warping or burns.
- Keep the tool moving steadily across the surface
- Take breaks to let the material cool down
- Use lower speeds to reduce heat
Using Incorrect Attachments
Choosing the wrong polishing attachment can ruin your work or wear out the tool fast. Each attachment fits specific tasks.
Using a rough pad on delicate surfaces can cause scratches. Using a soft buff on tough spots may not clean well.
- Match attachments to the material type
- Use polishing pads for smooth finishes
- Select sanding or grinding bits for rough work
Applying Excessive Pressure
Pressing too hard with the rotary tool can harm both the tool and the surface. It reduces control and causes uneven polishing.
Light, steady pressure allows the tool to work properly. It also helps you avoid damaging the material.
- Let the tool do the work without force
- Hold the tool firmly but gently
- Adjust pressure based on material hardness
Maintaining Your Rotary Tool
Keeping your rotary tool in good shape helps it work better and last longer. Regular care prevents damage and makes polishing easier.
Simple maintenance steps can keep your tool running smoothly. Follow these tips to take care of your rotary tool.
Cleaning And Storage
Clean your rotary tool after each use to remove dust and debris. Use a soft brush or cloth to wipe it down gently.
Store the tool in a dry, cool place. Avoid damp areas to stop rust and damage to the parts.
- Remove attachments before cleaning
- Use compressed air to blow out dust
- Keep the tool in its case or a sealed box
- Store away from direct sunlight and moisture
Replacing Worn Attachments
Attachments like polishing pads wear out with use. Replace them to keep polishing smooth and effective.
Check attachments before every use. Look for cracks, tears, or worn areas that may affect performance.
- Remove old attachments carefully
- Match new attachments to your tool model
- Secure attachments tightly before use
- Use the right attachment for each job
Troubleshooting Tips
If your rotary tool does not work well, check for common problems. Fix small issues to avoid costly repairs.
Keep an eye on unusual sounds, smells, or loss of power. These signs show your tool needs attention.
- Make sure the power cord is not damaged
- Check that attachments are installed correctly
- Clean vents to prevent overheating
- Test the tool on a low speed first
- Replace worn brushes if needed
Advanced Polishing Tips
Using a rotary tool for polishing can give your projects a smooth and shiny finish. You need to use the right techniques to get the best results.
This guide covers tips for working with different materials, achieving a mirror finish, and using speed settings well.
Working With Different Materials
Different materials need different polishing approaches. Soft materials need a gentle touch, while hard materials can handle more pressure.
Choose the right polishing pad and compound for each material to avoid damage and get a smooth finish.
- Use soft pads for plastics and soft metals
- Use firm pads for hard metals and stones
- Test on a small area before full polishing
Achieving A Mirror Finish
A mirror finish means the surface shines like glass. To get this, polish in small circles with light pressure.
Use finer polishing compounds step by step. Wipe the surface clean before moving to the next finer compound.
- Start with coarse compound for scratches
- Switch to medium compound for smoothness
- Finish with fine compound for shine
Using Speed Settings Effectively
Speed settings change how the rotary tool works. Lower speeds give more control and less heat.
Higher speeds are good for rough polishing but can damage soft materials. Adjust speed based on material and polish stage.
- Use low speed for delicate materials and final polishing
- Use medium speed for general polishing
- Use high speed only for heavy material removal
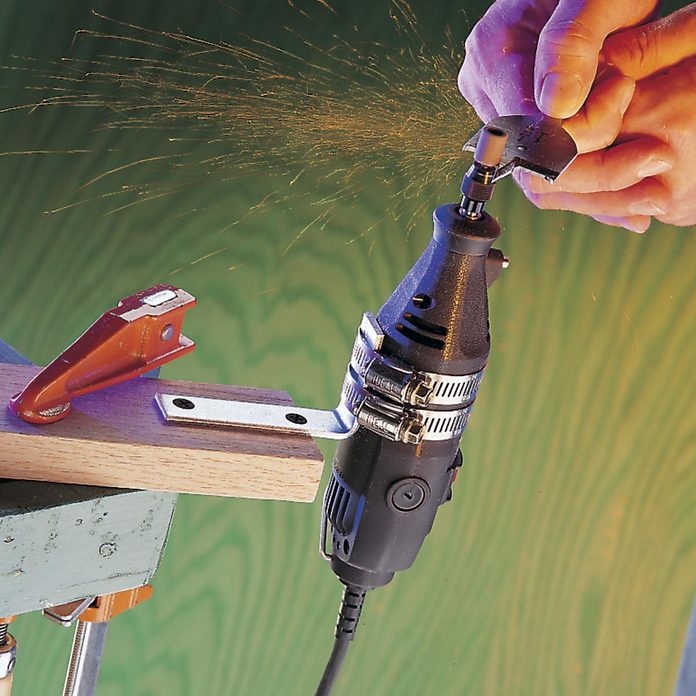
Credit: www.familyhandyman.com
Credit: hardell.com
Frequently Asked Questions
What Materials Can I Polish With A Rotary Tool?
A rotary tool can polish metals, plastics, glass, and wood. Use the correct polishing bit for each material to avoid damage.
How Do I Prepare A Surface Before Polishing?
Clean the surface thoroughly, removing dirt and debris. Sand rough areas to create a smooth base for polishing.
What Speed Setting Is Best For Polishing?
Use low to medium speed settings for polishing. High speeds can cause heat buildup and damage the surface.
Which Polishing Attachments Work Best With Rotary Tools?
Felt wheels, buffing pads, and polishing compounds are ideal. Choose attachments based on the material and desired finish.
Conclusion
Using a rotary tool for polishing makes projects easier and faster. Choose the right attachments and speed for best results. Always wear safety gear to protect yourself. Practice on small areas before polishing large surfaces. Clean your tool after each use to keep it working well.
Polishing with a rotary tool brings a smooth, shiny finish. Keep these tips in mind to polish confidently every time. Enjoy the satisfaction of a polished, professional look.
